VMSA-2025-0016: VMware vCenter and NSX

By Lerpong Intaraworrpath | October 4th, 2025

VMSA-2025-0016: VMware vCenter and NSX updates address multiple vulnerabilities (CVE-2025-41250, CVE-2025-41251, CVE-2025-41252)

https://support.broadcom.com/web/ecx/support-content-notification/-/external/content/SecurityAdvisories/0/36150

Advisory ID: VMSA-2025-0016
Advisory Severity:Important
CVSSv3 Range:7.5 -8.5
Synopsis:VMware vCenter and NSX updates address multiple vulnerabilities (CVE-2025-41250, CVE-2025-41251, CVE-2025-41252)
Issue date:2025-09-29
Updated on:2025-09-29 (Initial Advisory)
CVE(s)CVE-2025-41250, CVE-2025-41251, CVE-2025-41252

Impacted Products:

  • VMware NSX – 4.2.x, 4.1.x, 4.0.x
  • NSX-T – 3.x
  • VMware Cloud Foundation – 9.x.x.x, 5.x, 4.5.x
  • VMware vCenter Server -8.0, 7.0
  • VMware Telco Cloud Platform – 5.x, 4.x, 3.x, 2.x
  • VMware Telco Cloud Infrastructure – 3.x, 2.x

Introduction

Multiple vulnerabilities in VMware vCenter and NSX were privately reported to Broadcom. Updates are available to remediate these vulnerabilities in affected Broadcom products.

A.vCenter SMTP header injection vulnerability (CVE-2025-41250)

B.NSX weak password recovery mechanism vulnerability (CVE-2025-41251)

C.NSX username enumeration vulnerability (CVE-2025-41252)

Reference

https://support.broadcom.com/web/ecx/support-content-notification/-/external/content/SecurityAdvisories/0/36150

vCenter Server shows unhealthy in VAMI:5480 page.

By Lerpong Intaraworrapath | September 18th, 2025

We found that vCenter Server appliance shows unhealthy status in Overall Health alert and Memory alert.

We expand the Memory status alert show message

Appliance is running low on memory. Add more memory to the machine

Step

1.In a Web browser, go to the vCenter Appliance Management Interface.

https://appliance-IP-address-or-FQDN:5480.

2.We get an alert stating that the alert is for Overall Health.

3.We discovered that the Overall Health alert comes from the memory alert.

4.We validated KB: https://knowledge.broadcom.com/external/article/318571/appliance-is-running-low-on-memory-add-m.html and determined that it is not applicable.

5.Use the following command.

# grep -i percpu /proc/meminfo

It is not high (not more than 1GB).

6.It is a low number (0) of VMware Pod service restarts, as validated by the following command on the VCSA SSH session:

# journalctl -b 0 | grep "Started VMware Pod" | wc -l

7.The vCenter Server appliance is assigned 30GB of memory, which is insufficient to support 1300+ VMs.

  • vCenter Server Appliance configuration.
  • CPU: 8
  • Memory: 30GB
  • Disk: 1TB

8.We may look at the memory % history from last year and last month.

Based on memory history, we can determine that the memory percentage is sometimes more than 80% and sometimes lower.

Last month

Last year

Memory usage is around 80% which is triggering the alert in the VAMI Page.

We recommend increasing RAM from 30GB to 34 or 36GB to manage more than 1300+ VMs.

Suggestions:

Increase the memory of the vCenter Server appliance as required by following the procedures below:

1.Log in to the ESXi Host UI and shutdown the vCenter Server appliance .

2.Increase Memory.

3.Turn on the vCenter Server appliance


Check replication agreement and status with vCenter Server using CLI

By Lerpong Intaraworrapath | September 3rd, 2025

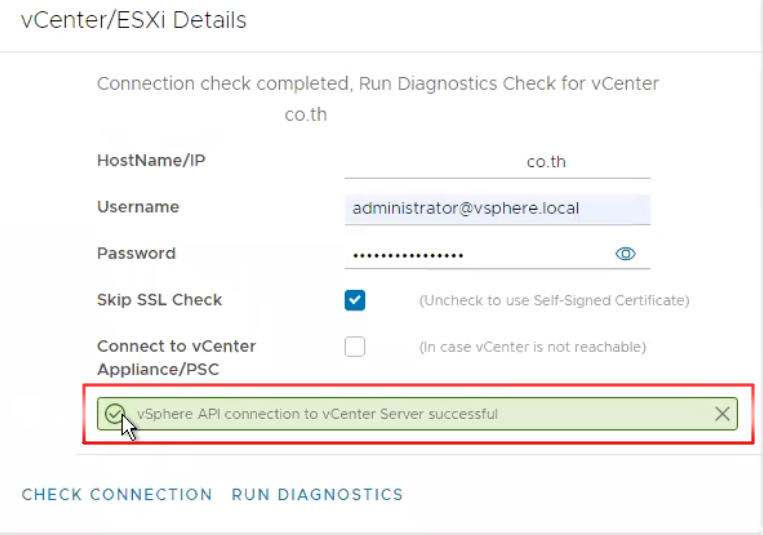
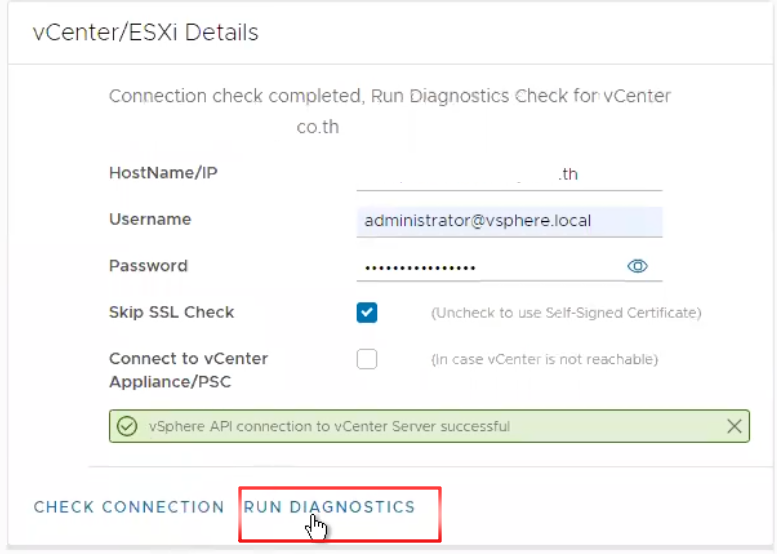
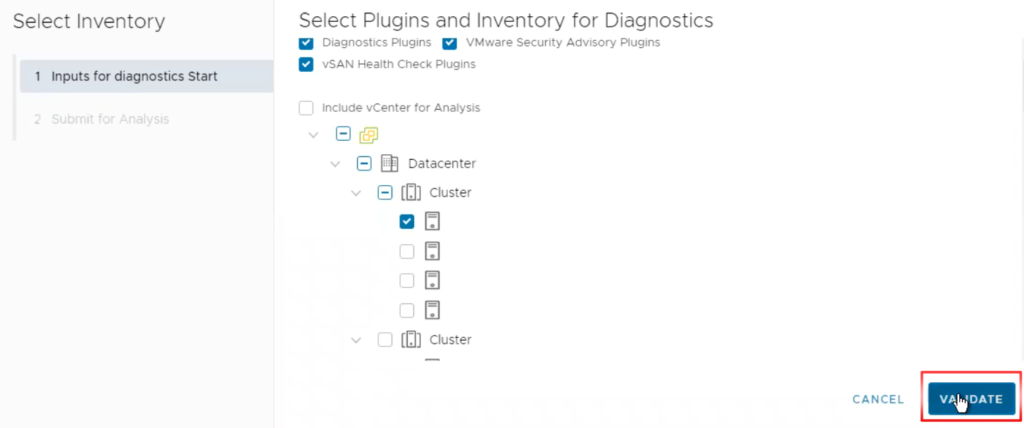
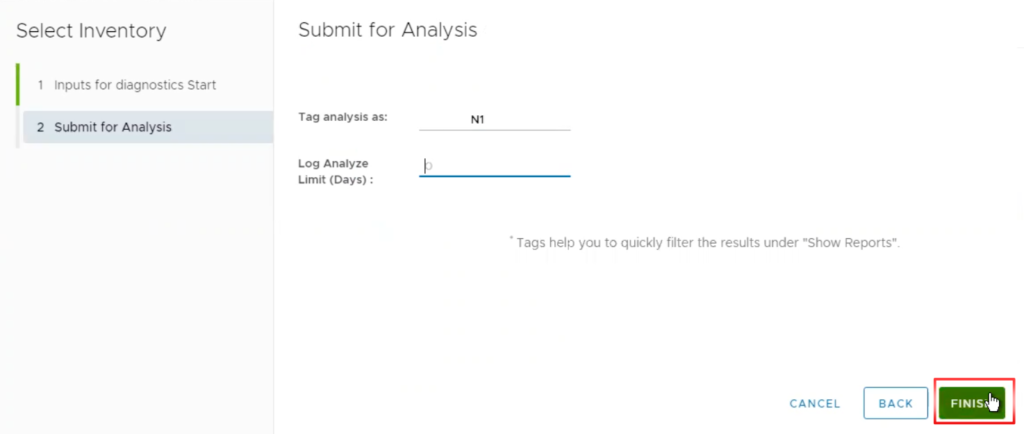
This article explains how to use the vdcrepadmin command-line interface (CLI) for assessing the vSphere domain and vCenter Server, as well as check the replication agreements and replication status in an environment.
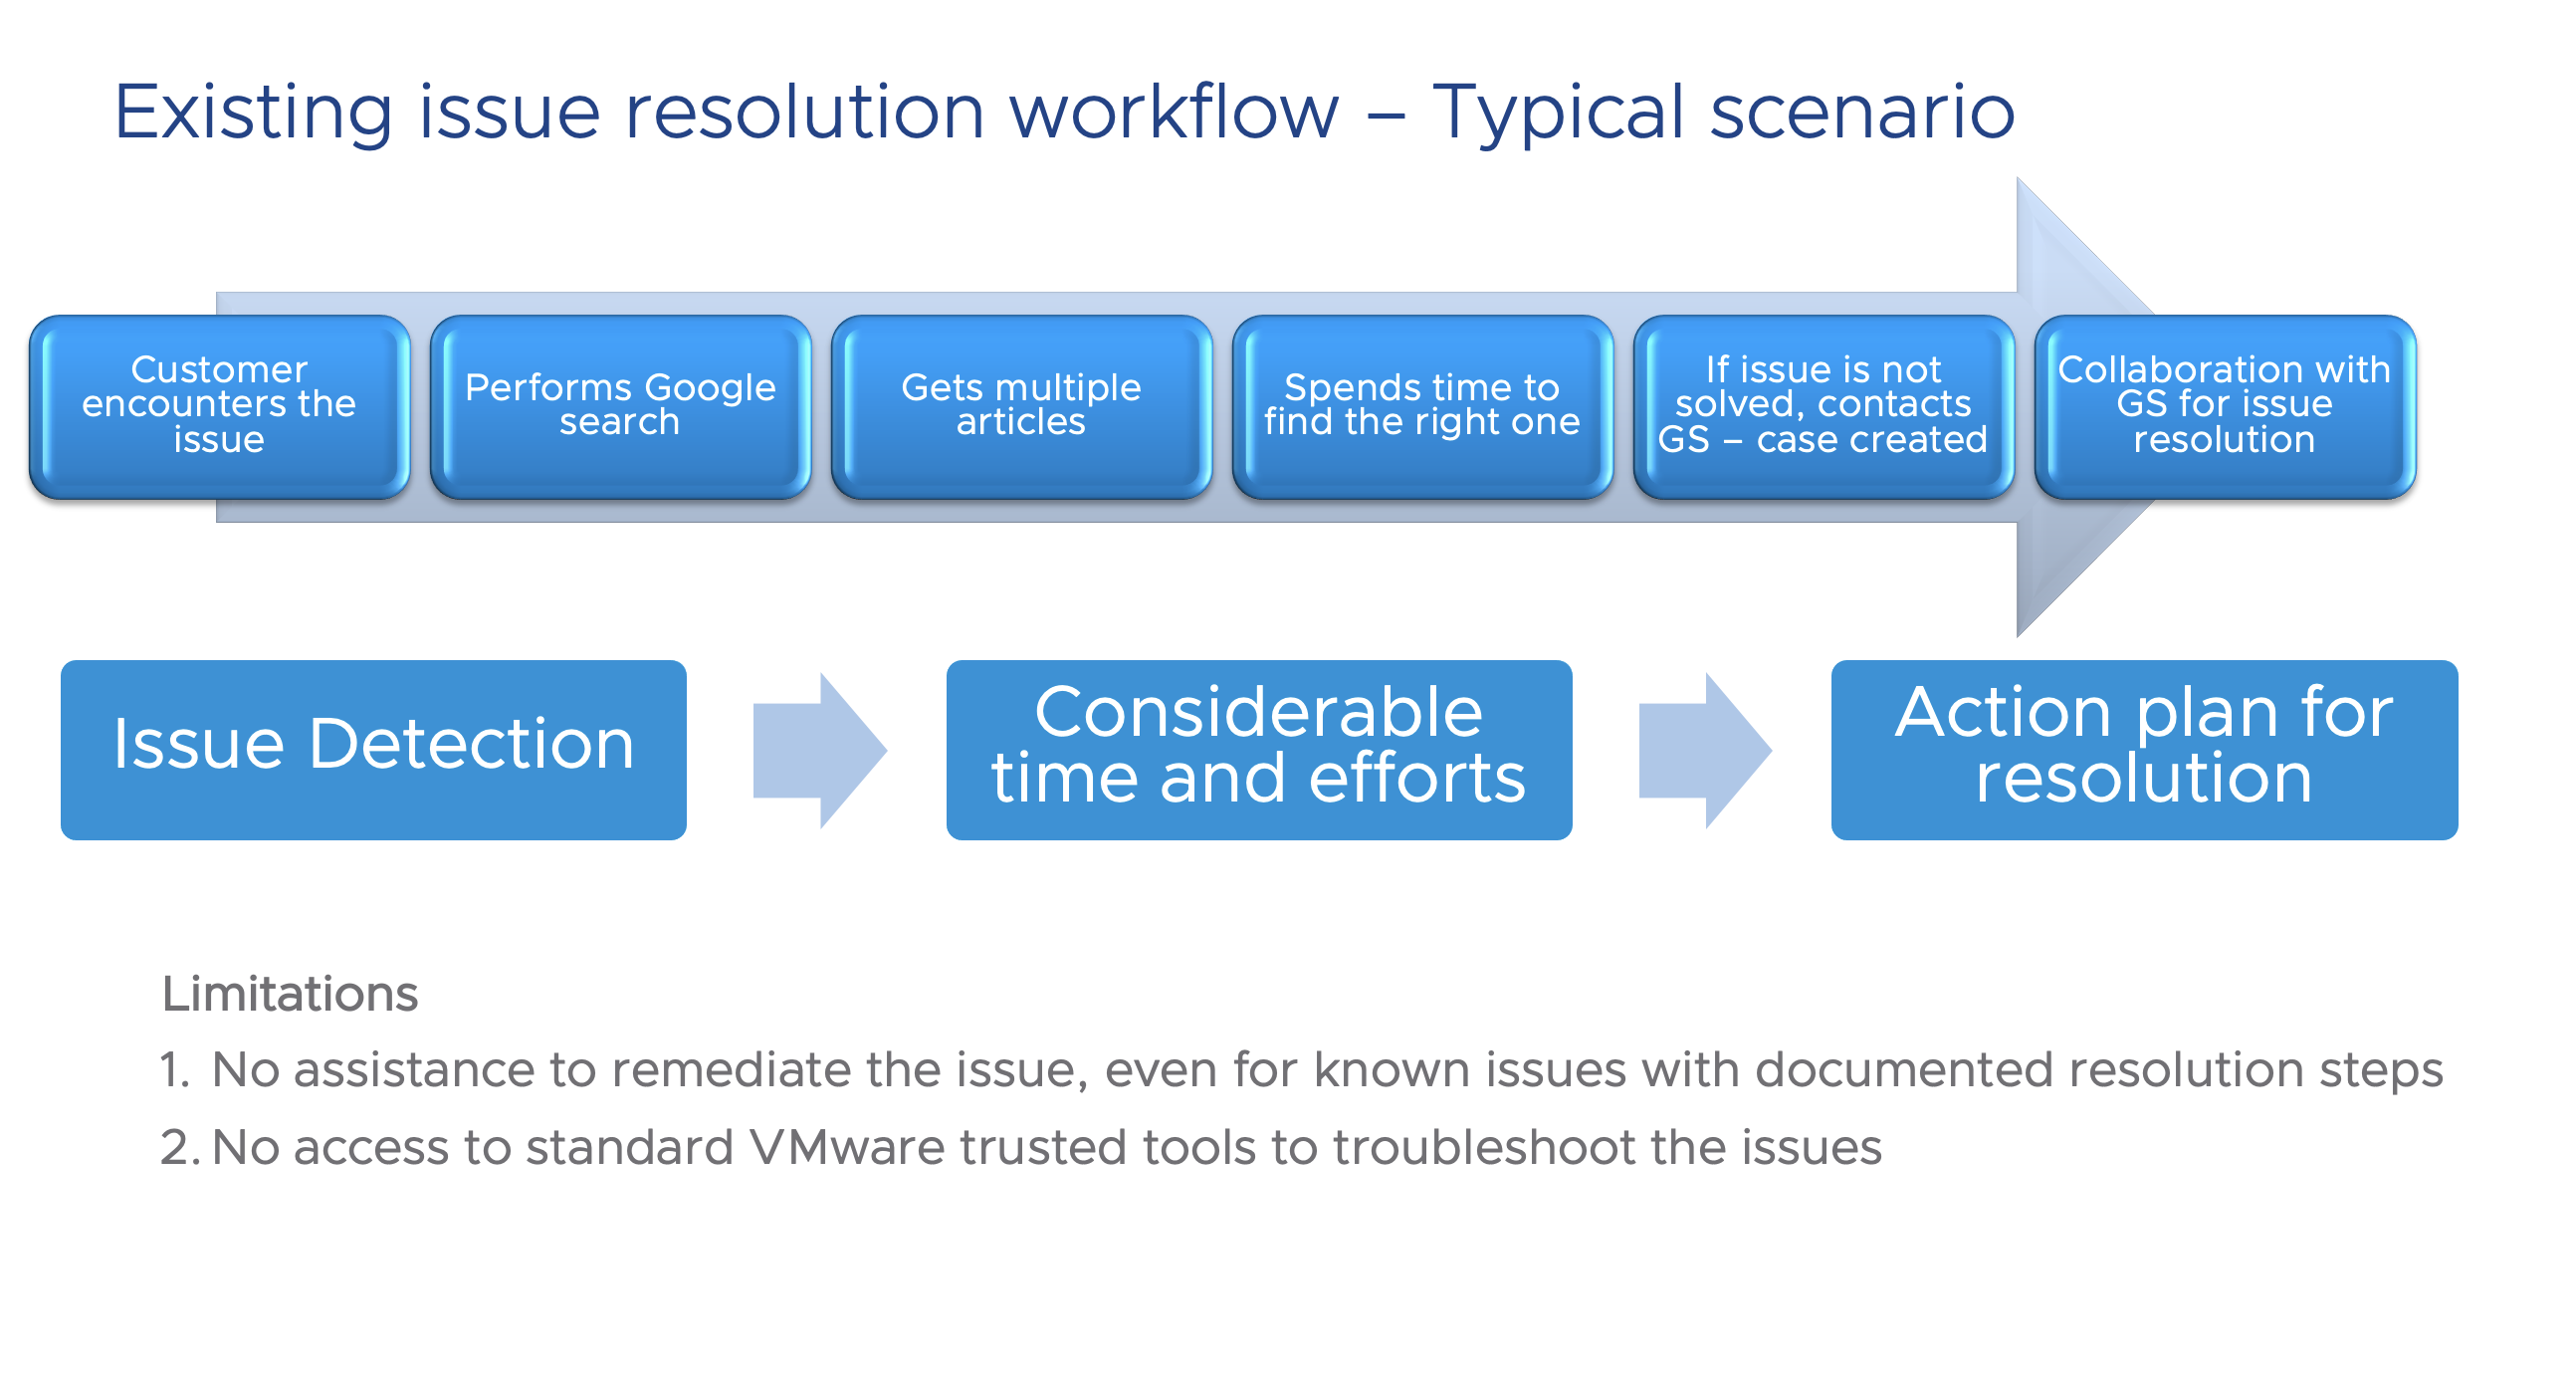
How does it work?

In this article, we will look at 2 vCenter servers that have been setup with enhanced link mode.

Note that this requires BASH Shell access to the appliance. To change from the appliance shell to the BASH shell, see Toggling the vCenter Server Appliance 6.x default shell.

1.SSH into vCenter Server T01 and use the following command to display all of the vCenter Servers with a vSphere domain.

/usr/lib/vmware-vmdir/bin/vdcrepadmin -f showservers -h localhost -u administrator

2.After you press enter, you will be asked to type the password and enter.

3.You will find the results below.

4.Use the following command to determine the current replication status of any replication partner.

/usr/lib/vmware-vmdir/bin/vdcrepadmin -f showpartnerstatus -h localhost -u administrator

5.After you press enter, you will be asked to type the password and enter.

6.You will find the results below from vCenter Server T01 .

7.Then, log into vCenter Server T02 and run the command in step 4. The results are provided below.

Here we can see that both replication partners are 0 changes behind, and their changes are equivalent. Keep in mind that the two replication partners’ change values may differ from one another, and as long as they are 0 changes independently, everything is adequate.

Reference

Determining replication agreements and status with the Platform Services Controller (PSC)
https://knowledge.broadcom.com/external/article?legacyId=2127057

Toggling the vCenter Server Appliance default shell
https://knowledge.broadcom.com/external/article/319670

vCenter Server Services are not displayed on the “vCenter Appliance Availability” Dashboard.

By Lerpong Intaraworrapath | 3rd June 2025

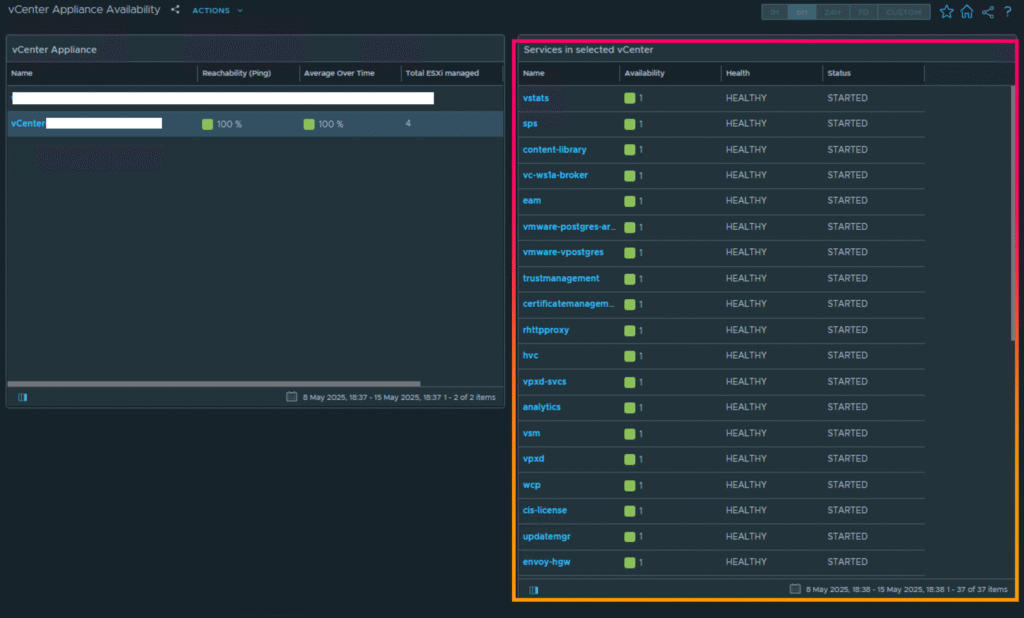
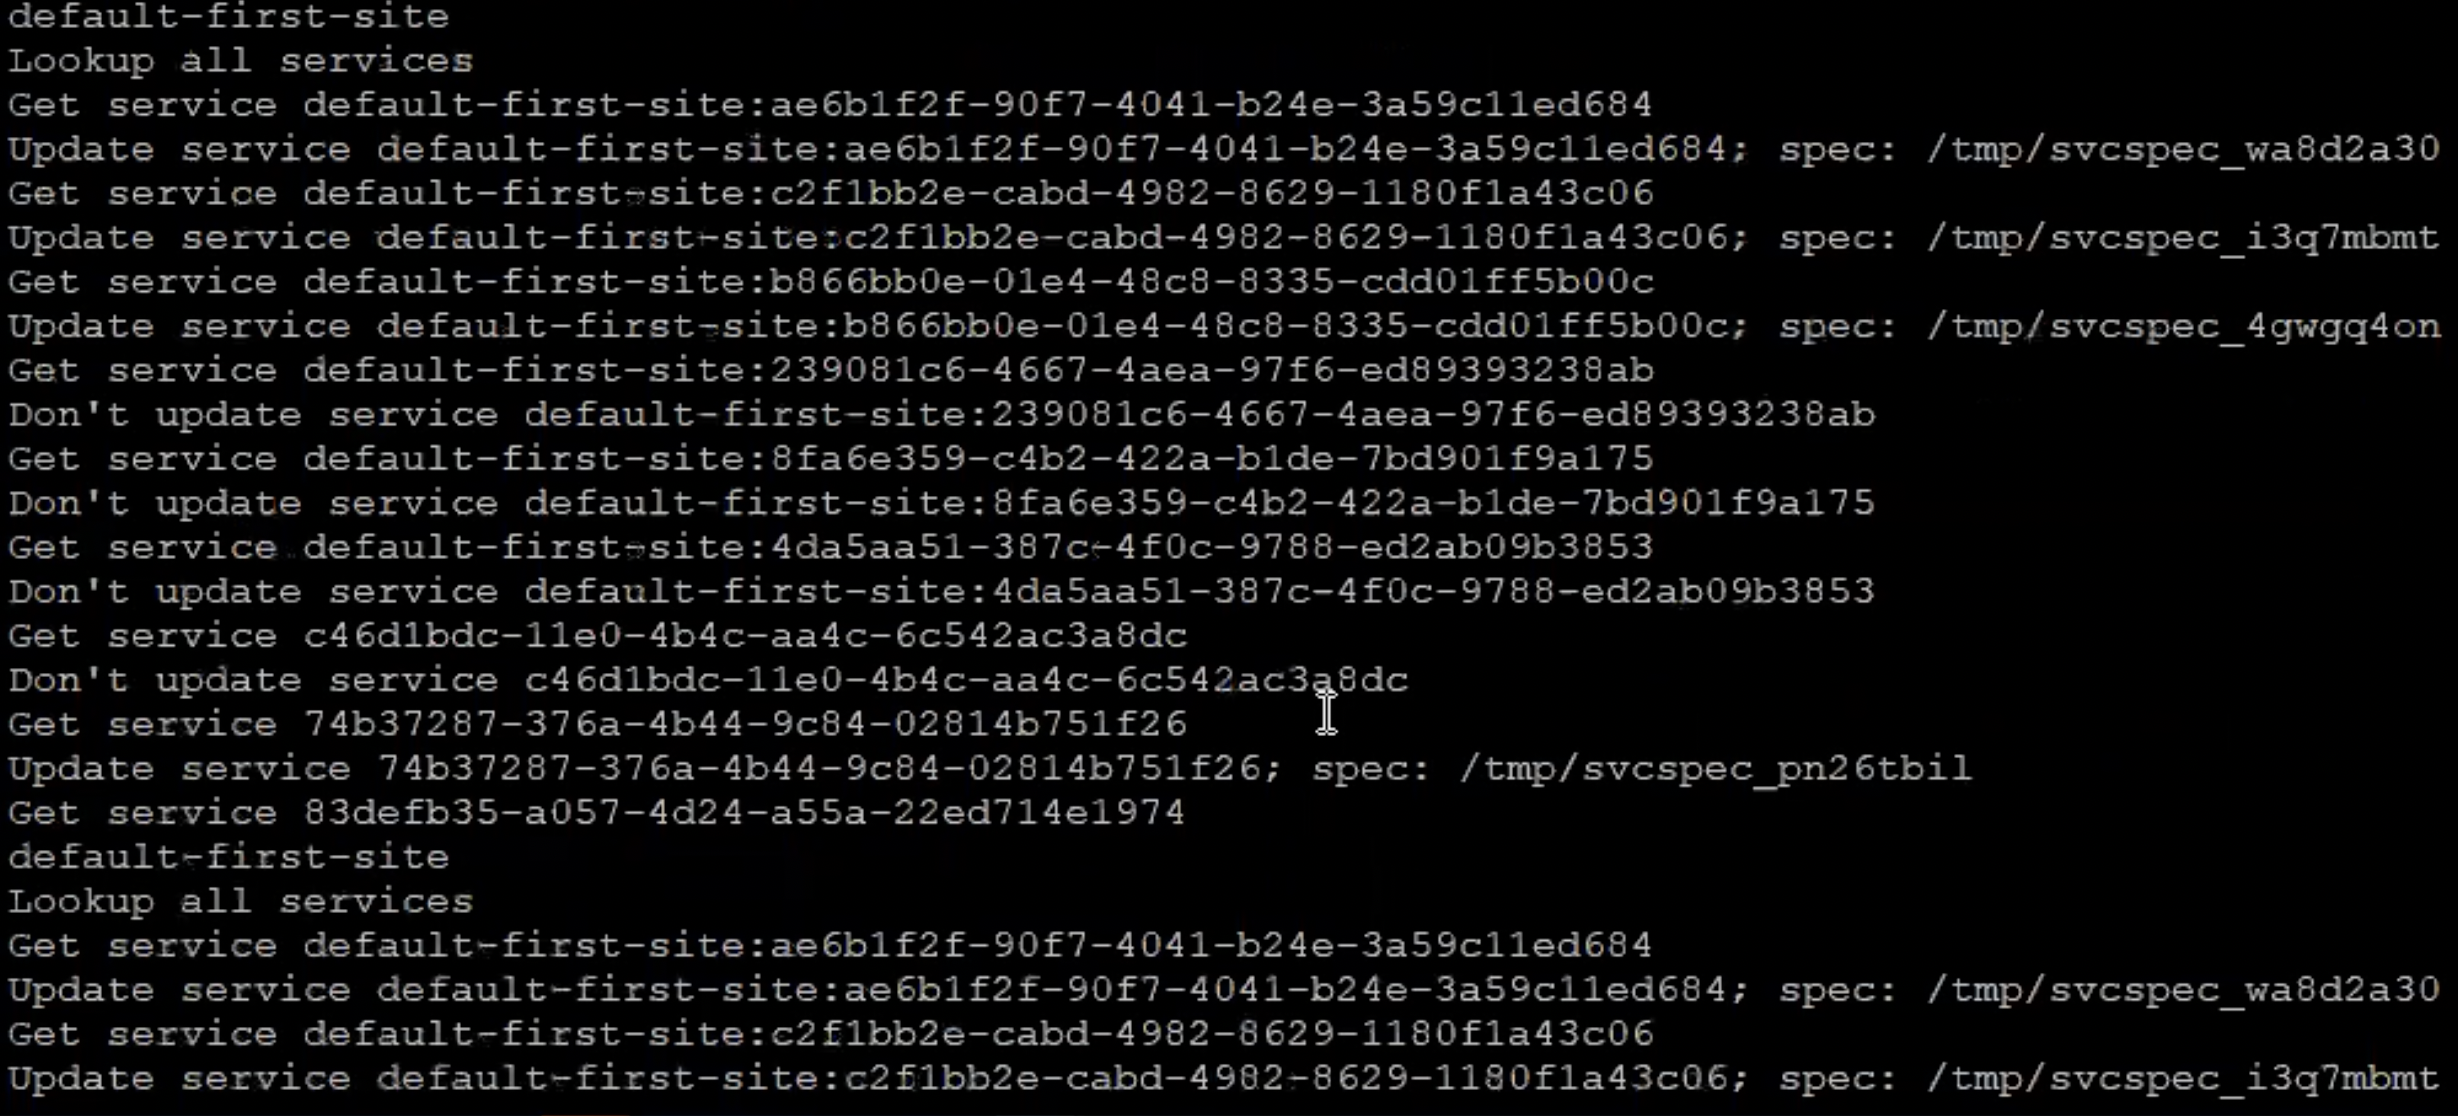
In Aria Operation 8.18, you may monitor vCenter Server services by going to the vCenter Appliance Availability dashboard.

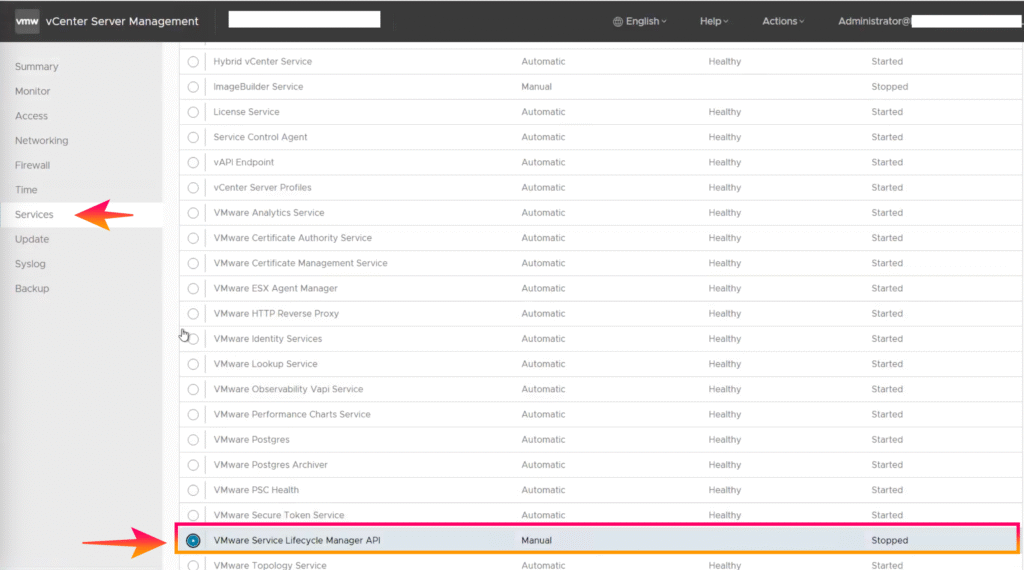
If you do not see vCenter and all its services, please check the VMware Service Lifecycle Manager API in the vCenter Appliance and start these services. (In vCenter Server Management versions 8.0.3 and above, the start type must be set to automated).

Step-by-Step

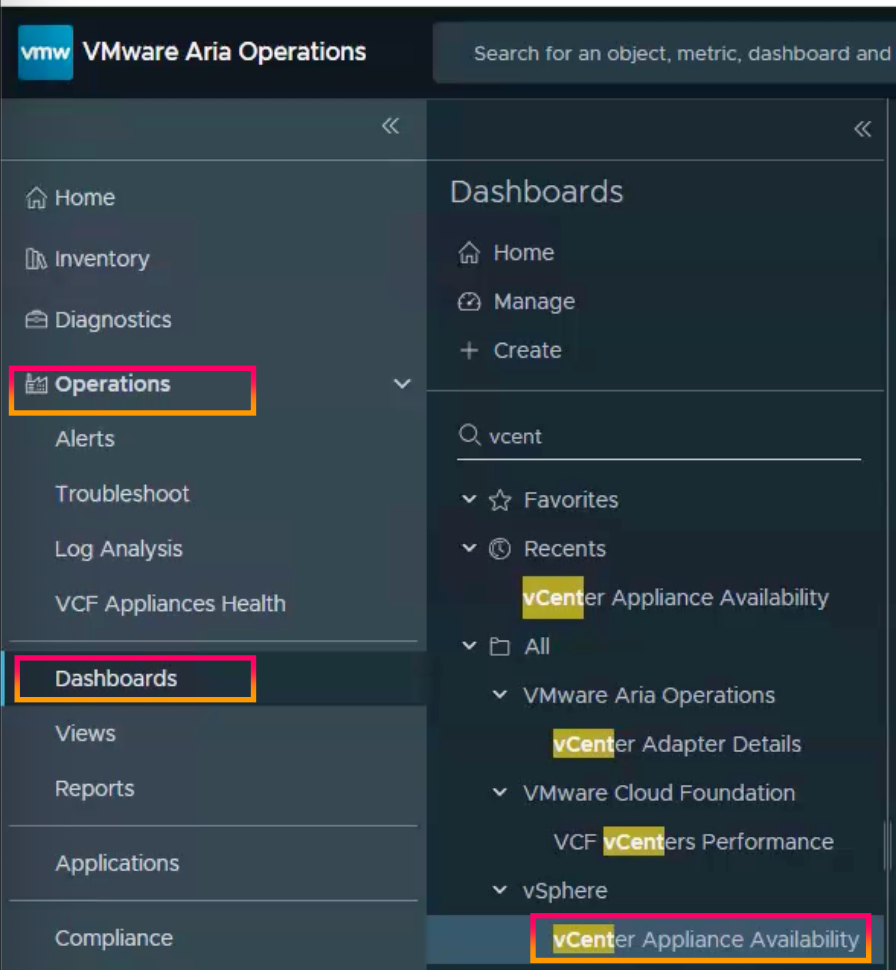
1.Log in to Aria Operations and go to “Operations” then “Dashboards” to find the “vCenter Appliance Availability” Dashboard.

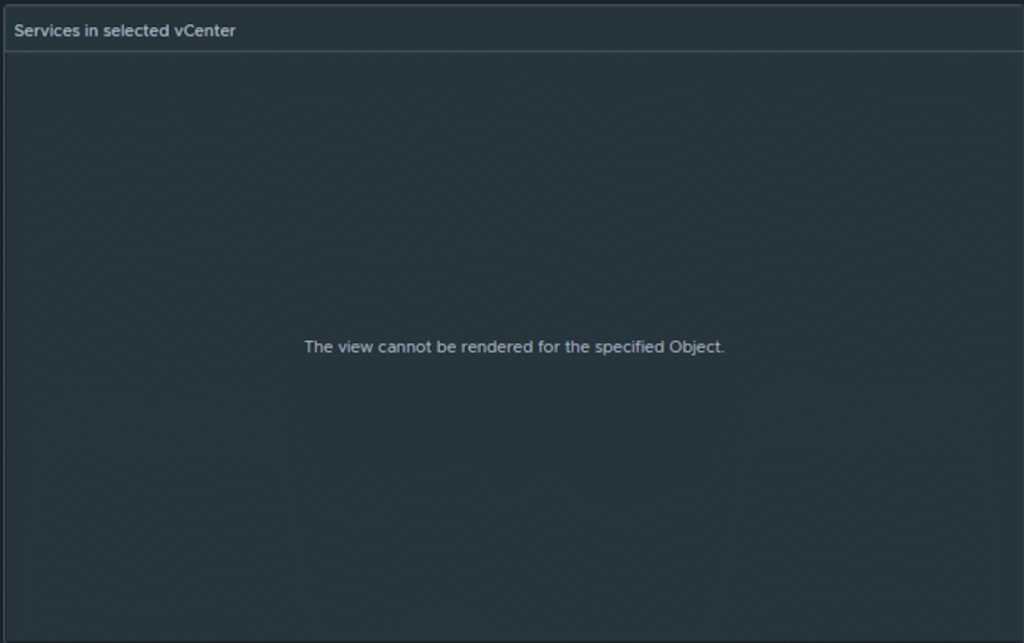
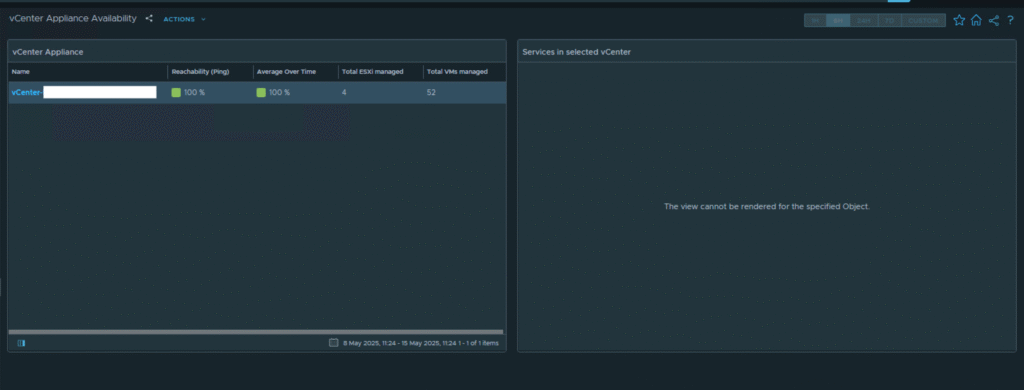
2.when you click on the vCenter Server. The entire vCenter Server is not visible, and you receive the message “The view cannot be rendered for the specified Object“.

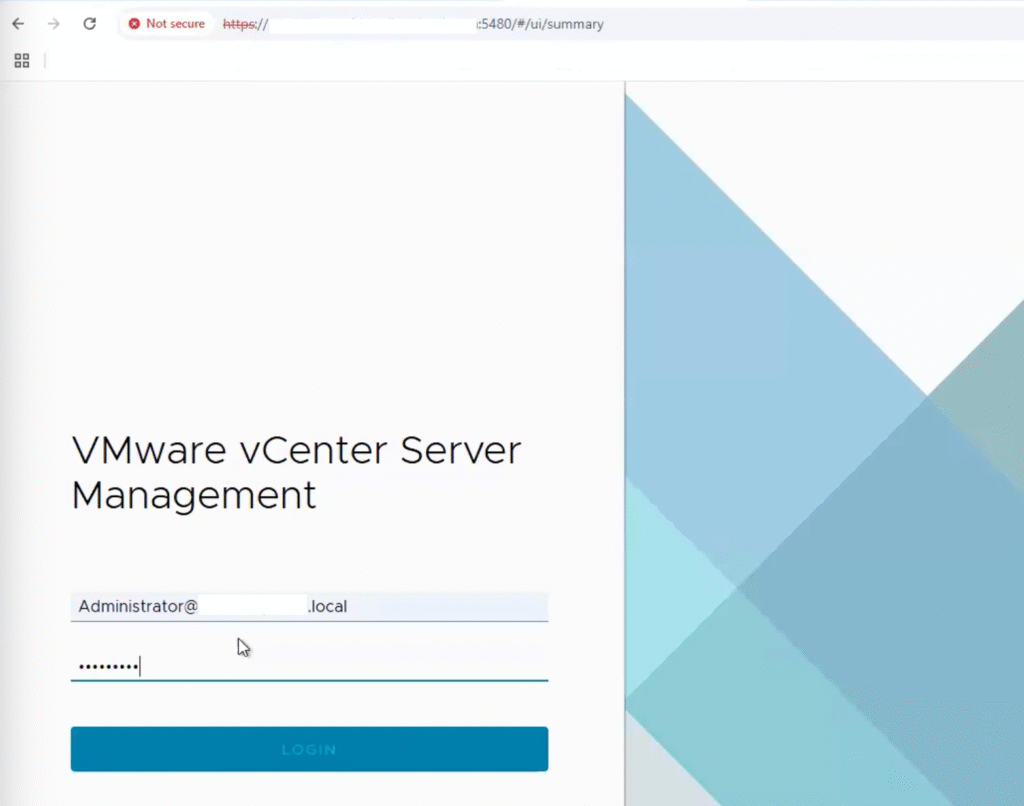
3.Login to the vCenter server Appliance

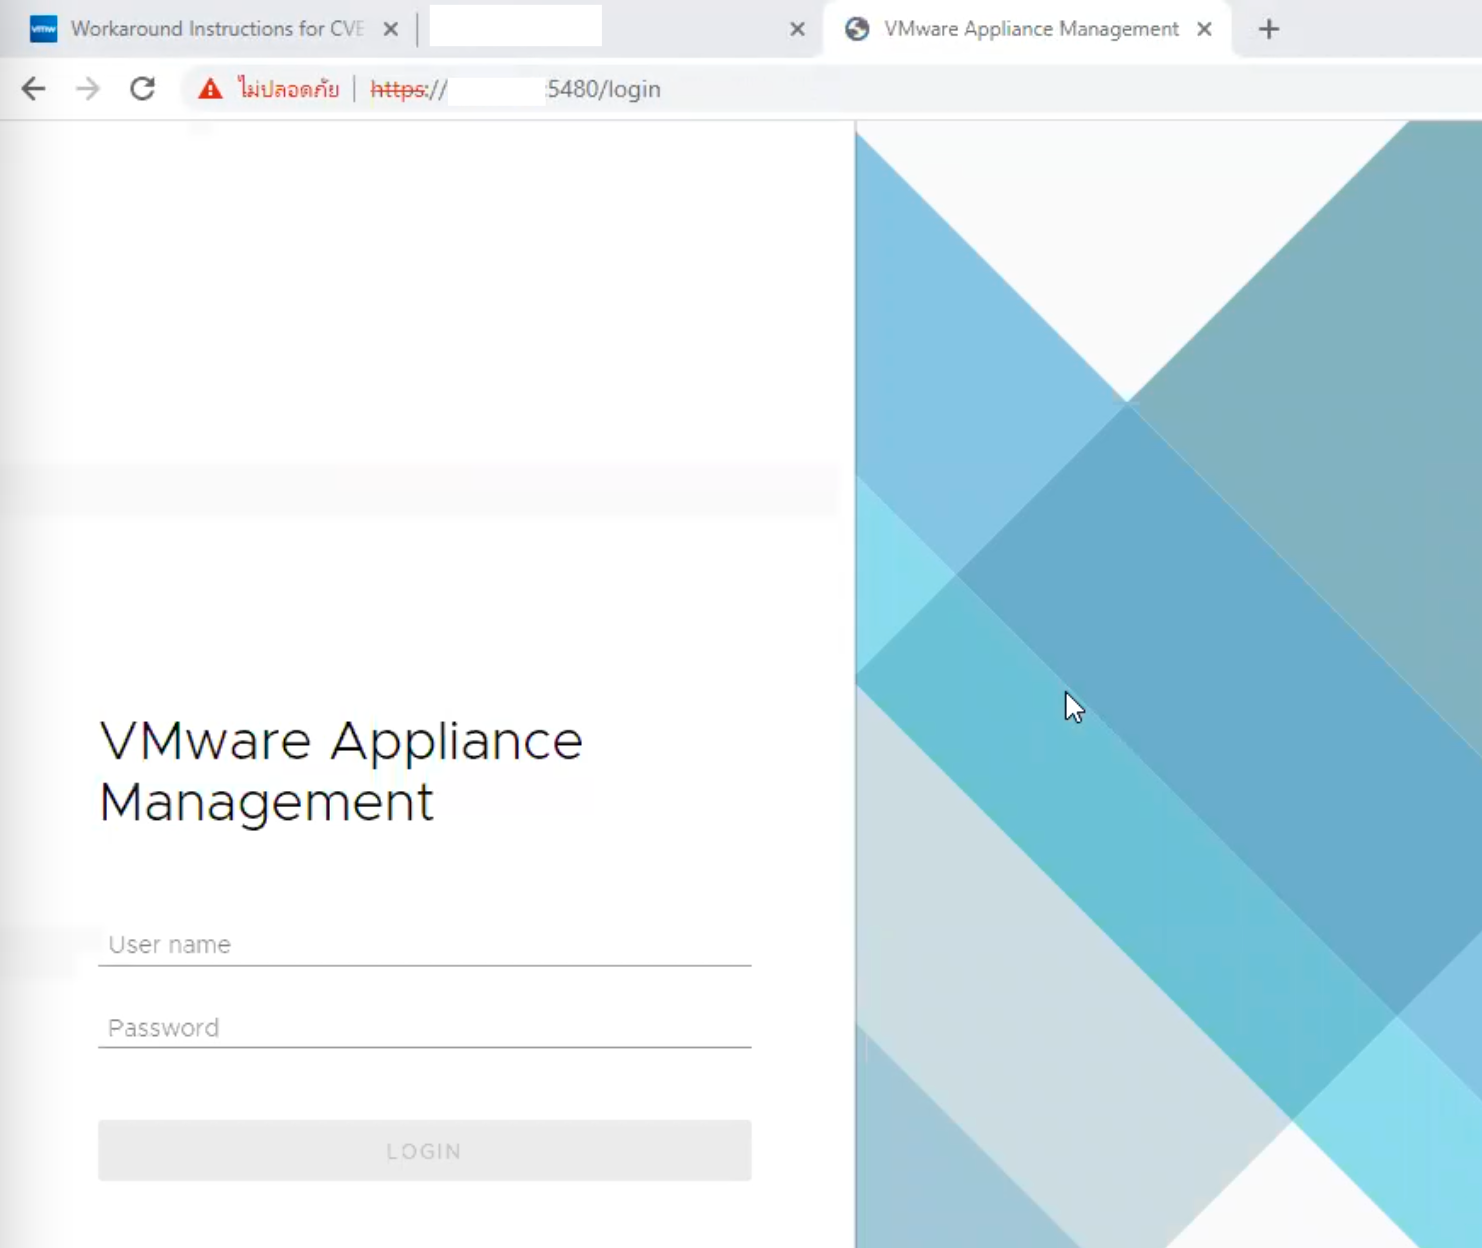
4.In a Web browser, go to the vCenter Server Appliance Management Interface, https://appliance-IP-address-or-FQDN:5480.

5.You have to start the “VMware Service Lifecycle Manager API” from the vCenter Appliance. (Automated start needs to be performed in vCenter Server Management versions 8.0.3 and above).

6.Navigate to “Services” and select “VMware Service Lifecycle Manager API“.

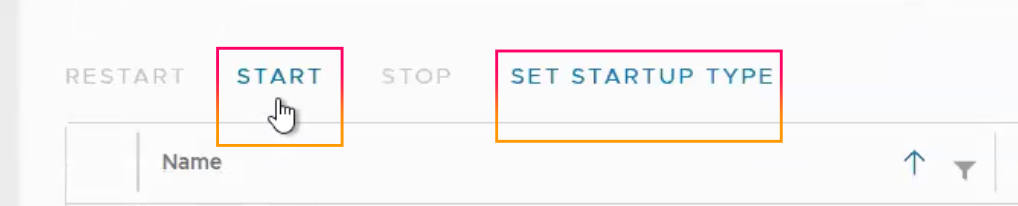
7.Click “START” and select “SET STARTUP TYPE“.

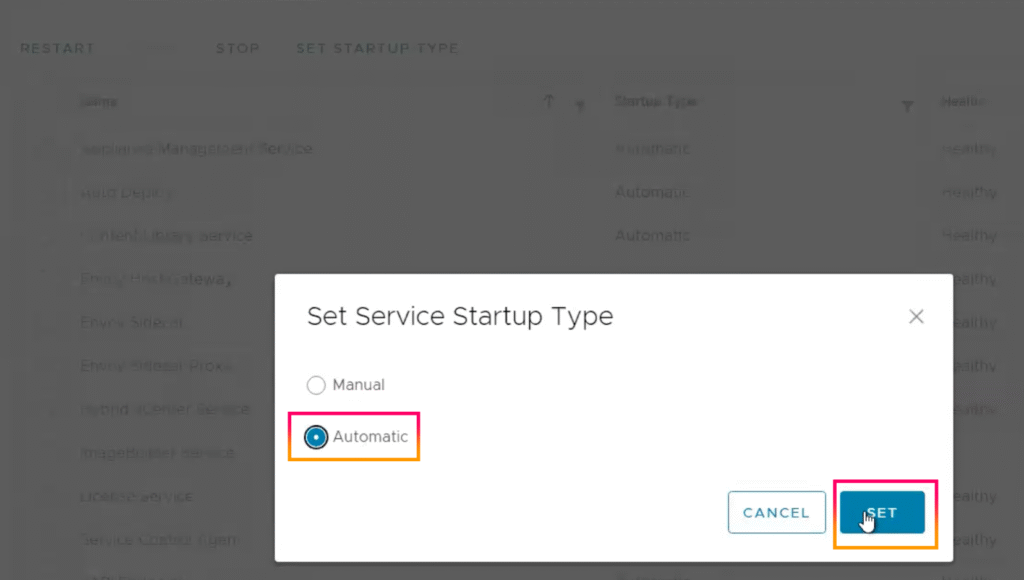
8.Set Service Startup Type to “Automatic” and click “SET“.

9.Wait 5 to 10 minutes before logging back into Aria Operations and selecting the “vCenter Appliance Availability” dashboard. Select “vCenter Server“, and the vCenter Server services will appear.

Reference

https://techdocs.broadcom.com/us/en/vmware-cis/vsphere/vsphere/6-7/configuring-vcenter-server-6-7/configuring-vcenter-server-using-the-management-interface/log-in-to-the-vcenter-server-management-interface.html

https://techdocs.broadcom.com/us/en/vmware-cis/aria/aria-operations/8-18/vmware-aria-operations-configuration-guide-8-18/connect-to-data-sources/vmware-infrastructure-health/vcenter-services-in-vmware-infra-health.html

Failed to deploy OVF package Throwable with Proxy enable

By Lerpong Intaraworrapath | July 11th ,2023

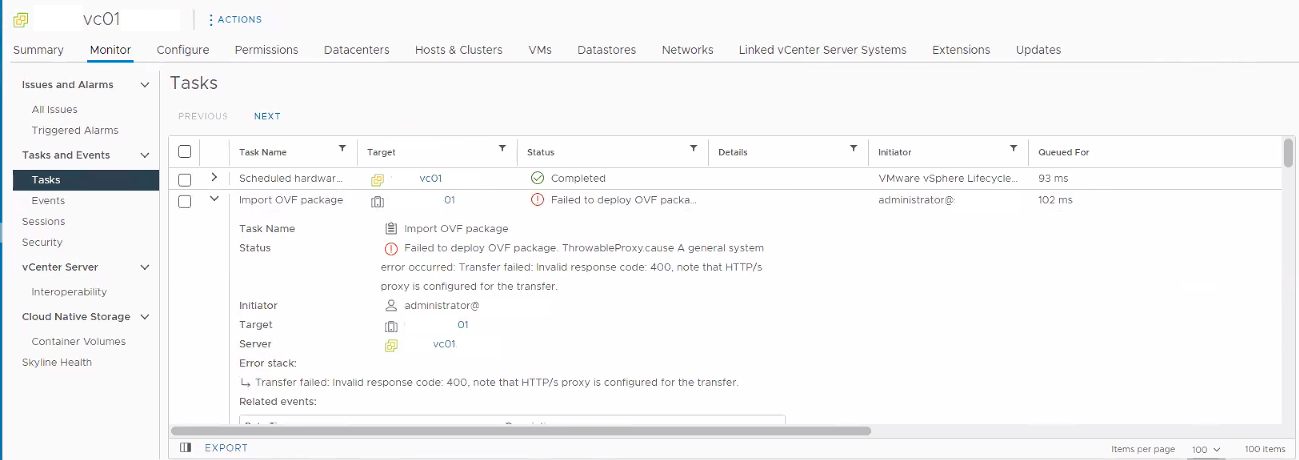
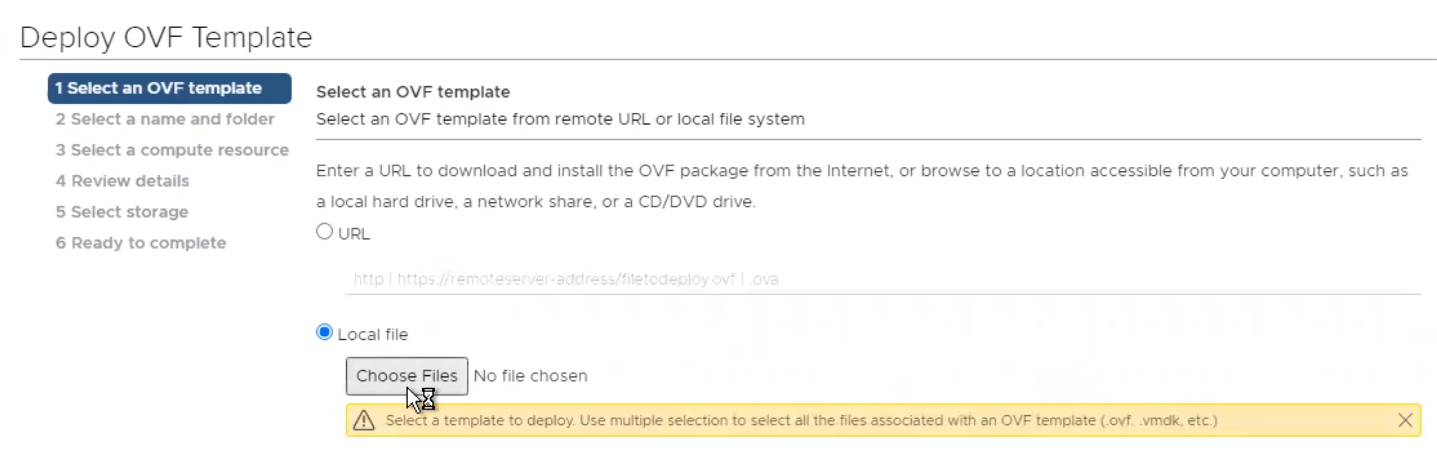
After upgrading vCenter Server from 7.0U2 to 7.0U3, I encountered an issue with my customer. They attempted to use vCenter Server to deploy an OVA file. They discovered the following error:

Failed to deploy OVF package.ThrowableProxy.cause A general system error occurred: Transfer failed: Invalid response code: 400, note that HTTP/s proxy is configured for the transfer

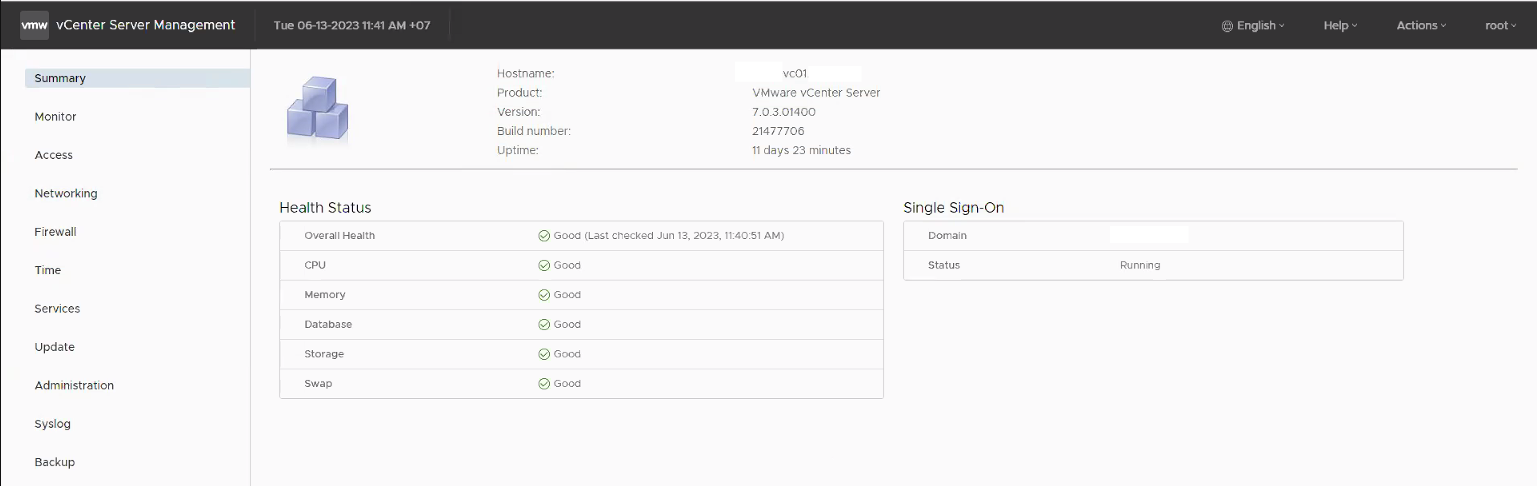
vCenter Server version 7.0.3.01400 build 21477706

Below are some additional workarounds.

Option 1 – Deploy through vSphere ESXi host

1.Login directly through vSphere ESXi host.

2.If you connect with your FQDN and you will still be unable to deploy the OVA file. Change the vSphere ESXi host login to an IP address and try again to deploy the OVA file.

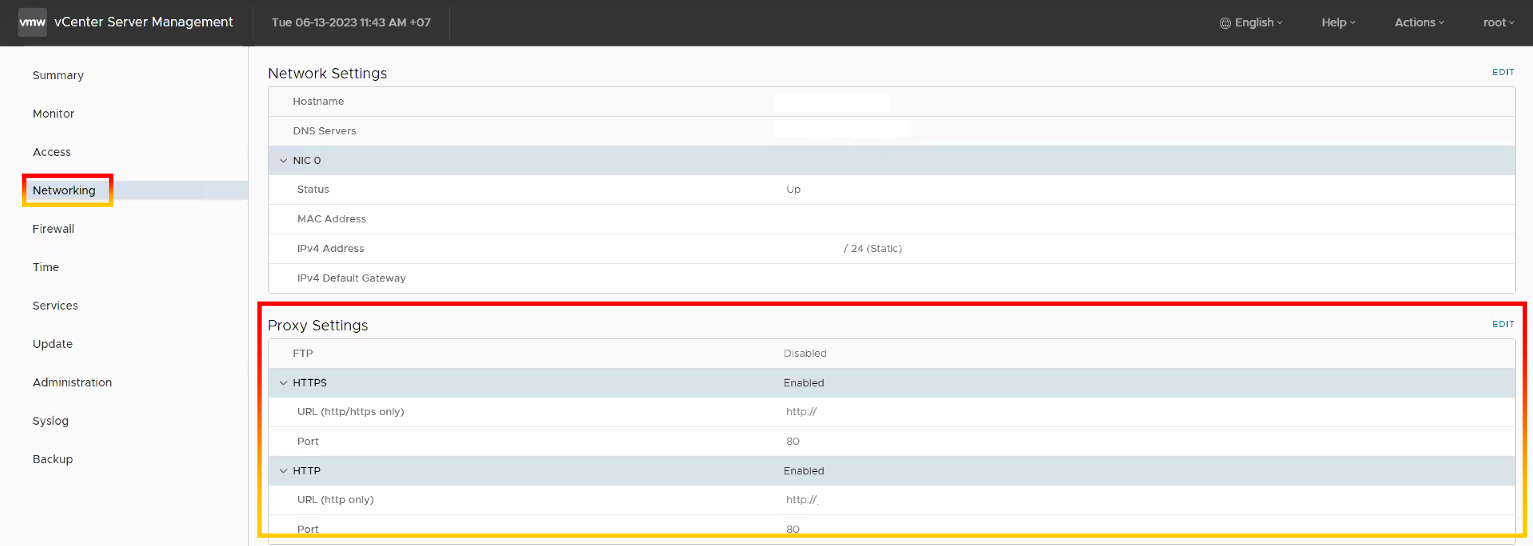
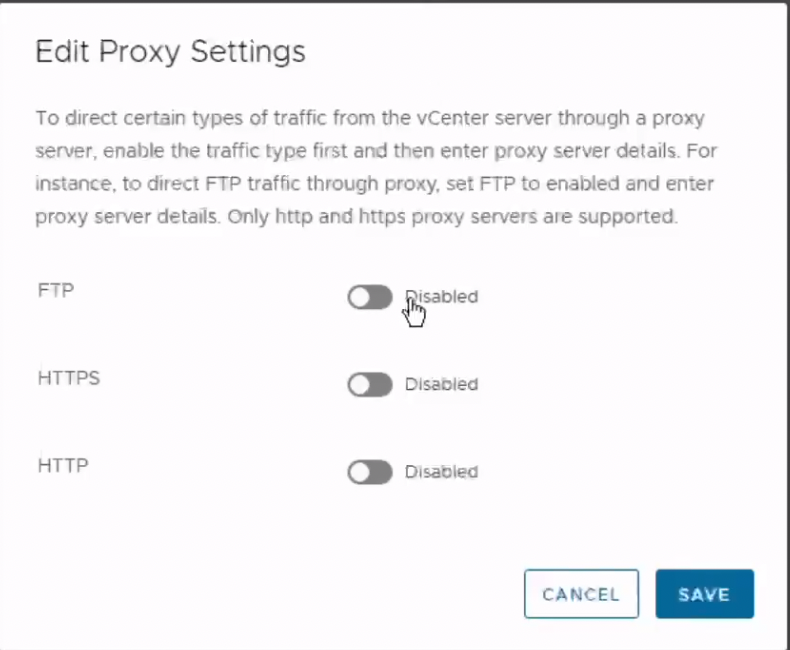
Option 2 – Disable proxy setting in vCenter Server

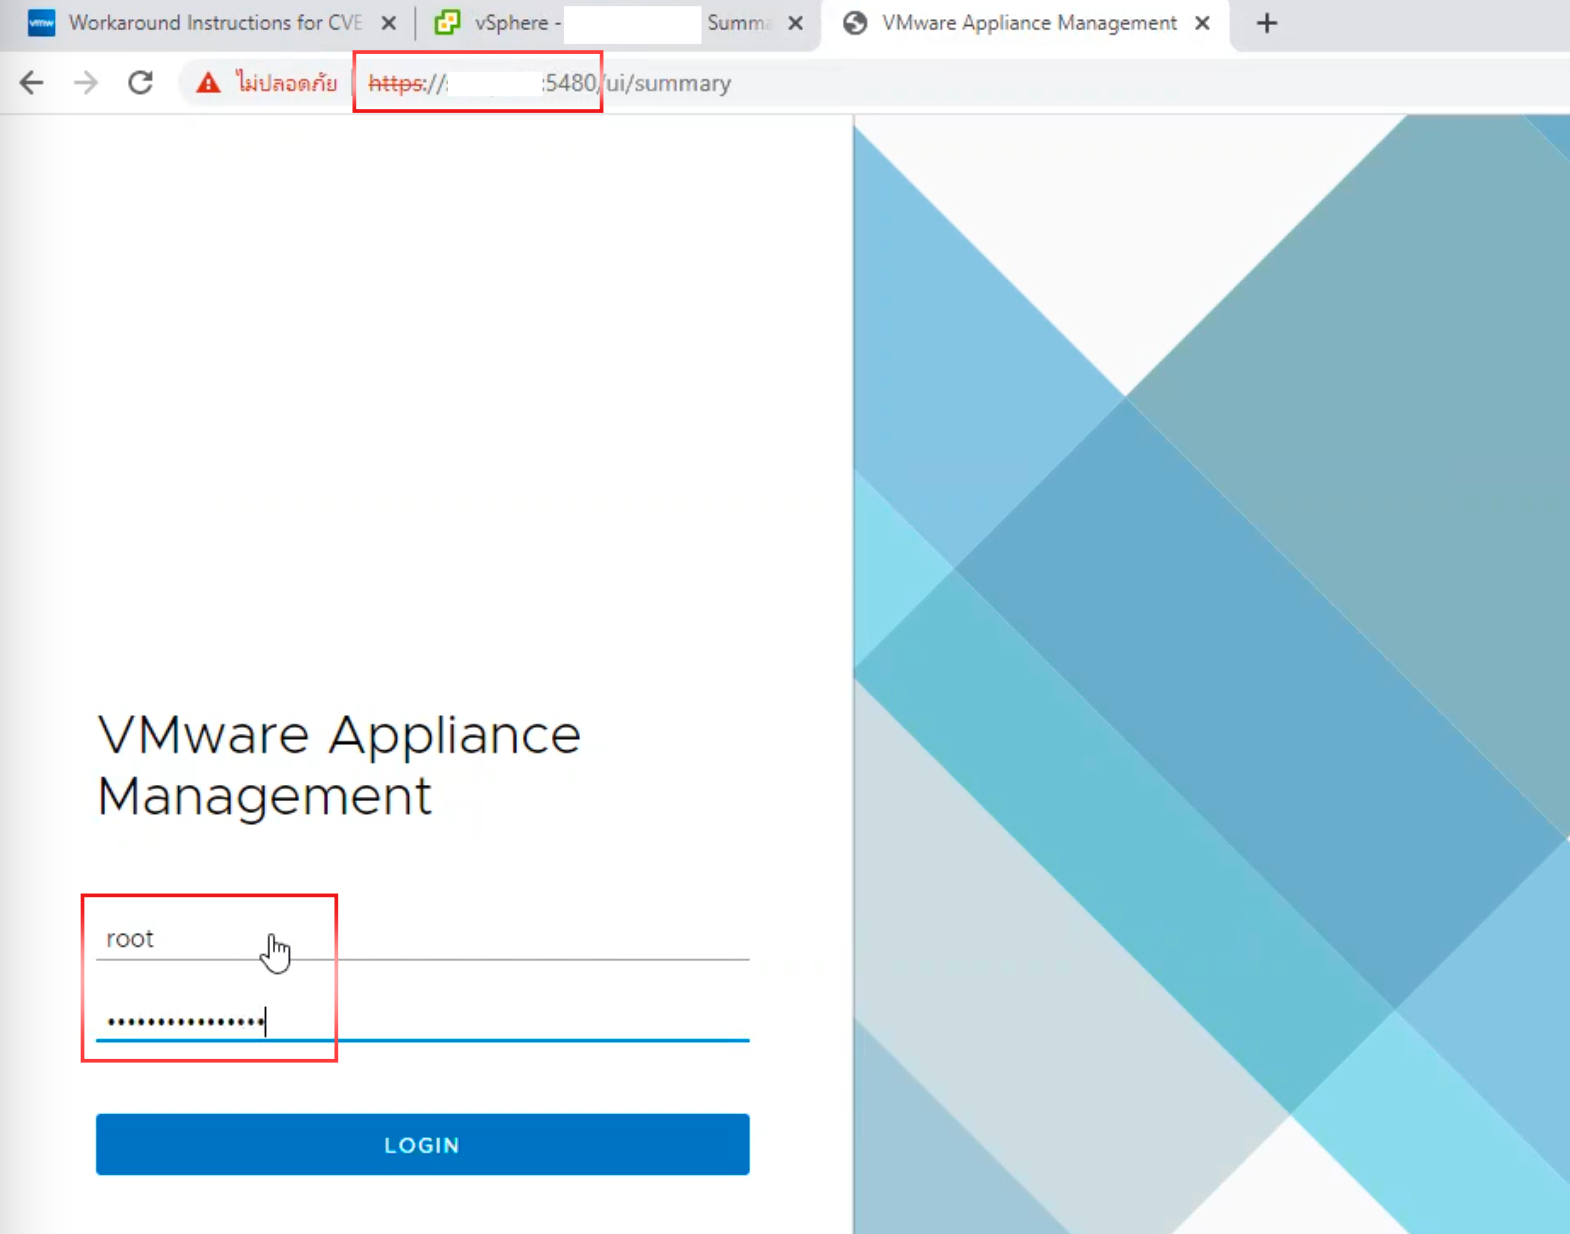
1.In a Web browser, go to the vCenter Server Management Interface, https://appliance-IP-address-or-FQDN:5480.

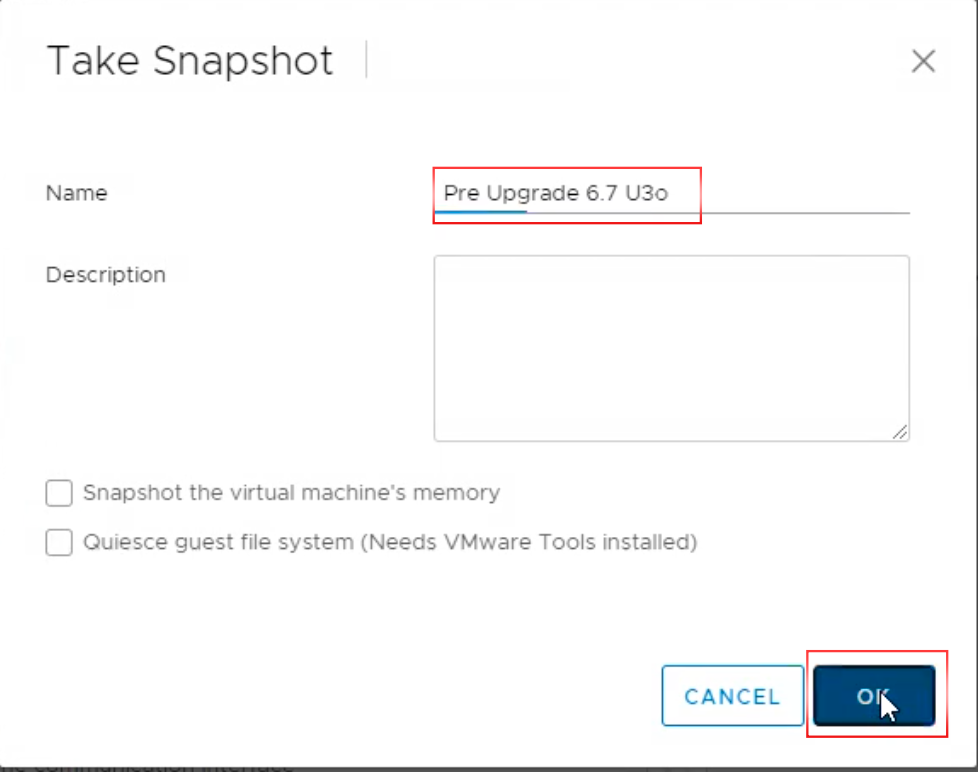
Note:If you need to make changes to vCenter Server, we recommend taking a snapshot.

2.Login as root.

3.Go to the Networking section.

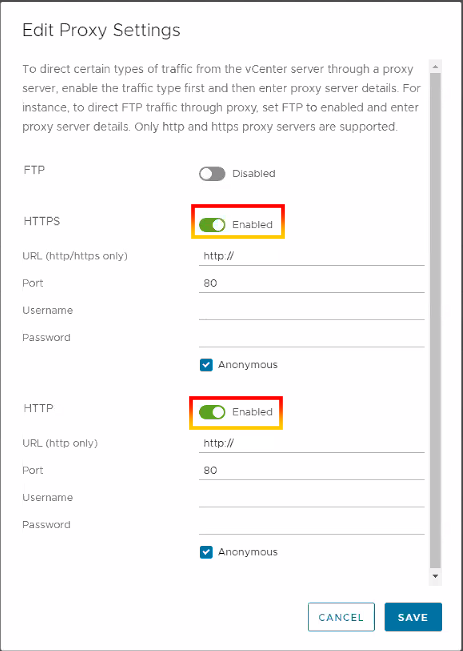
4.Click EDIT under the Proxy Setting section.

5.Uncheck both HTTPS and HTTP proxy enabled and click SAVE.

6.The OVA file will be successful.

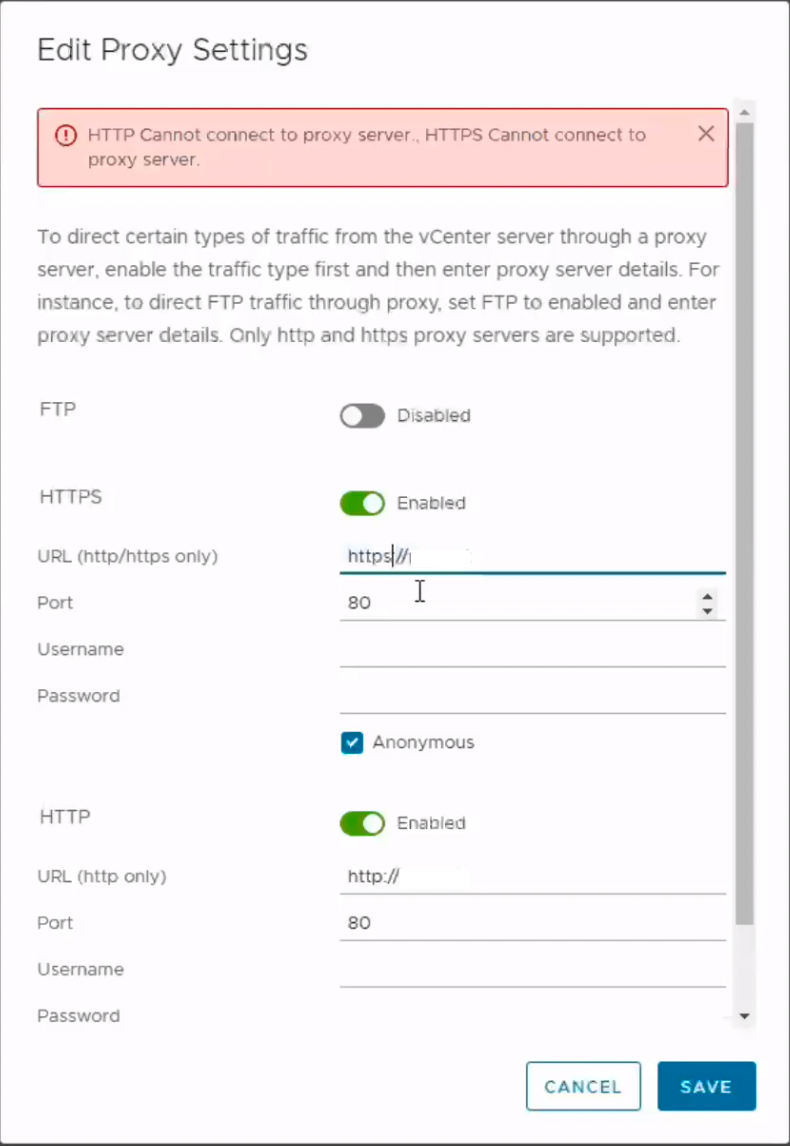
However, we discovered a new issue in which we were unable to enable the proxy and input the proxy server into the proxy settings.

7.We follow the VMware KB81565 to bring proxy configuration back to vCenter Server.

7.1)Change the HTTPS PROXY settings.

7.2)We make a backup of the proxy file.

7.3)Change the /etc/sysconfig/proxy file. Change the HTTPS_PROXY line to update the value from https to http:

HTTPS_PROXY="https://proxy.domain:80/"

to

HTTPS_PROXY="http://proxy.domain:80/"

Note: The proxy URL is determined by your proxy server.

7.4)If you are using a version previous to 7.0 U1, restart the VCSA.Otherwise, use the command to restart services, then logout and log back in:

# service-control --stop --all && service-control --start --all

If the problems persist, we recommend submitting a support request to the VMware support staff.

vCenter Server warning Storage “File system /storage/log is low on storage space” – Expand disk.

By Lerpong Intaraworrapath | 26th January 2023

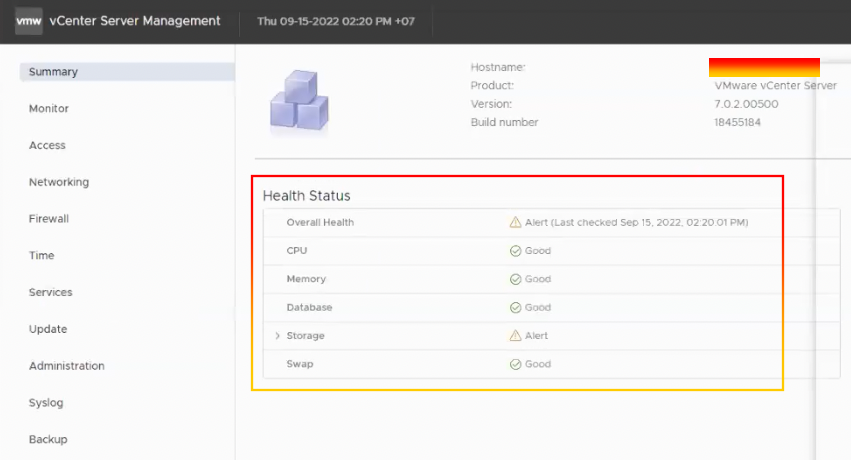
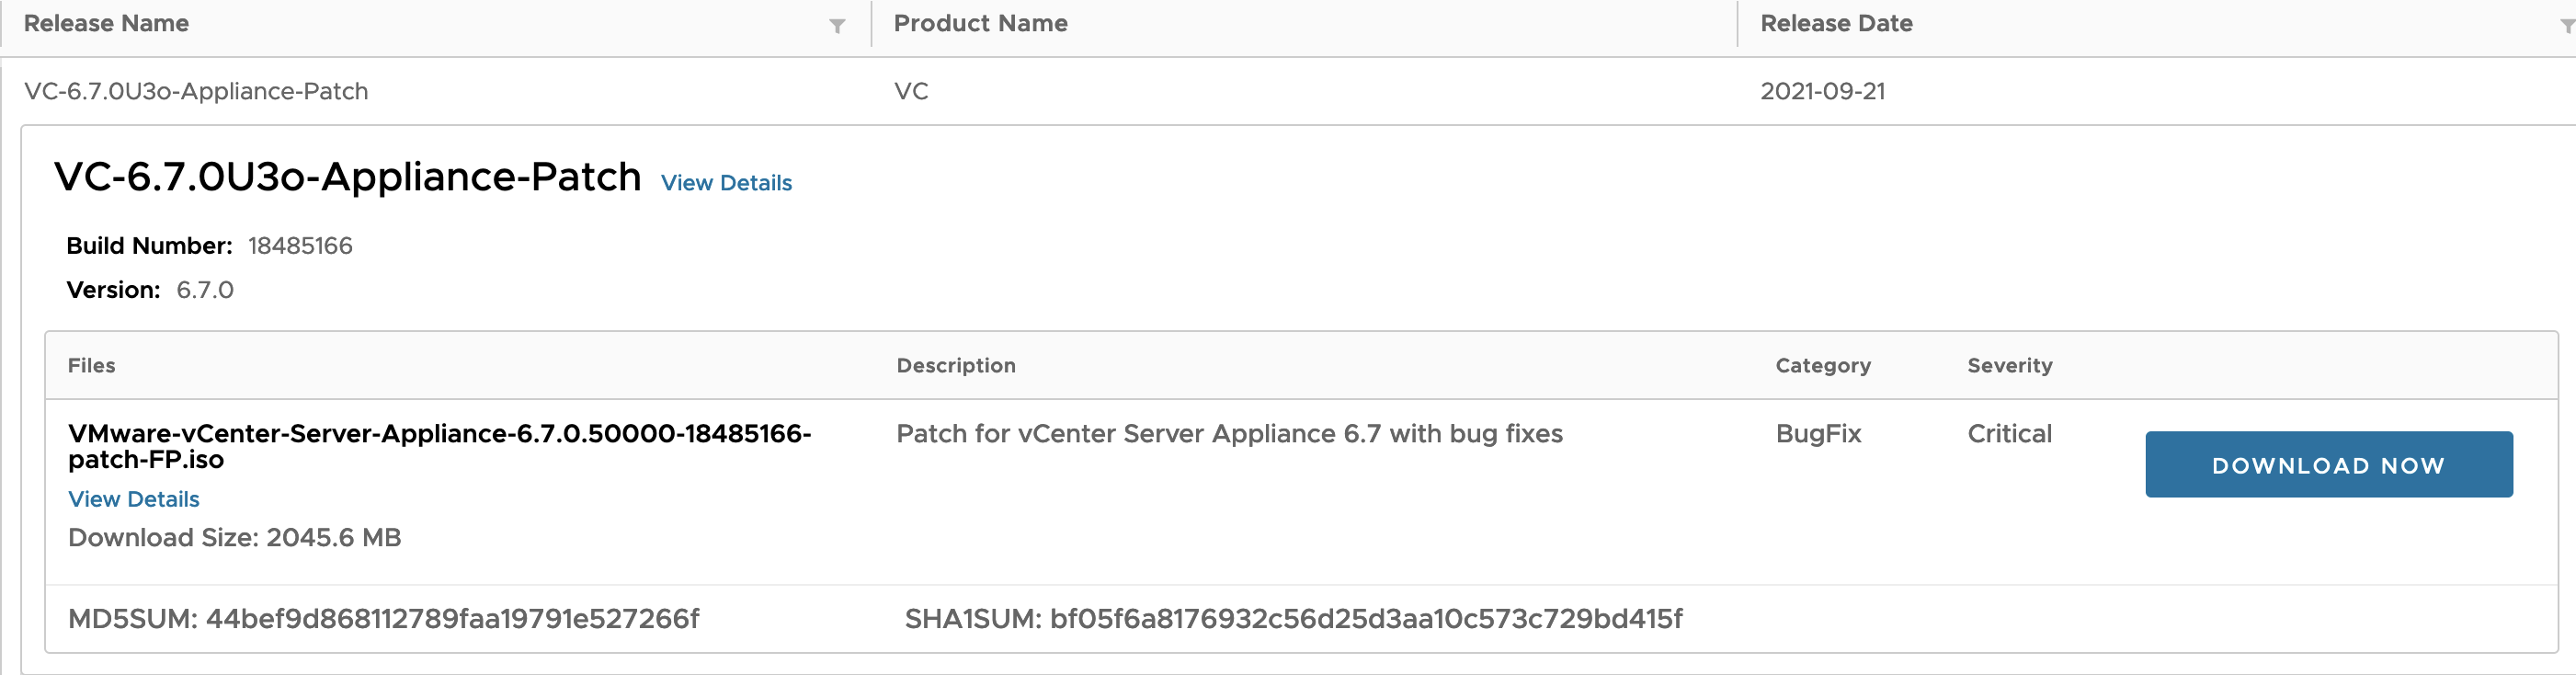
In this article, we are planning to upgrade vCenter Server appliance version 7.0.2.00500 build number 18455184 (vCenter Server 7.0 Update 2d) to vCenter Server 7.0 Update 3g (7.0.3.00800) build number 20150588 or higher.

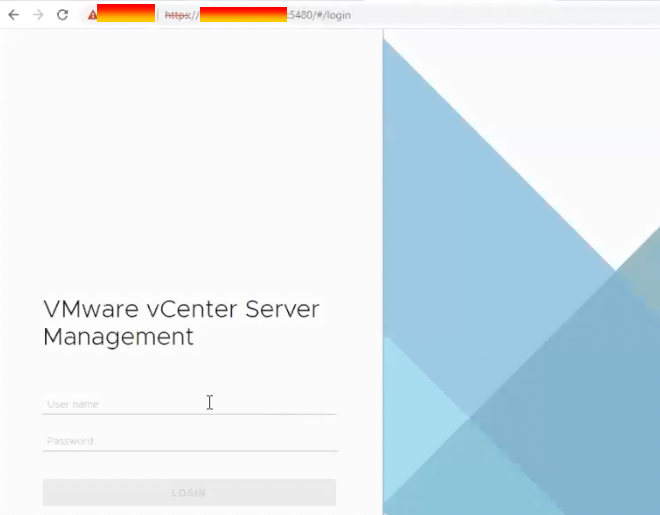
Before upgrading vCenter Server, we must first check its health status by logging onto
https://vCenter-Server-FQDN:5480

User: root
Password: xxxxx

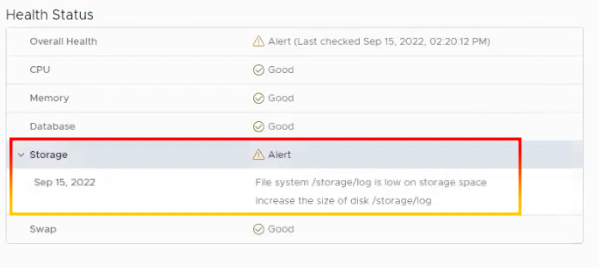
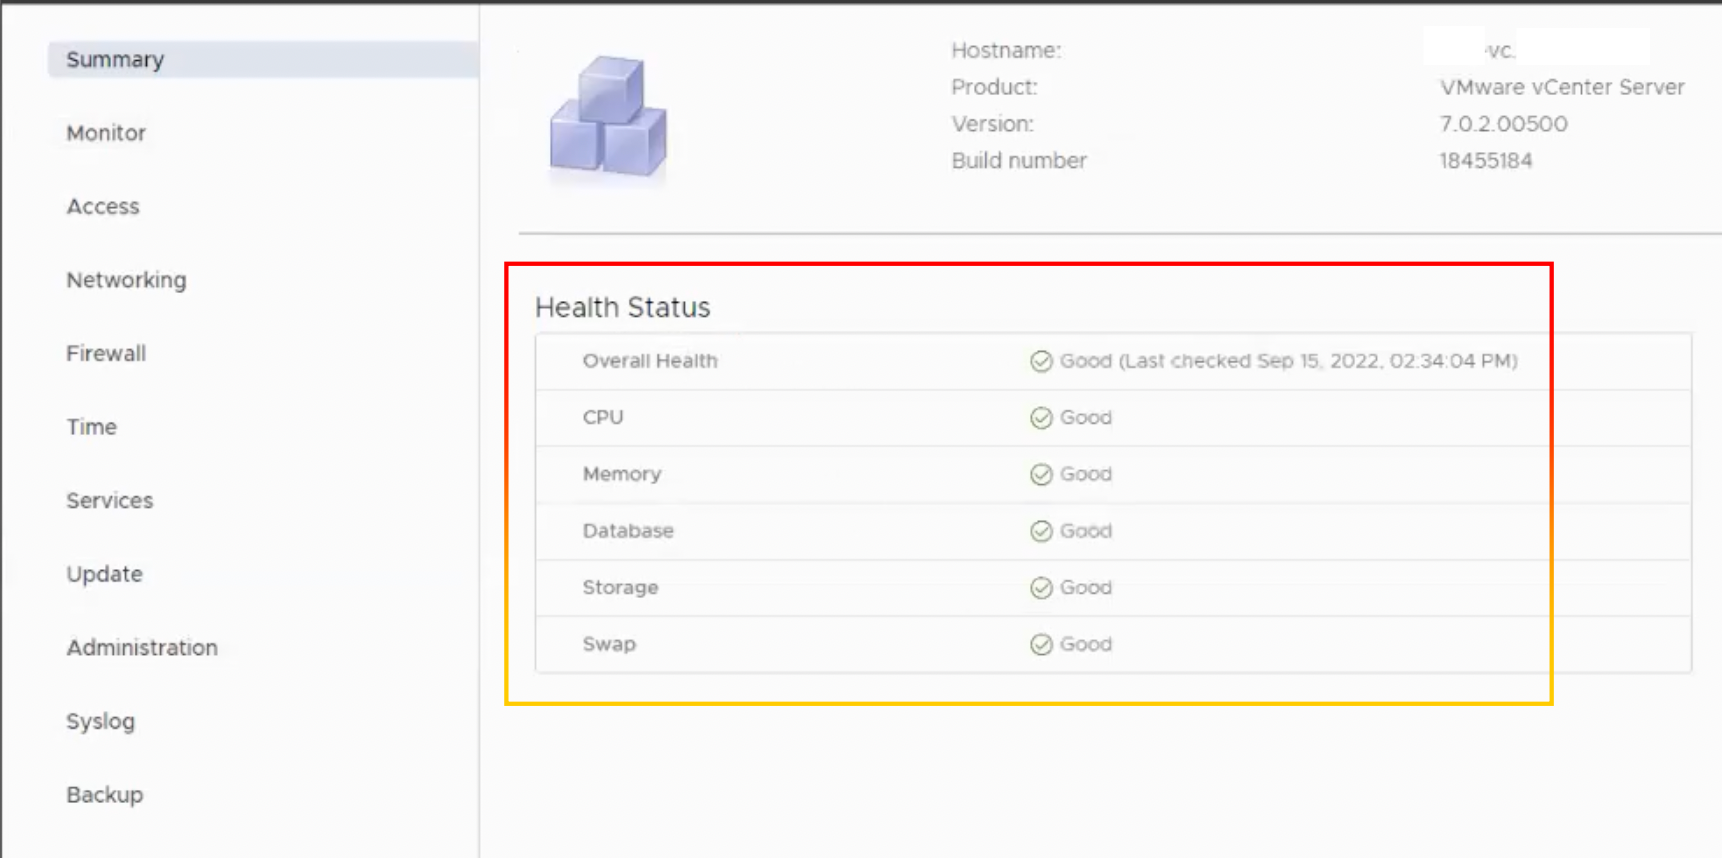
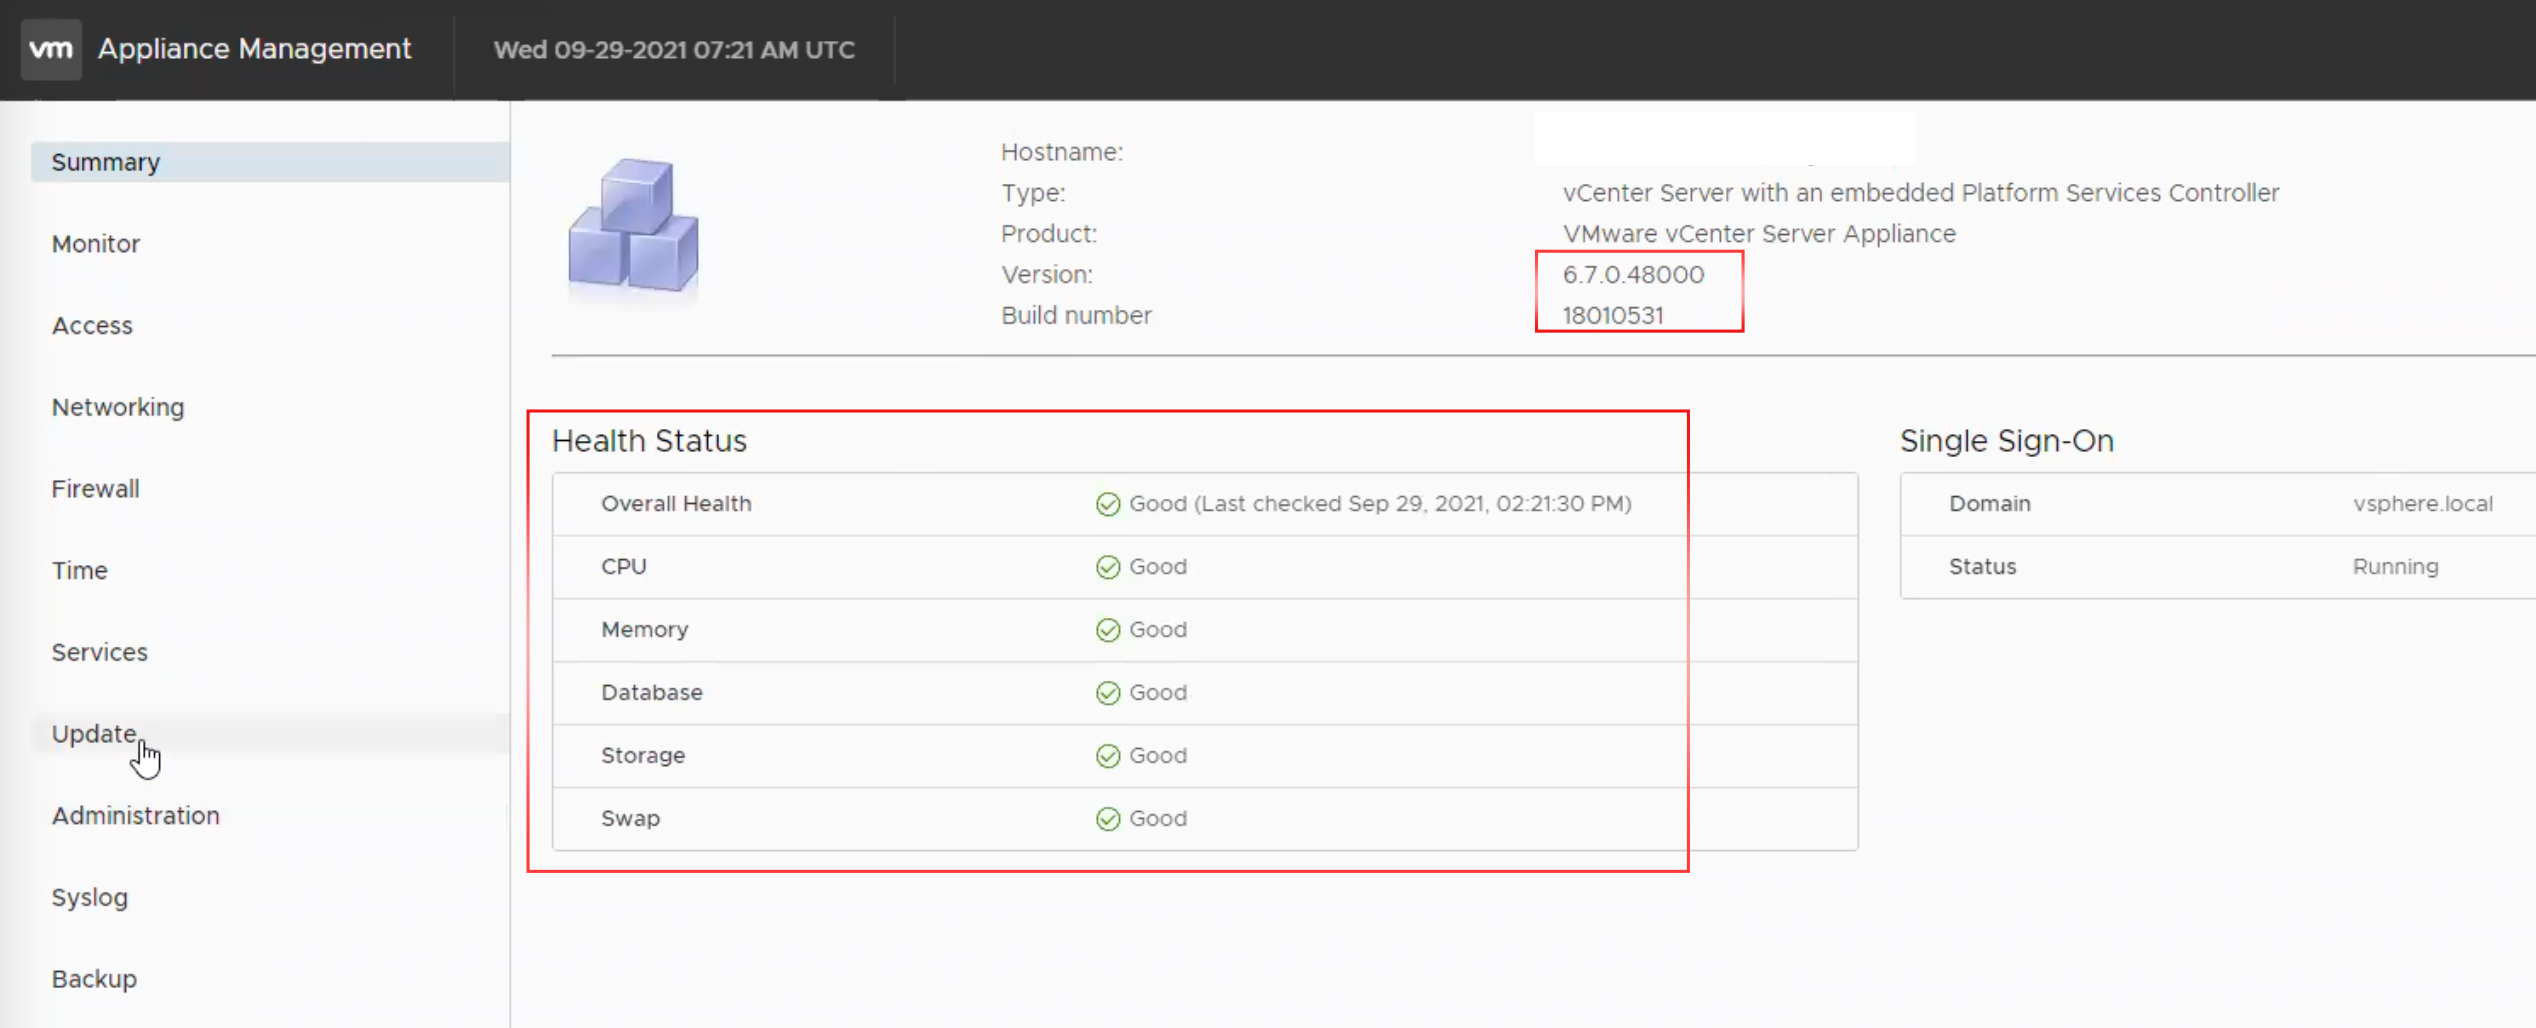
After login to vCenter Server appliance, go to summary and check on the “Health Status”.

We discovered that “Overall Health” displays a yellow alert warning on “Storage“.

Expand “Storage“, we found alert show “File system /storage/log is low on storage space increase the size of disk /storage/log

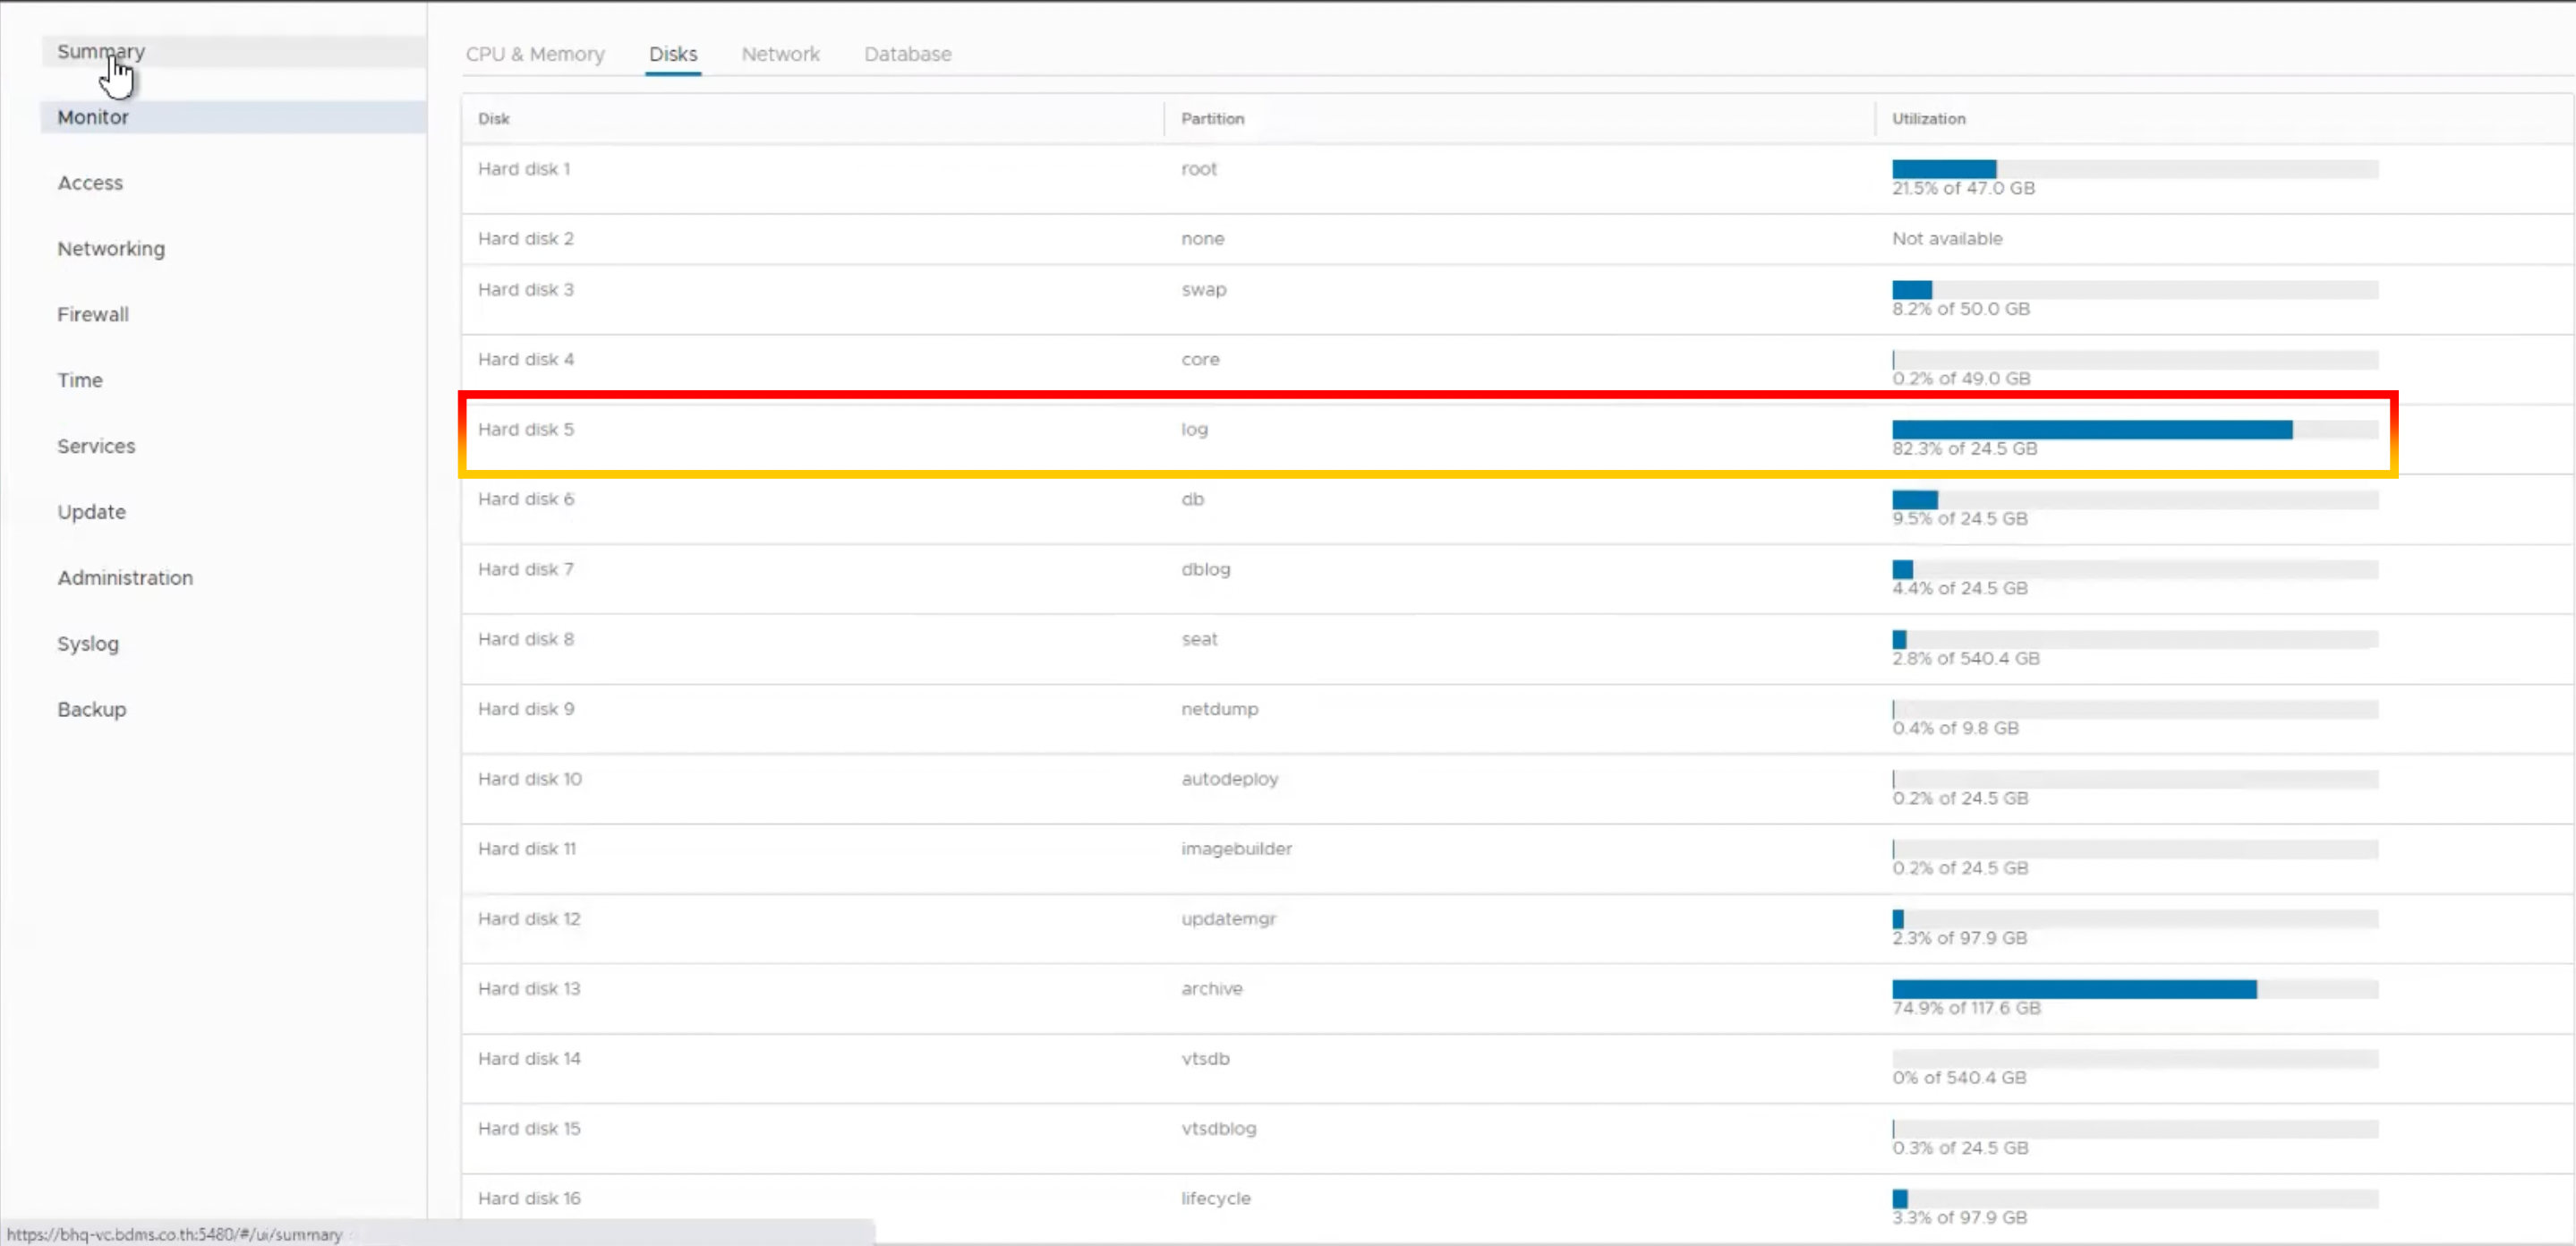
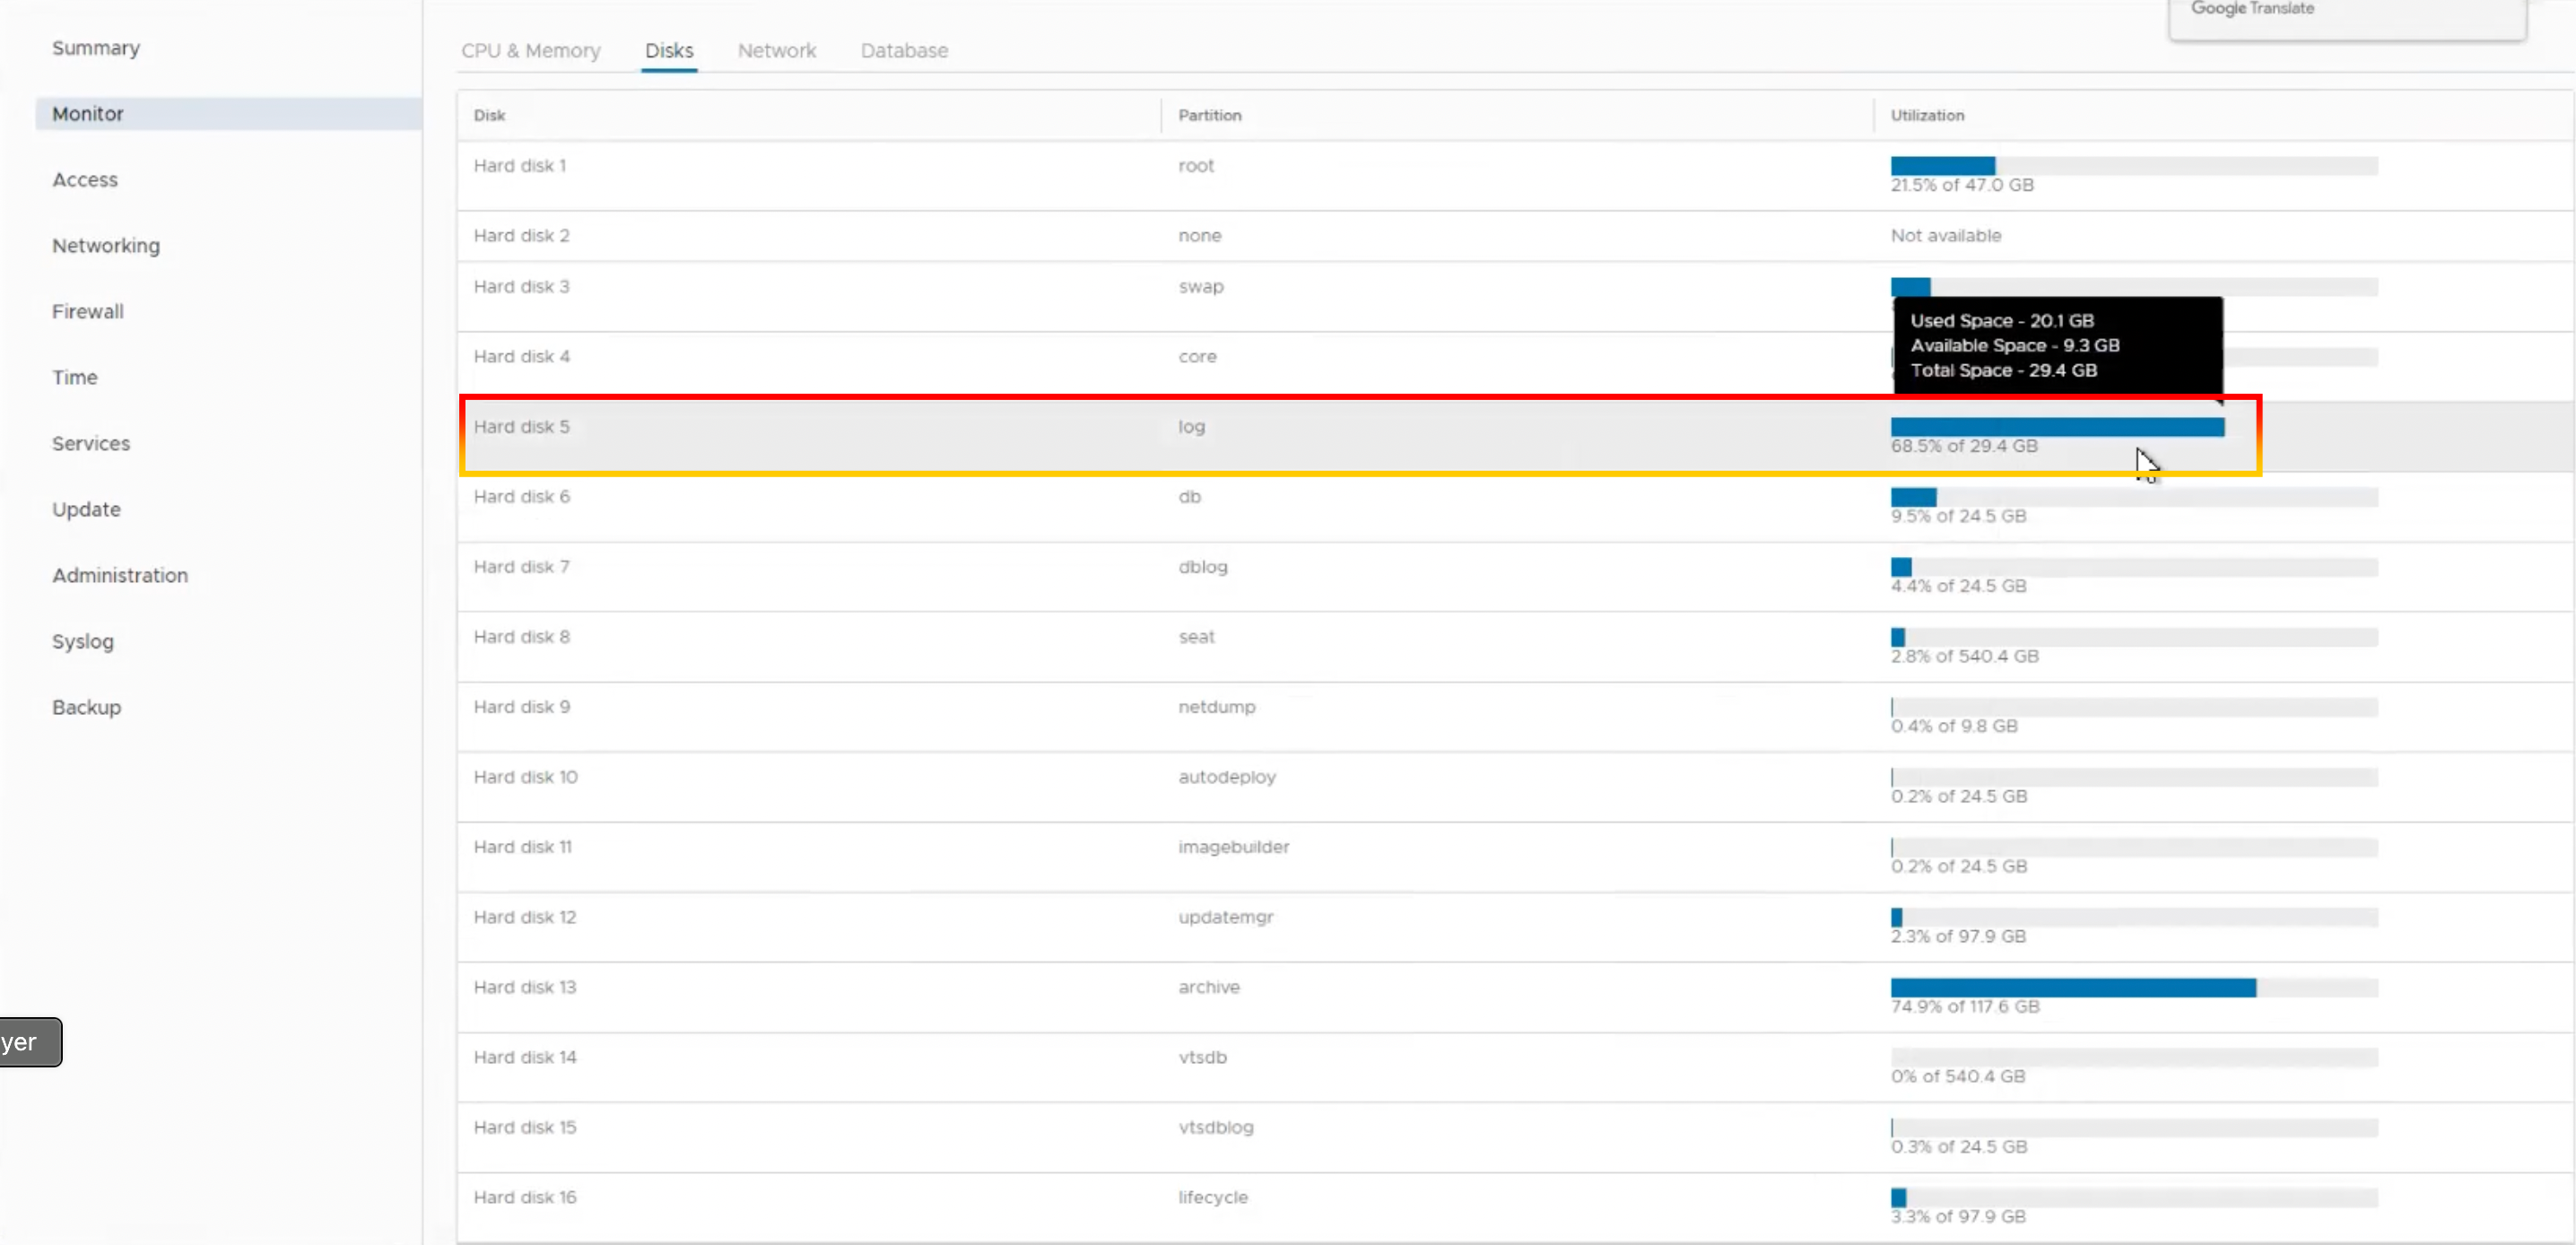
Go to “Monitor“, then “Disks“, and see which hard disks have alerts.

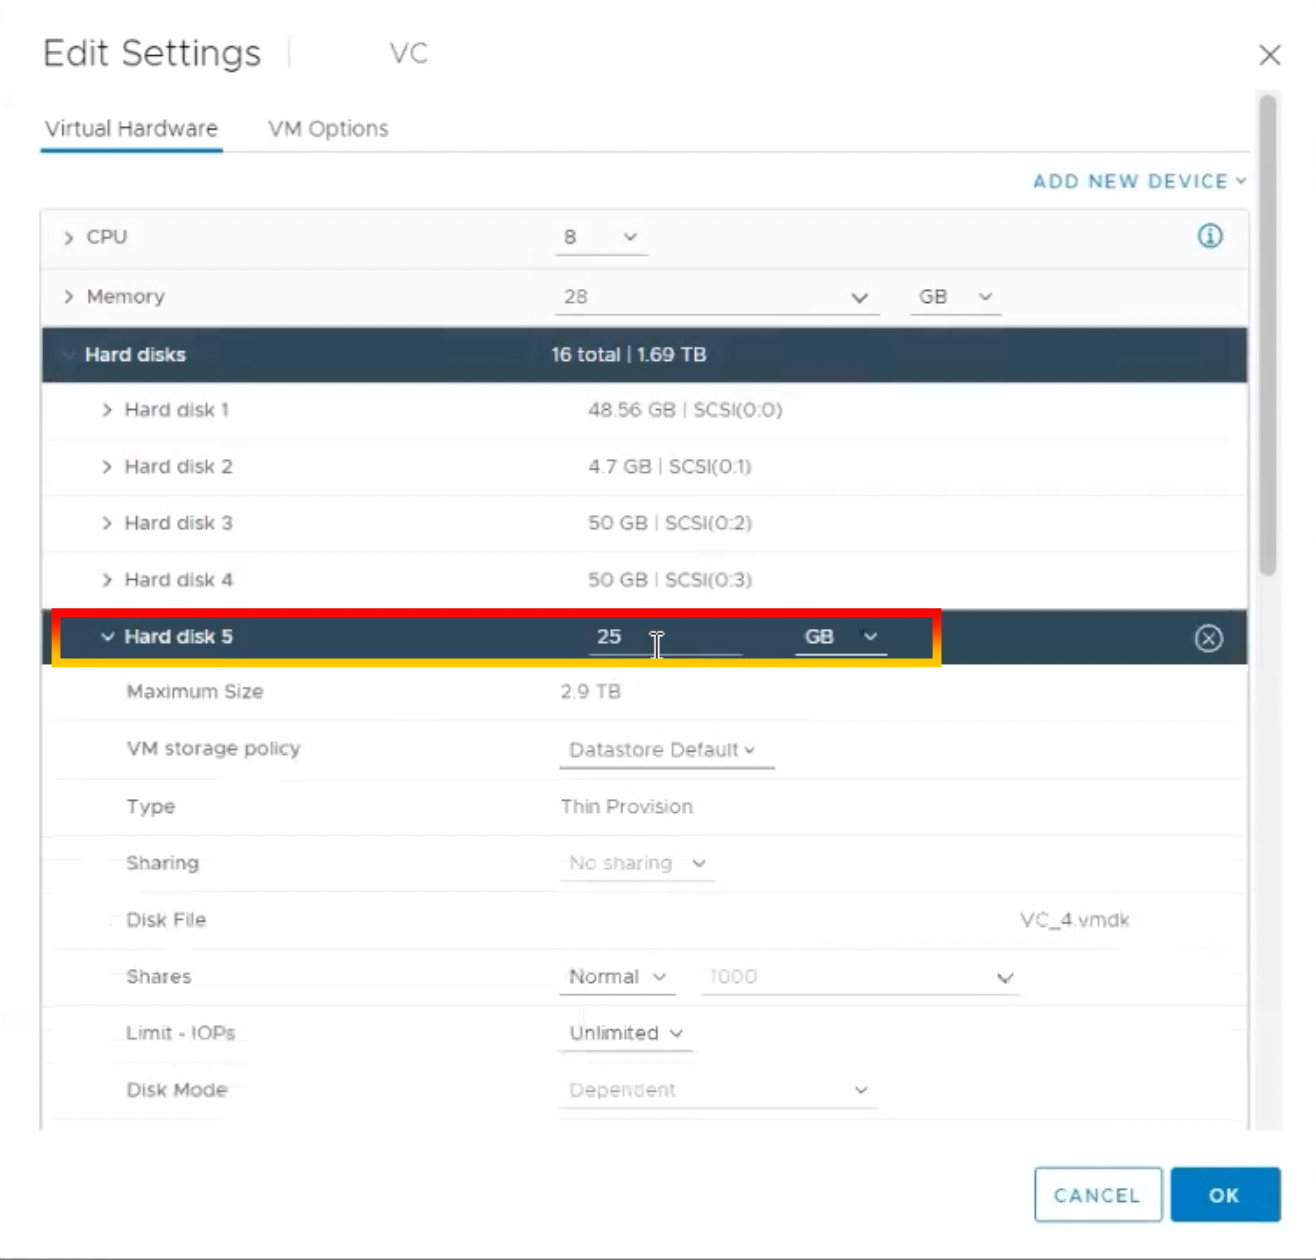
Hard drive 5 (log) has a utilization rate of more than 80%.

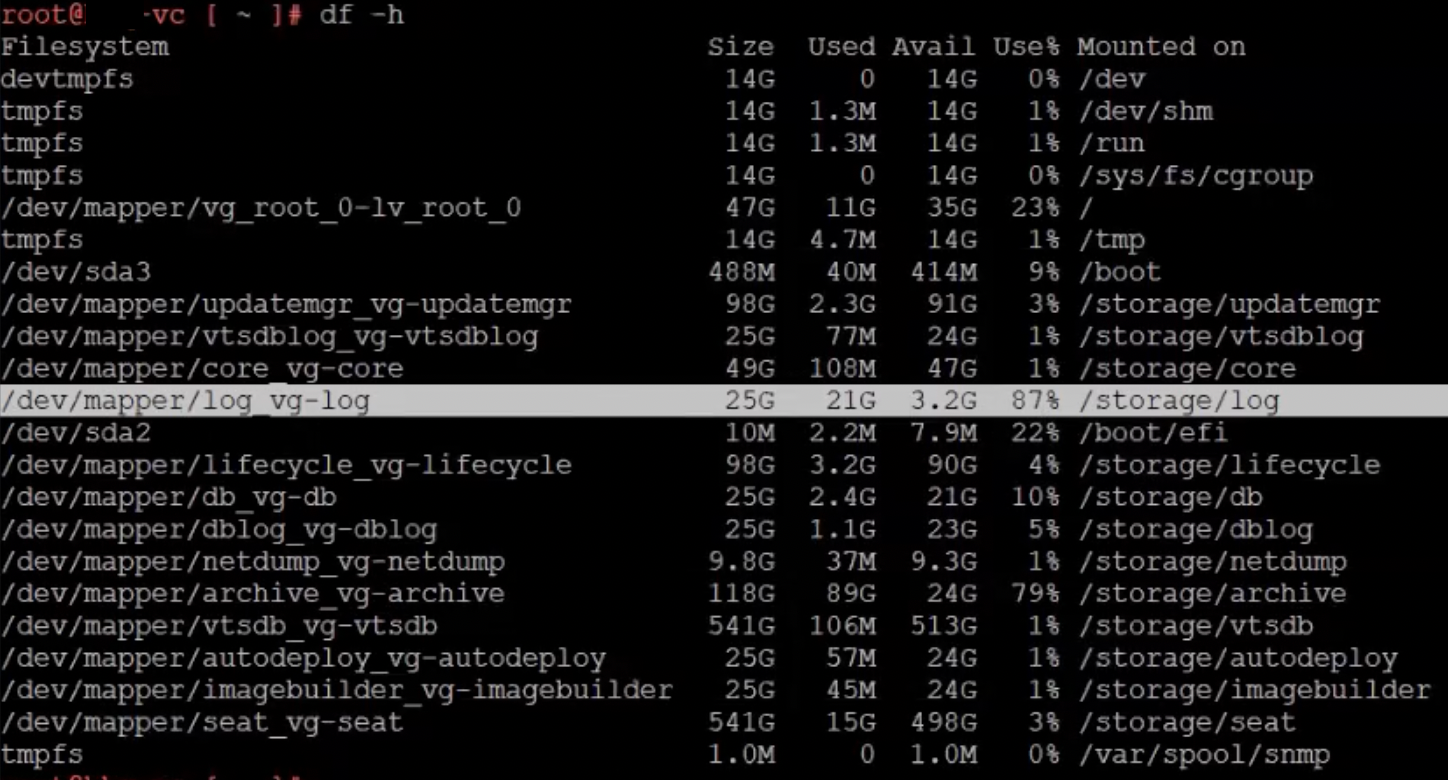
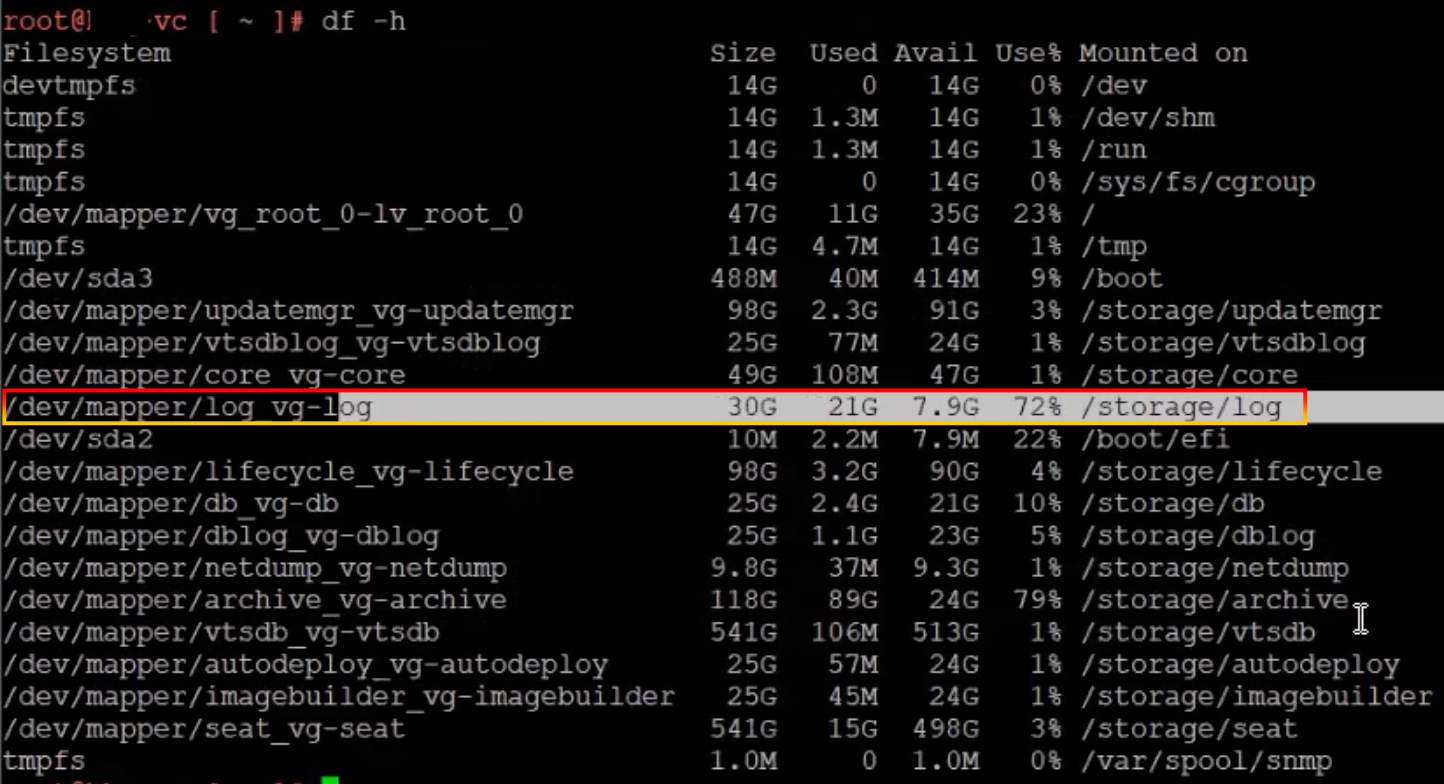
Run “df-h” command to display file system disk space statistics in “human-readable” format.

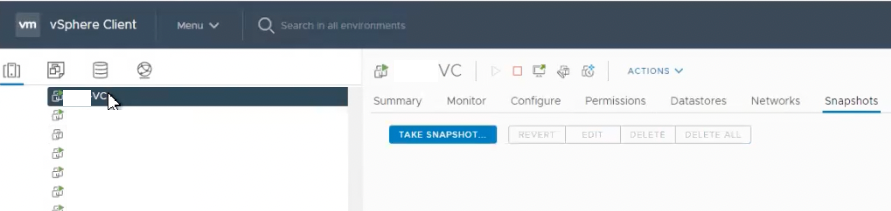
Return to the vCenter Server web client. There was no snapshot on the vCenter Server appliance.

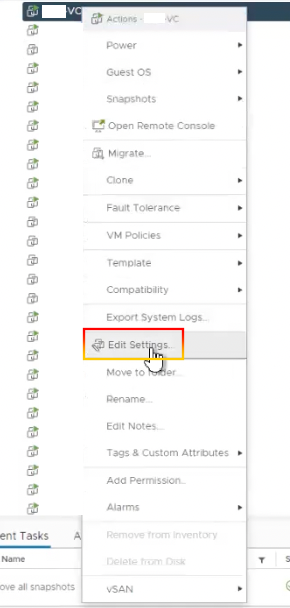
Right-click vCenter Server and choose “Edit Settings“.

Select Hard disks and expand Hard disk 5.

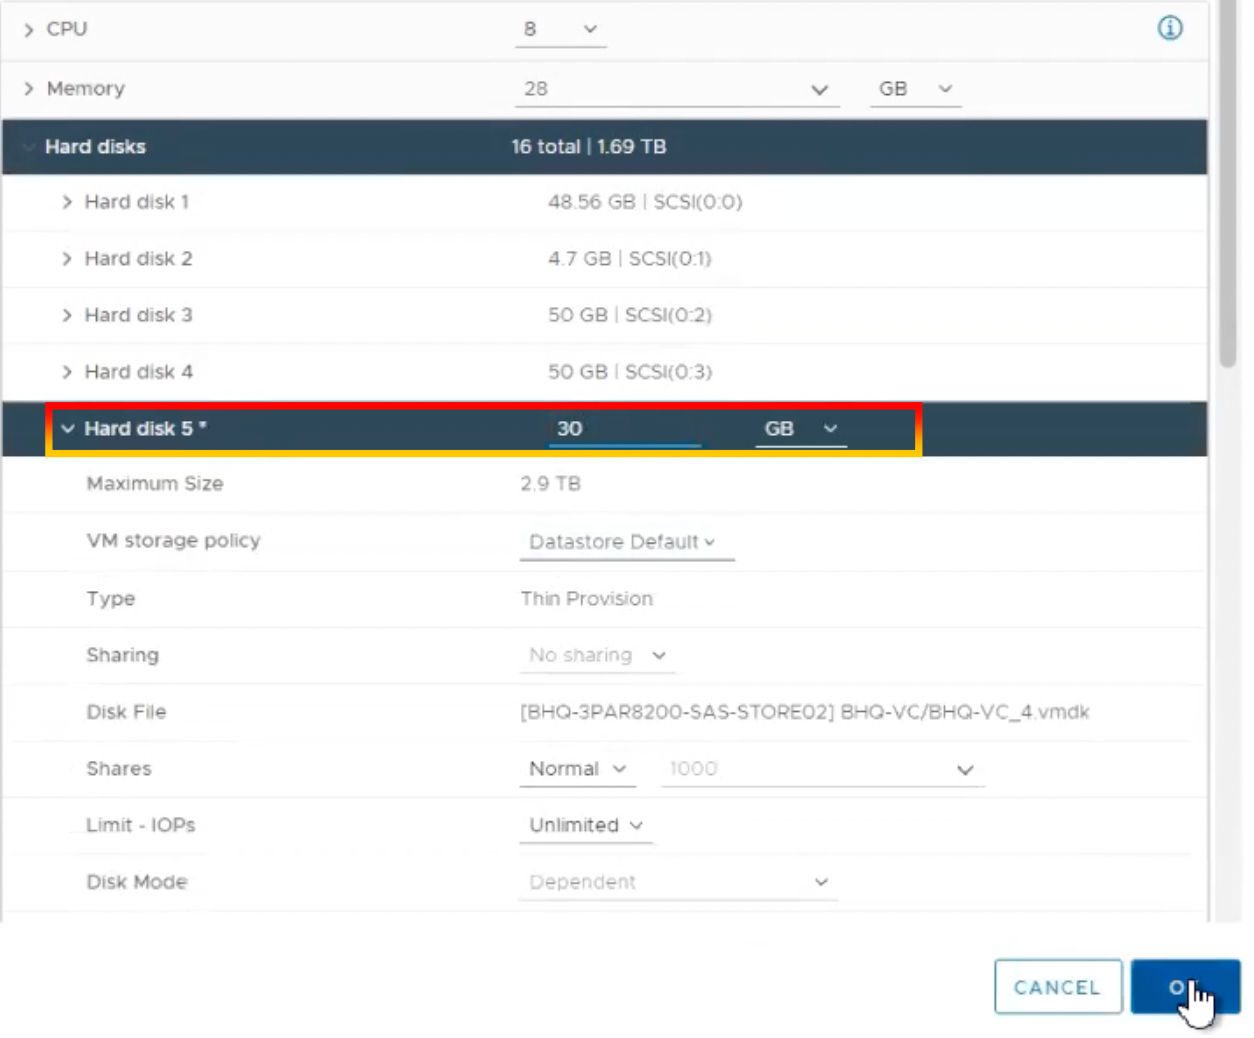
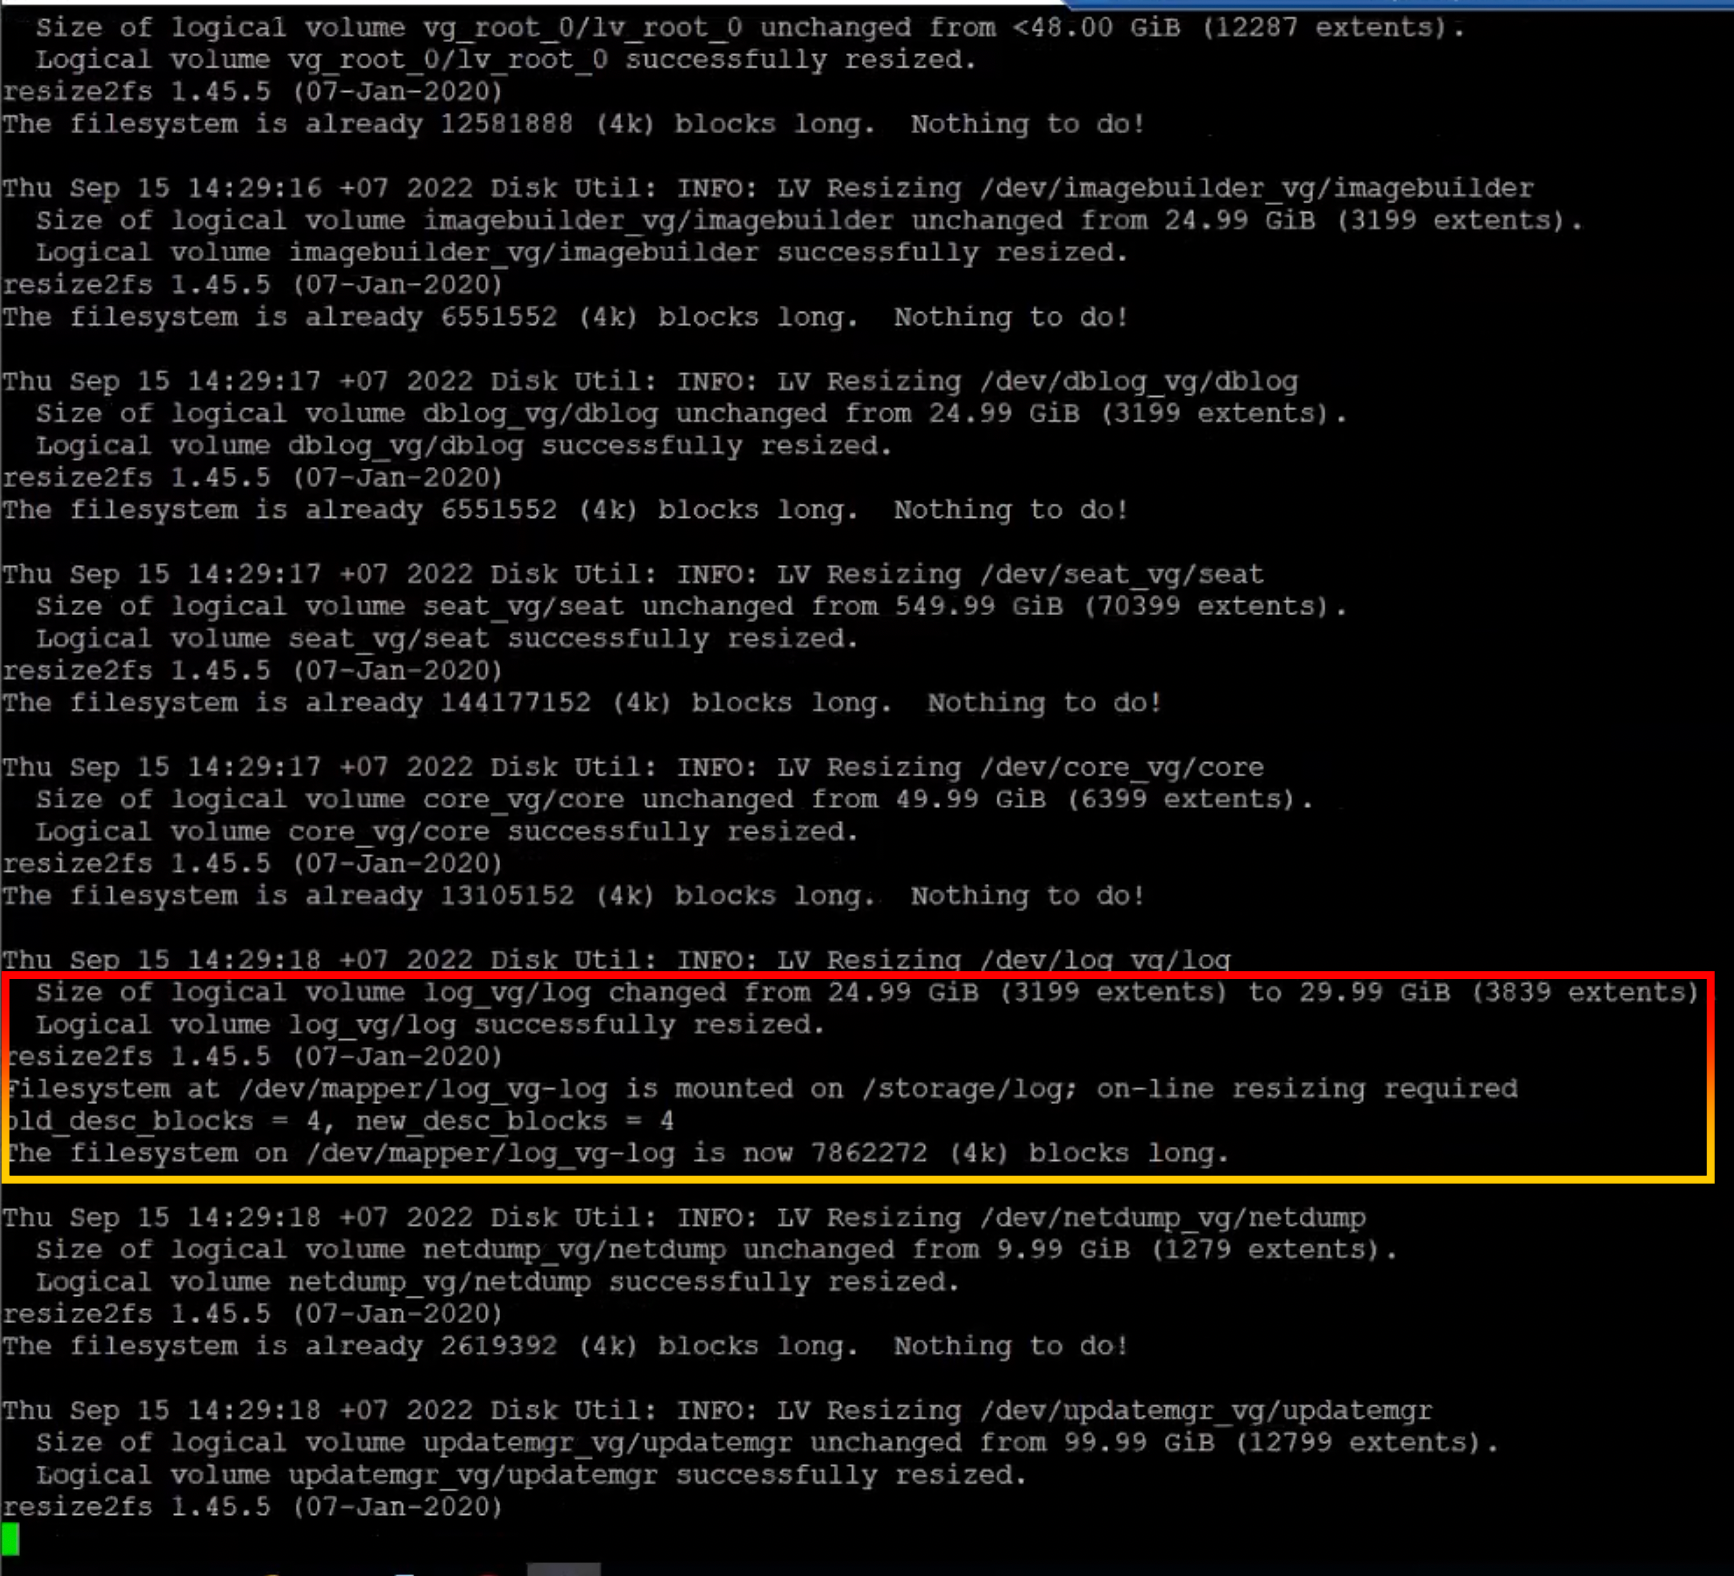
We will increase the size of hard disk 5 from 25 GB to 30 GB and then click OK.

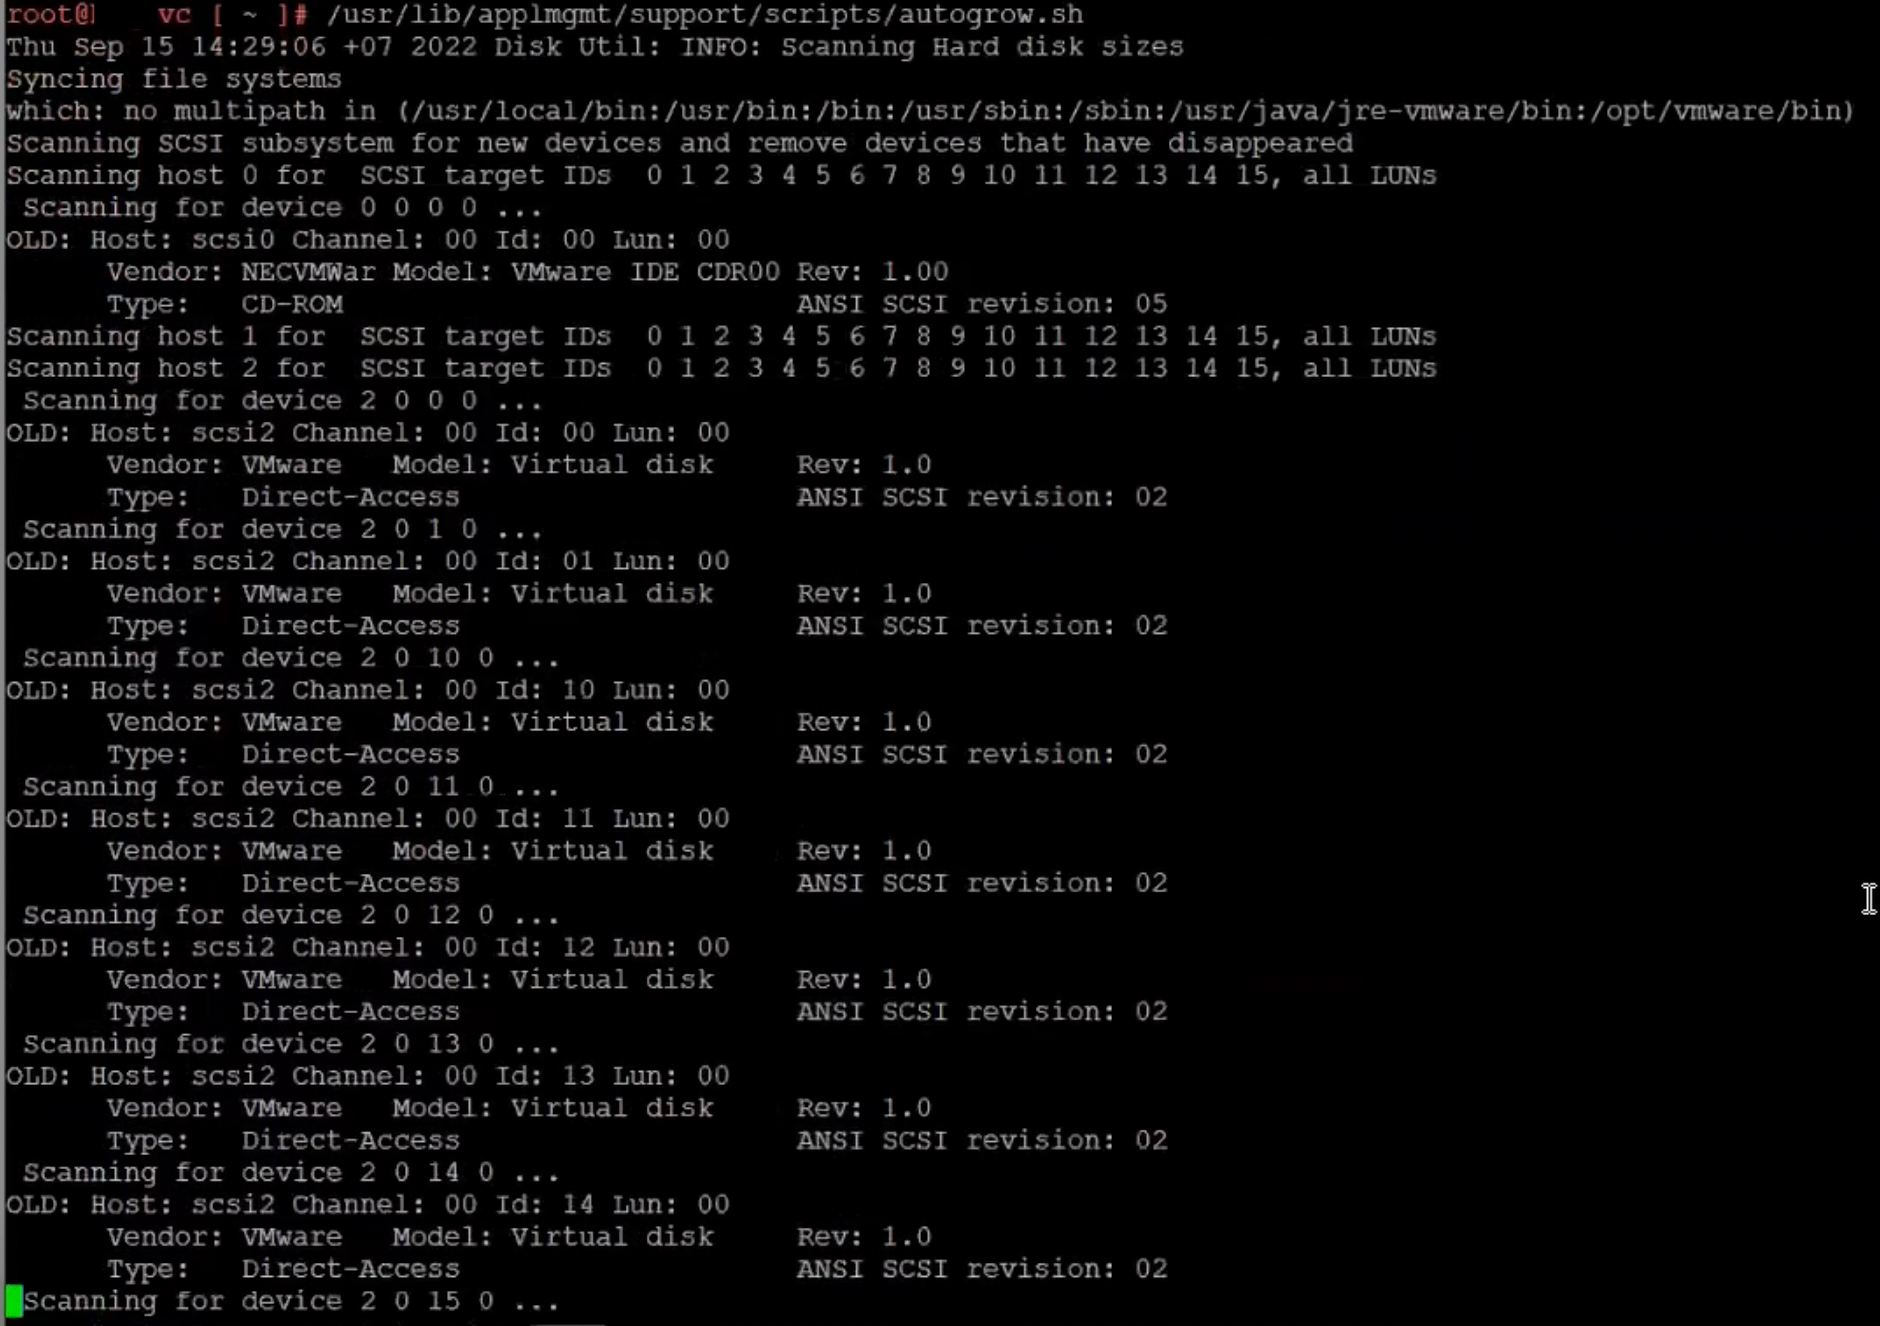
Log in to the vCenter Server Appliance through SSH.

User: root
Password: xxxx

Run this command to expand any logical volumes whose physical volumes have been increased (https://kb.vmware.com/s/article/2145603).

/usr/lib/applmgmt/support/scripts/autogrow.sh

Scripts will scan and expand disk volumes.

Logical volumes had been resized successfully.

Waiting for the procedure to complete.

Run df-h command to display file system disk space statistics in “human-readable” format.

Log in vCenter Server appliance VAMI page.

https://vCenter-Server-FQDN:5480

View the hard drive’s disk space of hard disk 5

The usage rate of hard disk 5 (log) is less than 80%.

The summary page indicates that the health status is good, and you can proceed to upgrade vCenter Server.

How to Resolve vCenter Server appliance 7.x- Expired Machine SSL Certificate?

By Lerpong Intaraworrapath | 15th September 2022

When we use the vSphere Web Client to connect to vCenter Server appliance 7.x. We are unable to access with the message “HTTP Status 500 – Internal Server Error.

Steps to resolving these issues.

1.SSH into the vCenter Server appliance.

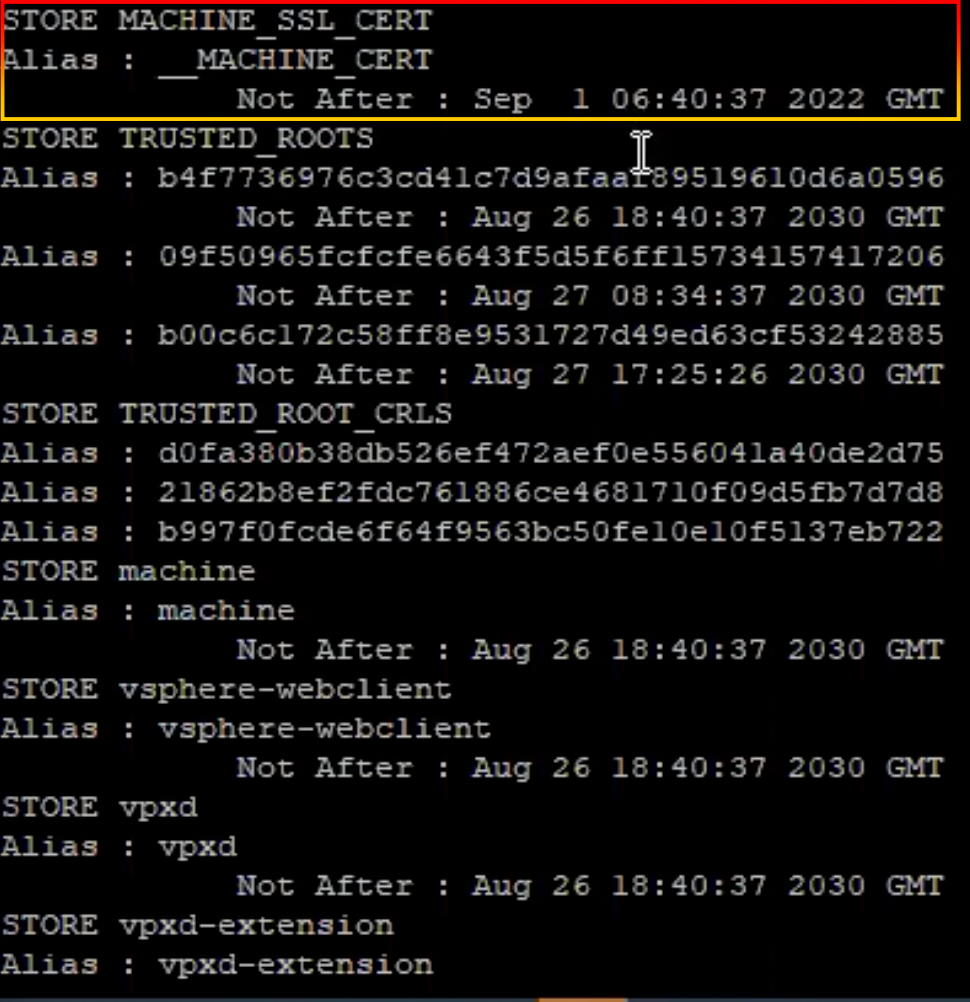
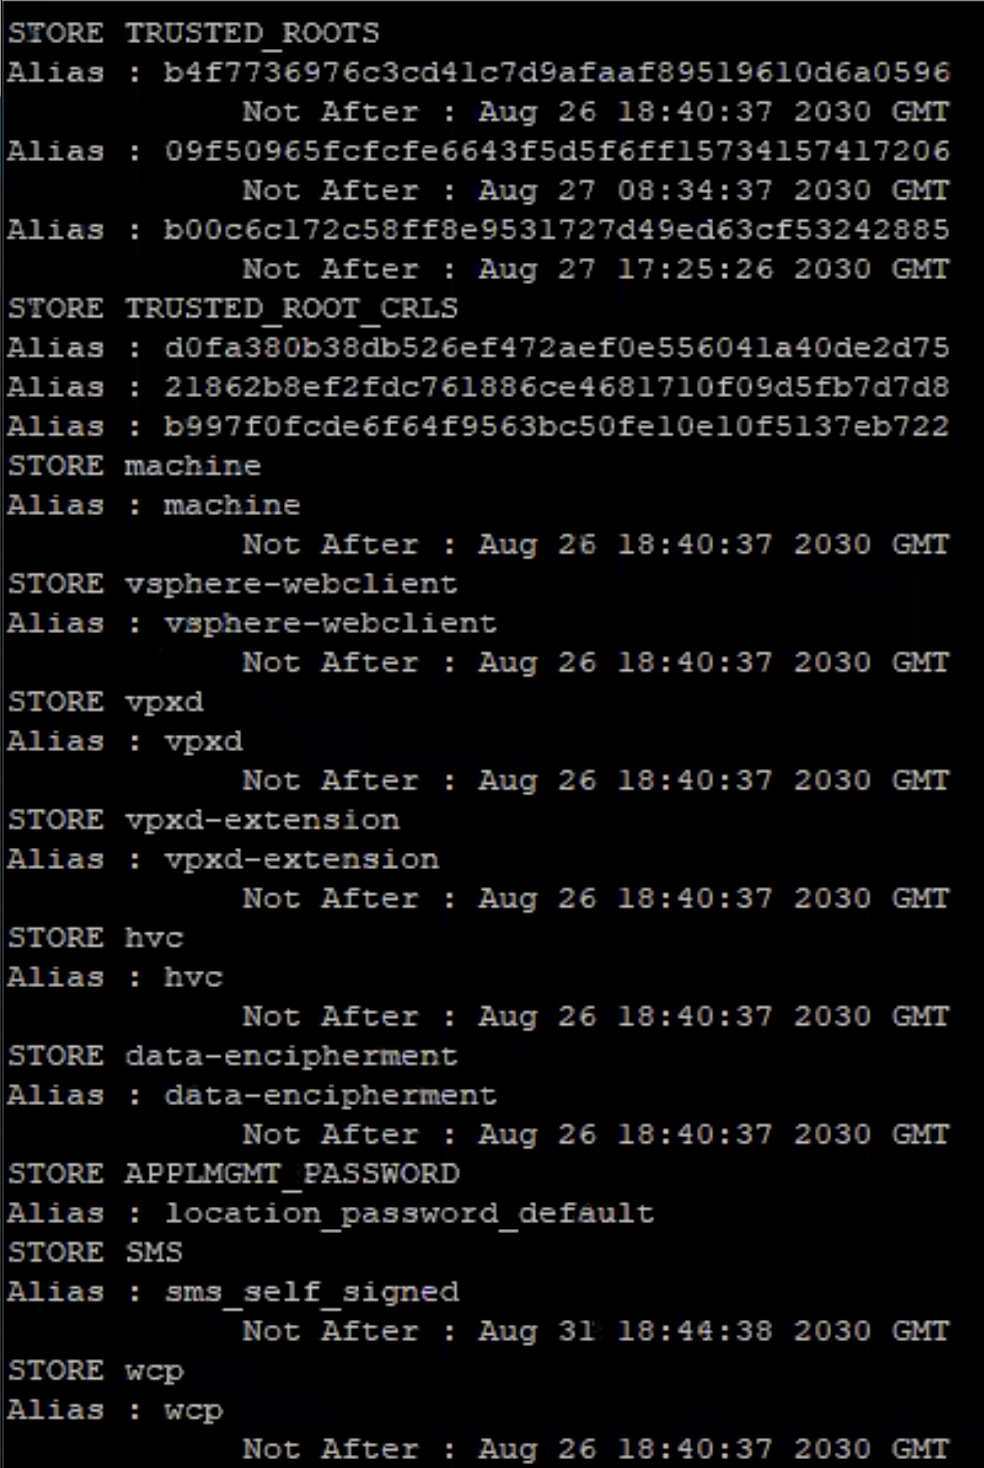
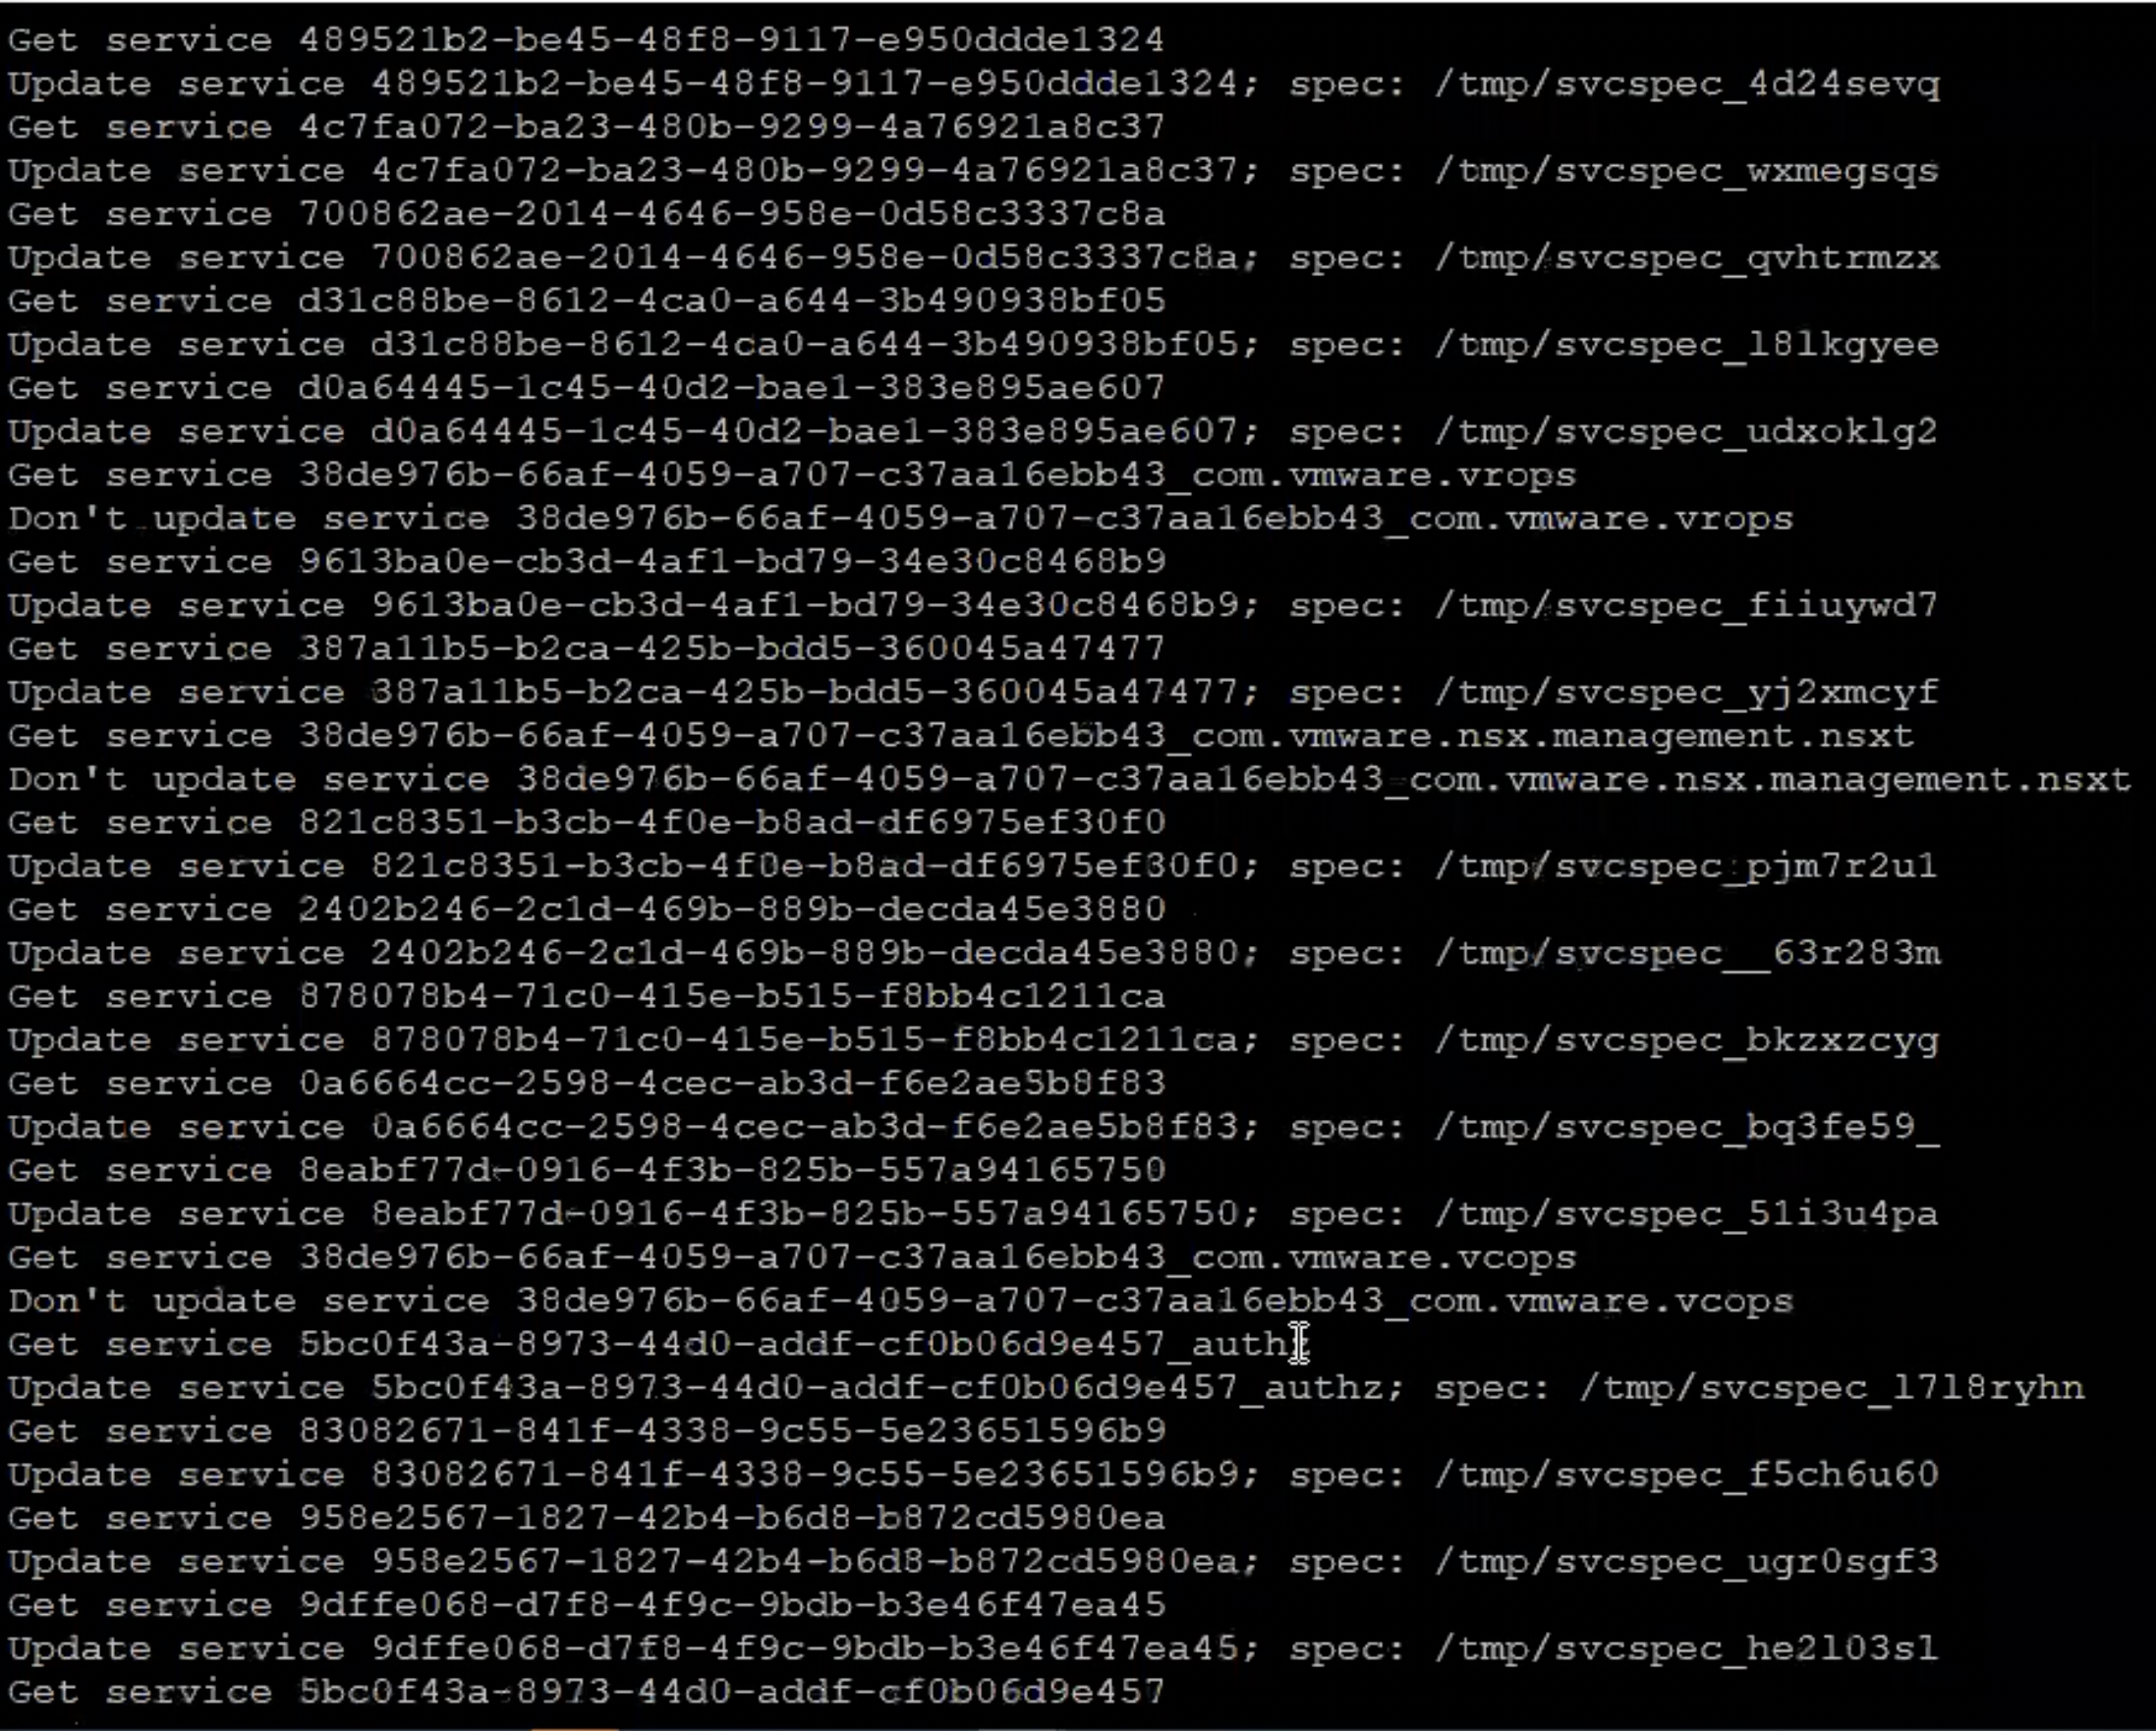
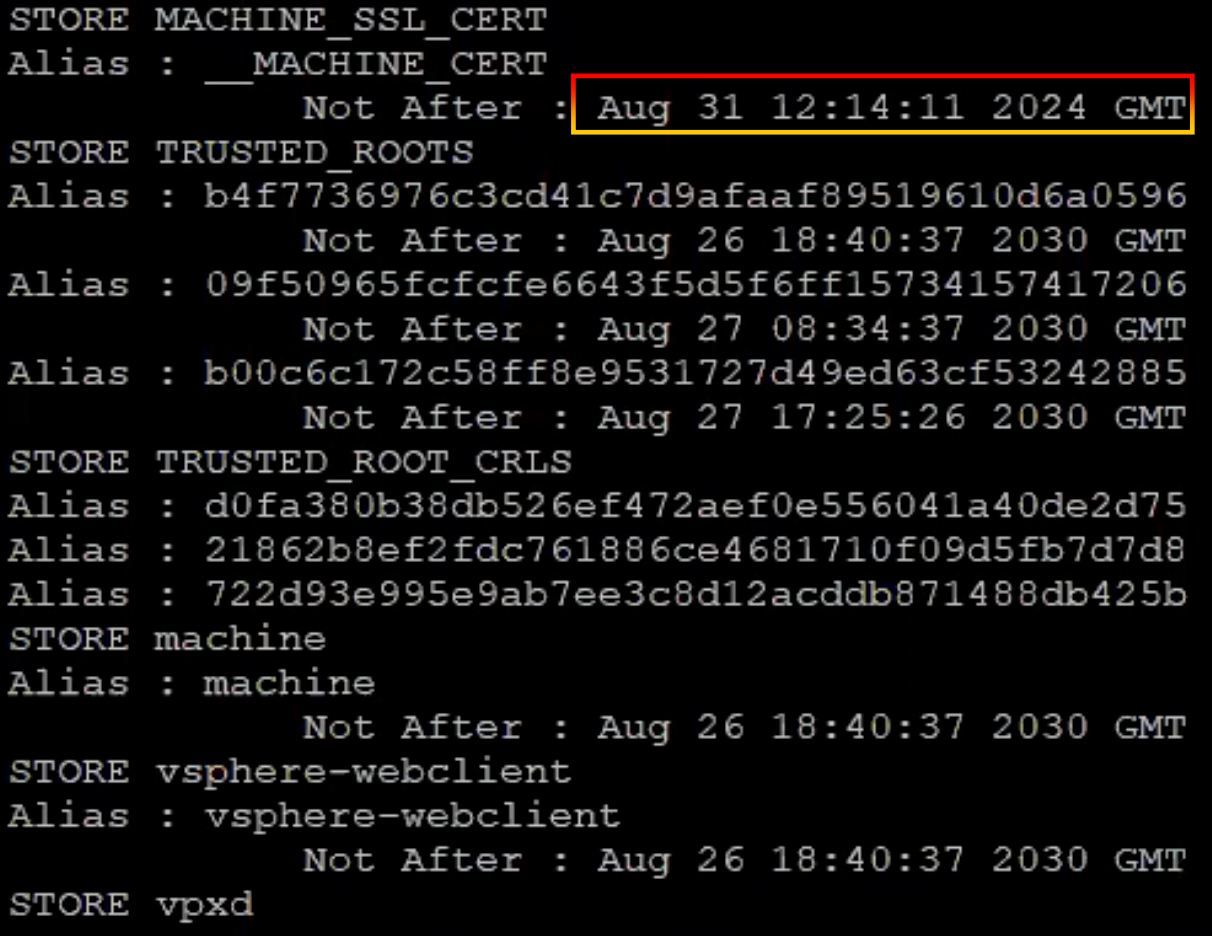
2.To see the status certificate expiration date, use the command below.
for i in $(/usr/lib/vmware-vmafd/bin/vecs-cli store list); do echo STORE $i; /usr/lib/vmware-vmafd/bin/vecs-cli entry list --store $i --text | egrep "Alias|Not After"; done

3.You will see an output similar to:

4.As you can see, the Machine SSL certificate expires on September 1 06:40:37 2022 GMT.

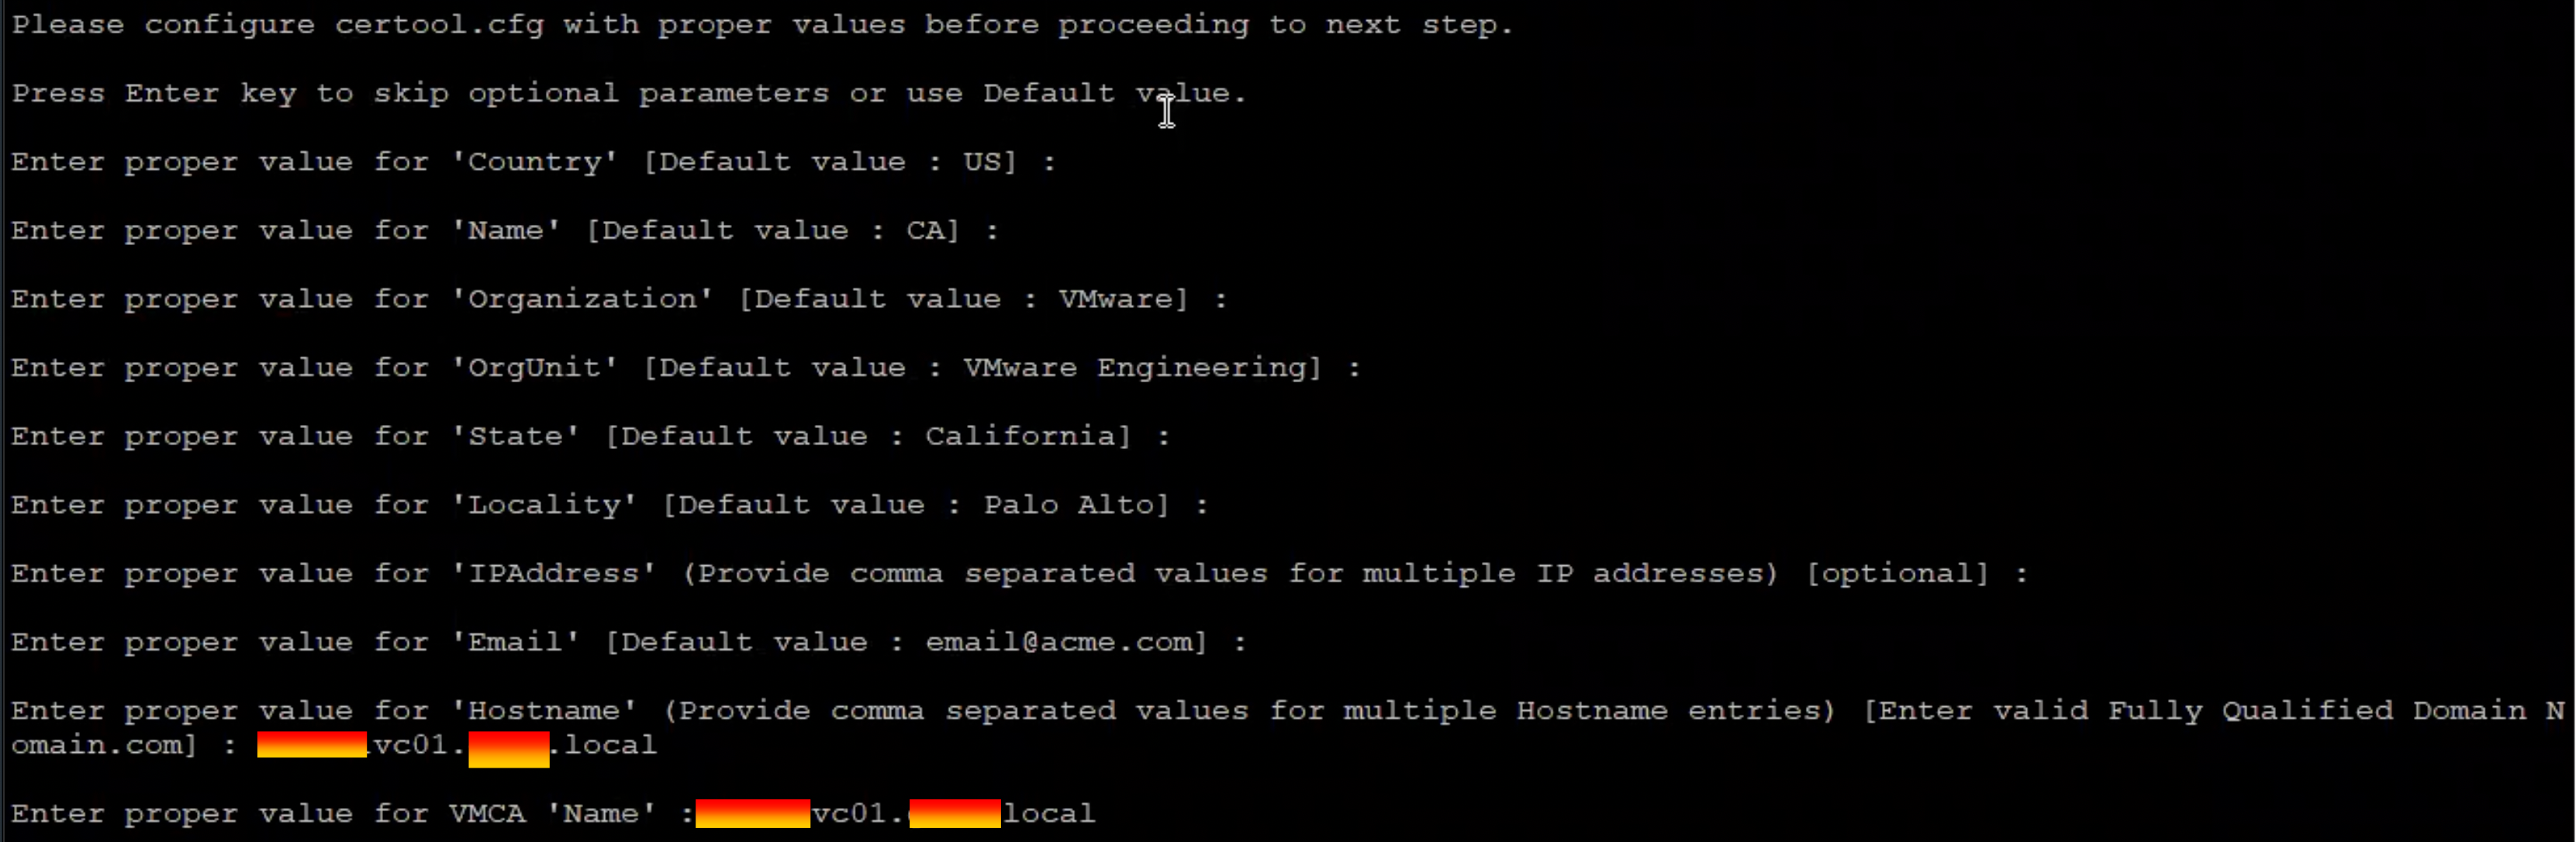
5.The Name, Hostname and VMCA values should match the PNID of the Node where you are replacing the Certificates. PNID should always match the Hostname. In order to obtain the PNID please run these commands:
/usr/lib/vmware-vmafd/bin/vmafd-cli get-pnid --server-name localhost

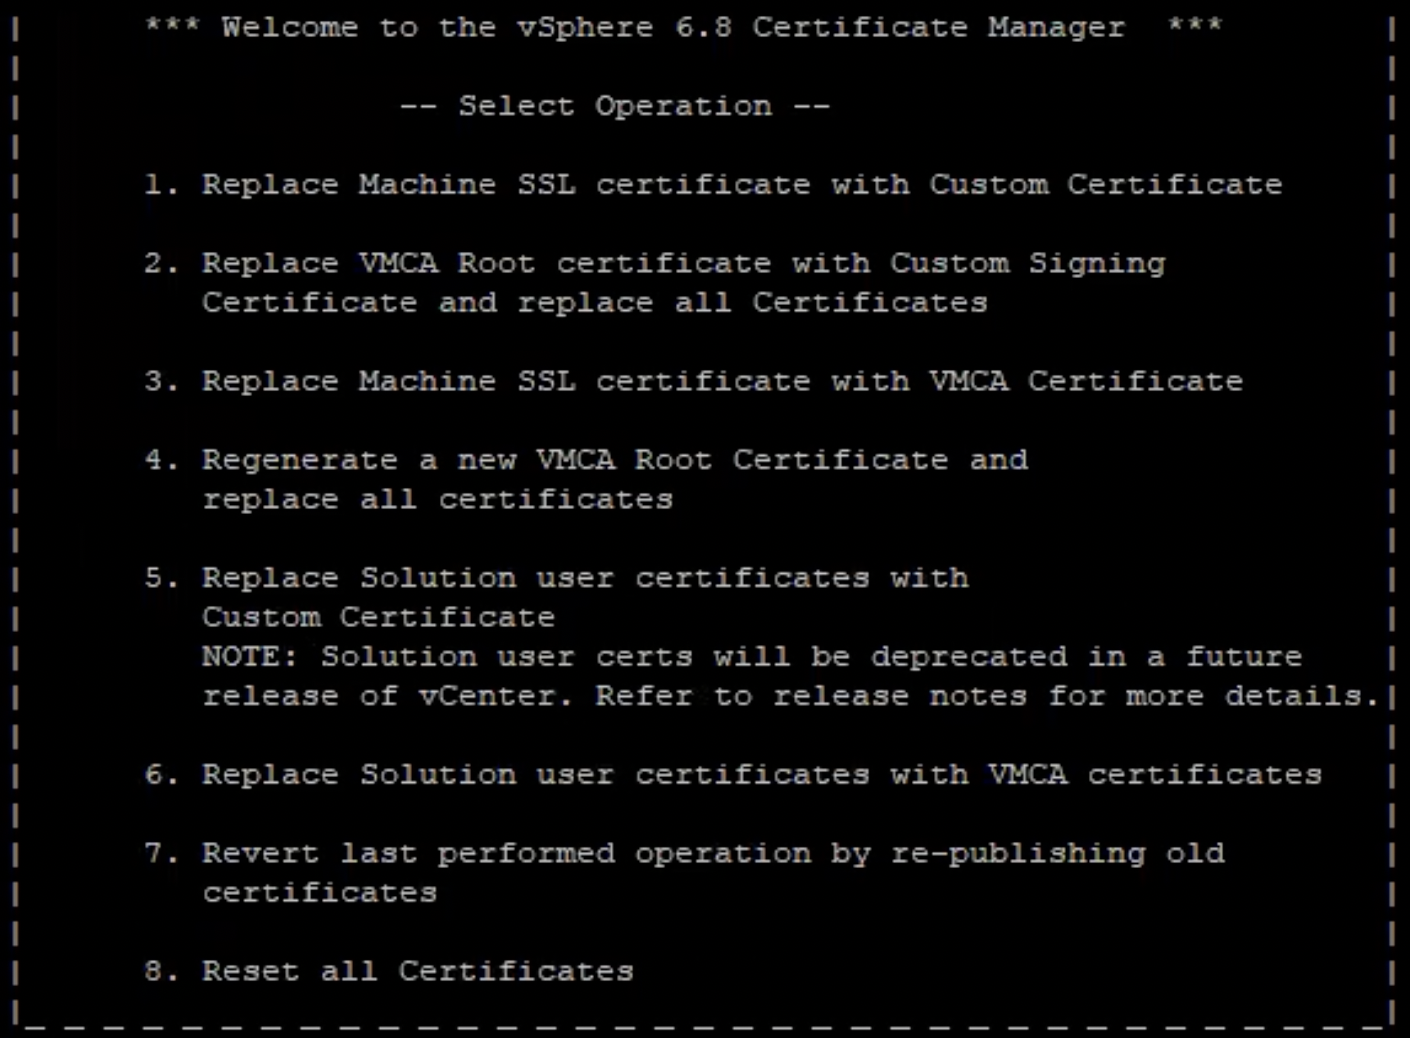
6.Run command below to replace “Machine SSL certificate”.
/usr/lib/vmware-vmca/bin/certificate-manager

7.You will have the option to replace or reset the certificate with in output.

Please keep in mind that this command may be used with both vCenter Server appliances 6.x and 7.x.

8.To replace Machine SSL certificate with VMCA Certificate, we choose option 3.

9.Provide credential

10.Enter these values as prompted by the VMCA (See Step 5 to confirm the Name/Hostname/VMCA):

11.To proceed, answer Yes (Y) to the confirmation request.

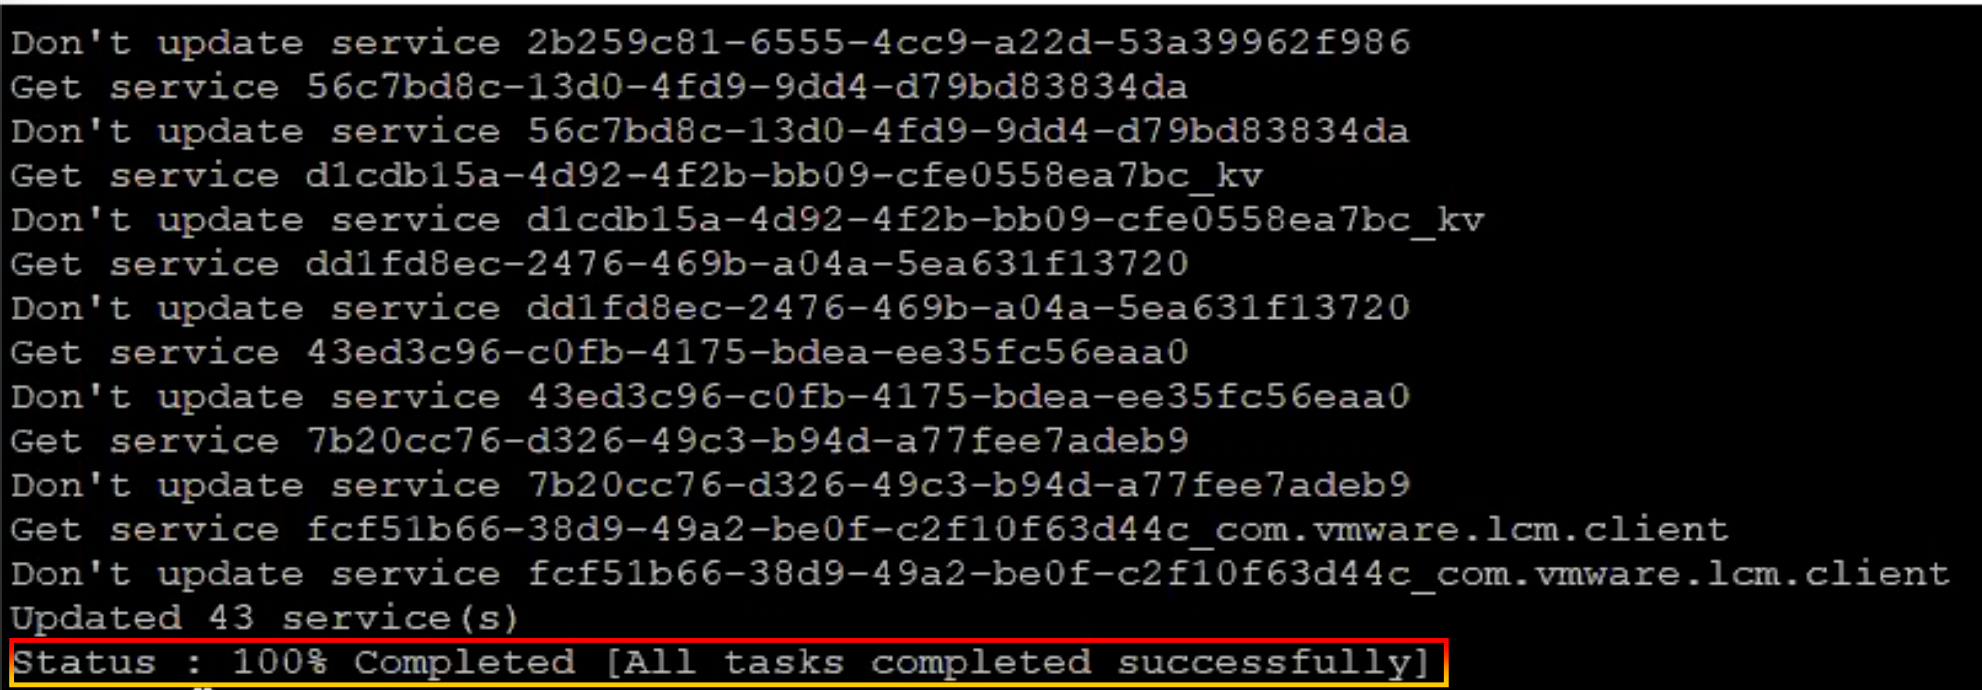
12.Wait till the status is 100% completed.

13.Re-run command to check Machine SSL certificate
for i in $(/usr/lib/vmware-vmafd/bin/vecs-cli store list); do echo STORE $i; /usr/lib/vmware-vmafd/bin/vecs-cli entry list --store $i --text | egrep "Alias|Not After"; done

14.Machine SSL certificate has been updated to August 31 12:14:11 2024 GMT.

Reference:

VMSA-2021-0028 | Workaround in vCenter Server virtual appliance (87081, 87088)

By Lerpong Intaraworrapath | January 6th, 2022

Workaround instructions to address CVE-2021-44228 and CVE-2021-45046 in vCenter Server and vCenter Cloud Gateway (87081)

ในบทความนี้ เราจะมาทำ workaround ในการแก้ปัญหา instructions to address CVE-2021-44228 and CVE-2021-45046 in vCenter Server virtual appliance 7.x, 6.7.x, 6.5.x โดยจะ followup วิธีการ จาก KB87081 และ KB87088

https://kb.vmware.com/s/article/87081?lang=en_US
https://kb.vmware.com/s/article/87088

Note: ในส่วนของ Product อื่นของ VMware และ ข้อมูล CVE-2021-44228 and CVE-2021-45046 ให้ อ่านได้จาก VMSA-2021-0028

Impact / Risks

  • ให้ทำการ remove VCHA ก่อนทำการ run script.
  • environment ที่มี external PSCs จะต้องทำการ run script ทั้ง vCenter และ PSC appliances.
  • Restore จาก File-Based Backup จะทำให้ environment กลับสู่ vulnerable. ให้ใช้ vc_log4j_mitigator.py หลังจาก restore.
  • อัปเกรด vCenter Appliance จะทำให้ environment กลายเป็น vulnerable. ให้ใช้ vc_log4j_mitigator.py หลังจาก อัปเกรด vCenter Appliance.

Resolution

Workaround ในบทความนี้เป็น Temporary solution เท่านั้น.

Completed remediation scenarios:

จะมี 3 วิธีในการทำ workaround สำหรับ vCenter server virtual appliance. ให้เลือกทำ วิธีใดวิธีหนึ่งเท่านั้น

  1. Used vc_log4j_mitigator.py from KB87081.
  2. Used vmsa-2021-0028-kb87081.py script from KB 87088 and remove_log4j_class.py from this KB87081.
  3. Used the manual workaround steps in KB87081 and remove_log4j_class.py.

Note: ในบทความนี้ จะใช้ วิธีที่ 2Used vmsa-2021-0028-kb87081.py script from KB 87088 and remove_log4j_class.py from this KB87081.
โดยจะเป็น vCenter server virtual appliance version 7.0.1.00301

Workaround

Automated Workaround (Recommended)

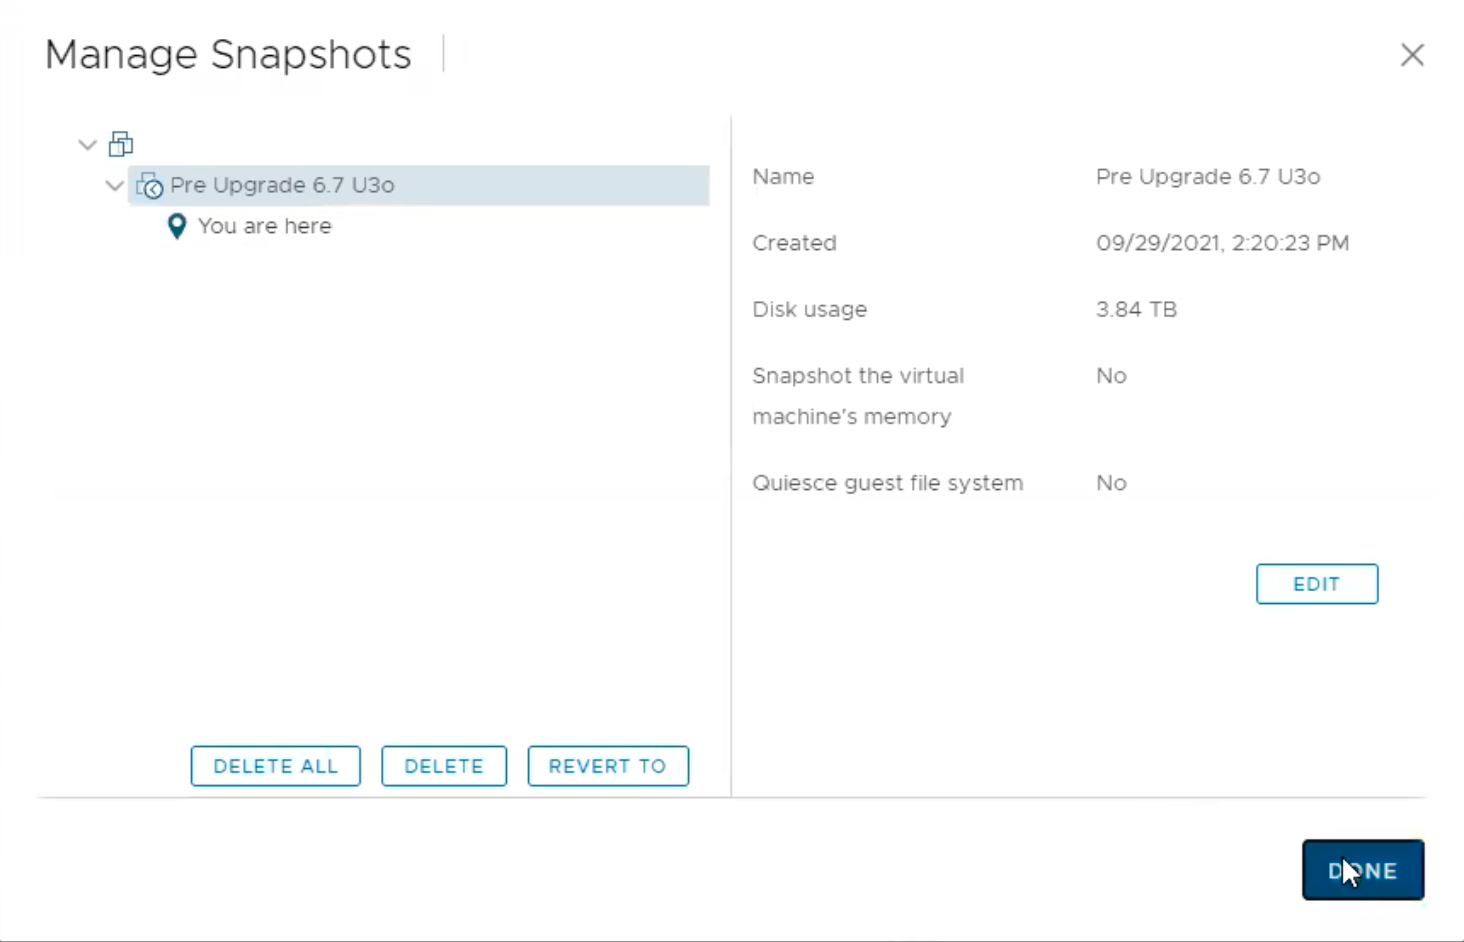
  1. ทำการ take snapshot “vCenter server virtual appliance”.
  2. ทำการ check disk space available by command “df-h” (capture screen ไว้ด้วย).
  3. ทำการ check vCenter server service by command “service-control –status –all” (capture screen ไว้ด้วย).
  4. Download the script attached this KB 87088 (vmsa-2021-0028-kb87081.py )

5. Login to the vCSA using an SSH Client (using Putty.exe or any similar SSH Client)

6. Login to the vCSA using an SSH Client (using Putty.exe or any similar SSH Client)

7. Transfer the file to /tmp folder on vCenter Server Appliance using WinSCP
Note: It’s necessary to enable the bash shell before WinSCP will work

8. Provide the root user name and password when prompted.

9. Run this command to enable the Bash shell:
shell.set --enable True

10. Run this command to access the Bash shell:
shell

11. In the Bash shell, run this command to change the default shell to Bash:
chsh -s /bin/bash root

12. ทำการ copy ไฟล์ vmsa-2021-0028-kb87081.py และ remove_log4j_class.py โดยใช้ WinSCP ไปเก็บไว้ที่ /tmp

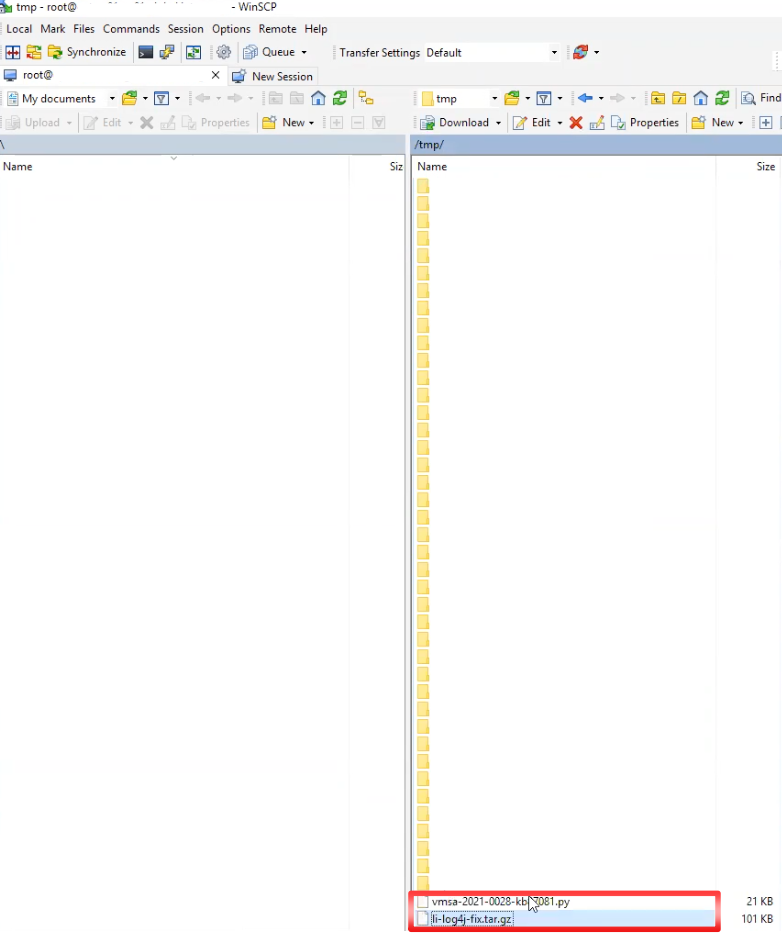
13. ทำการ Login to the vCSA using an SSH Client (using Putty.exe or any similar SSH Client) แล้วเข้าไปที่ path /tmp ใช้ “ls” command ทำการตรวจสอบไฟล์ ที่เราทำการ upload เข้าไป

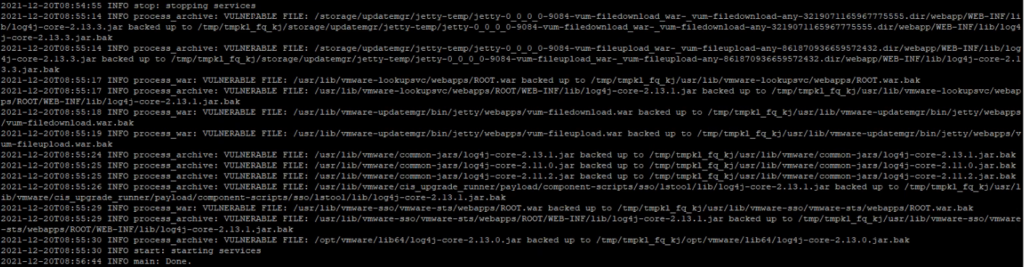
14. ทำการ run script vmsa-2021-0028-kb87081.py
root@xxxx[/tmp]#python vmsa-2021-0028-kb87081.py

15. พิมพ์ Y แล้วกด Enter

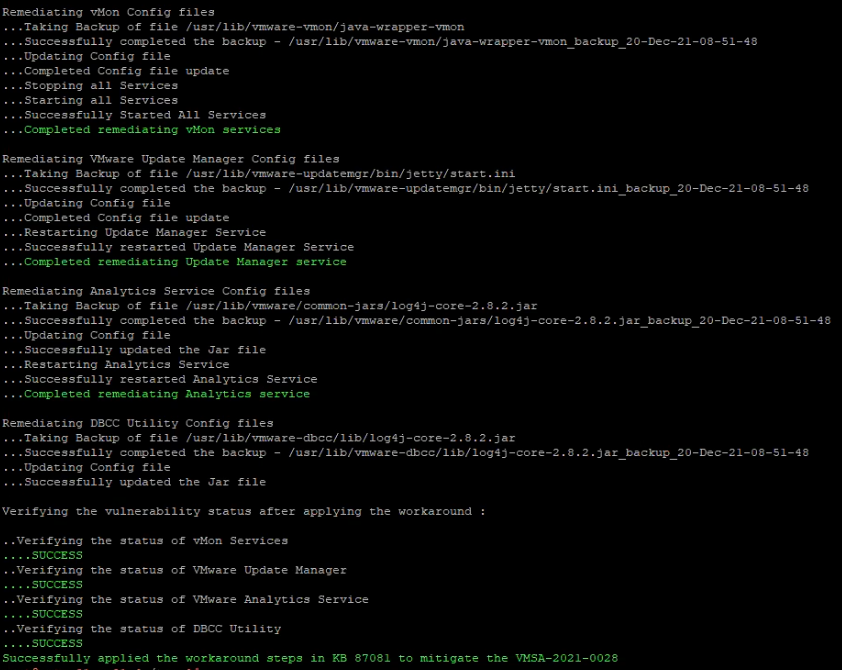
16. Script ก็จะทำการ run process เพื่อจะทำ workaround เกี่ยวกับ CVE-2021-44228 and CVE-2021-45046 (ใช้เวลา10 นาที โดยประมาณ).
โดย script ก็จะแสดง status ของแต่ละ process และที่สำคัญจะต้องแสดงผล “SUCCESS”
-vMON Config files
-VMware Update Manager Config files
-Analytics service Config files
-DBCC Utility Config files

17. เมื่อทำการ run script แรก เสร็จเรียบร้อยแล้วให้ เรา run script ตัวที่ 2 คือ remove_log4j_class.py from this KB87081.
root@xxxx[/tmp]#python remove_log4j_class.py

18. พิมพ์ Y แล้วกด Enter

19. Script ก็จะทำการ run process เพื่อจะทำ workaround เกี่ยวกับ CVE-2021-44228 and CVE-2021-45046 (ใช้เวลา10 นาที โดยประมาณ).โดย script ก็จะแสดง status ของแต่ละ process

Verify the changes

เมื่อเราทำการ run script ทั้ง 2 scripts completed แล้วให้เราทำ การ ตรวจสอบให้แน่ใจว่า script ที่เรา run นั้นถูกต้อง

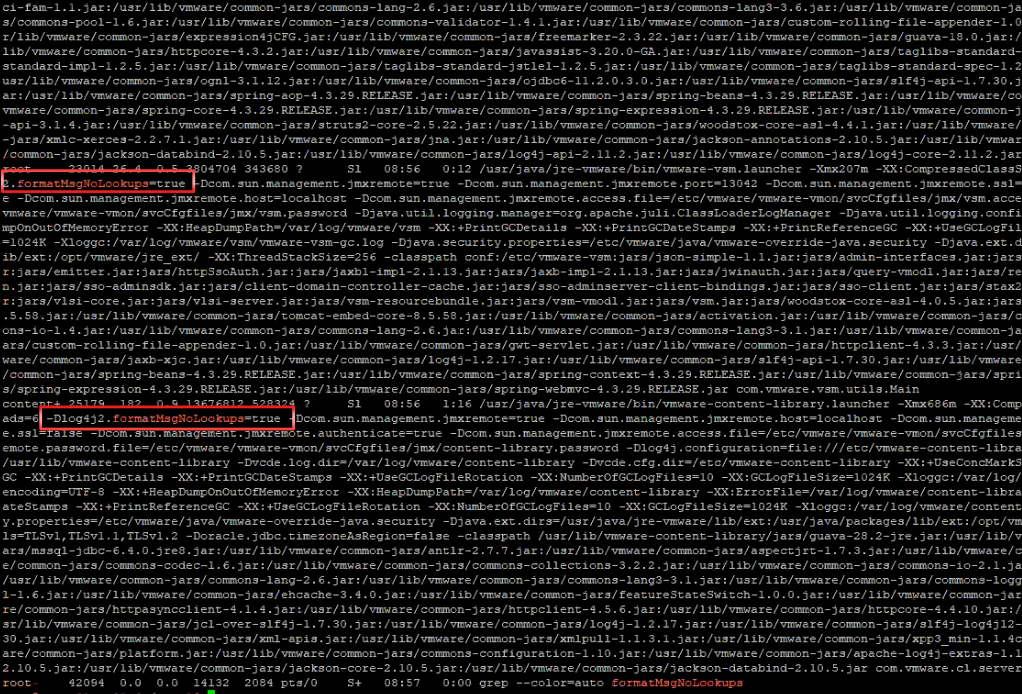
  1. Verify if the stsd, idmd, and vMon controlled services were started with the new -Dlog4j2.formatMsgNoLookups=true parameter:
    ps auxww | grep formatMsgNoLookups

โดย จะแสดง ผล -Dlog4j2.formatMsgNoLookups=true

2. Verify the Update Manager changes are shown under “System Properties” in the output of the following two commands:
cd /usr/lib/vmware-updatemgr/bin/jetty/
java -jar start.jar --list-config
system properties:
log4j2.formatMsgNoLookups = true (/usr/lib/vmware-updatemgr/bin/jetty/start.ini)

3. Verify the Analytics Service changes:
grep -i jndilookup /usr/lib/vmware/common-jars/log4j-core-2.8.2.jar | wc -l
โดย จะแสดงค่า “0

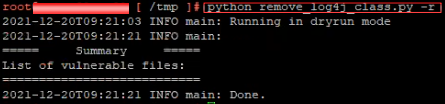
4. Verify the script successfully removed JndiLookup.class from all java files with the following command:
python remove_log4j_class.py -r

จะได้ผลลัพธ์ ดังนี้
2021-12-18T00:04:38 INFO main: Running in dryrun mode
2021-12-18T00:05:04 INFO main:
===== Summary =====
List of vulnerable files:
2021-12-18T00:05:04 INFO main: Done.

Remark

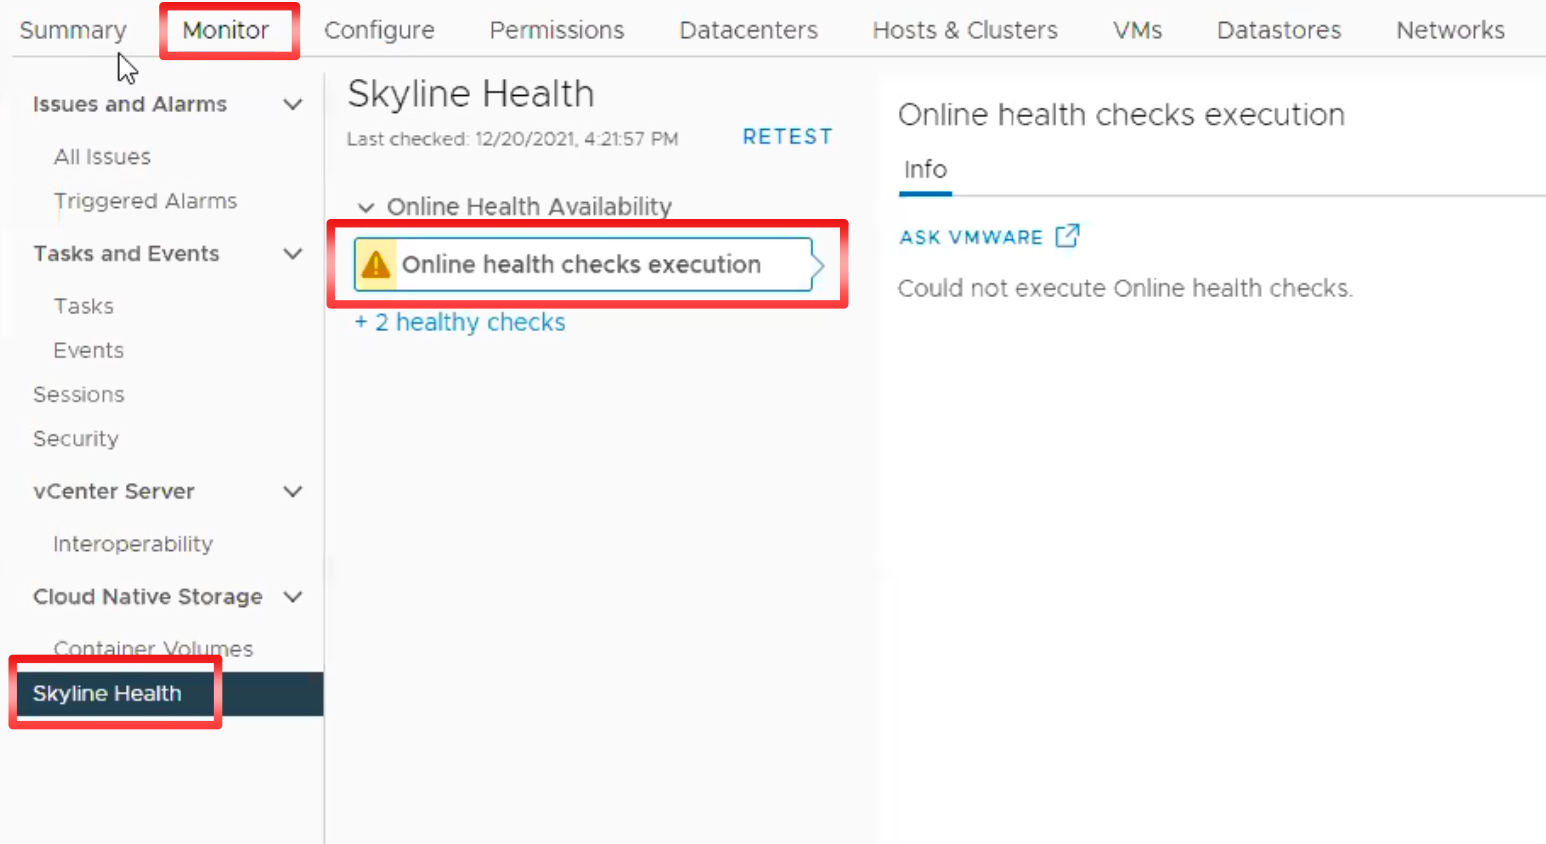
หลังจาก เราทำการ run script เสร็จเมื่อกลับที่ vSphere client browser ของ vCenter server จะพบว่า ที่ Tab -> Monitor ในหน้า Skyline Health จะ show warning “Online health checks execution” (ถ้าไม่เจอแบบนี้ก็ไม่เป็นไร นะครับ)
!!!warning ที่แสดง จะหายไป เอง นะครับ!!!

Conclusion

ในบทความนี้จะเป็น workaround สำหรับ vCenter server virtual appliance 7.x เท่านั้น โดย fix version ยังไม่มีออกมาในส่วน version อื่น ให้ทุกท่านติดตาม VMSA-2021-0028 ในการทำ workaround หรือ fix version รวมถึง Product อื่นๆ ของ VMware ที่ได้รับผลกระทบ เช่นกัน.

SHD – Skyline Health Diagnostics

By Lerpong Intaraworrapath | November 17th ,2021

SHD – Skyline Health Diagnostics

เมื่อมีเหตุการณ์ ที่ vSphere ESXi host down การทำงาน ของ vSAN หรือ VCF มีปัญหา และเราต้องการ investigate logs system จาก vSphere ESXi host หรือ ต้องการทราบ ว่า vSphere ESXi host มี error หรือ issues อะไร บ้าง เราจะทำได้อย่างไร

Skyline Health Diagnostics จะช่วยเราในการวิเคราะห์ และแสดงผล จาก bundle logs ที่เรา อัปโหลด เข้าไปใน SHD

โดย report จะรายงานค่า error และ issues ที่เกิดขึ้นกับ vSphere ESXi host ในระบบของเรา รวมถึง vSAN VCG (VMware Compatibility Guide) ที่ช่วยเราตรวจสอบ compatibility guide, Network driver, Firmware ต่างๆ

SHD (Skyline Health Diagnostics) Overview

Existing issue resolution workflow

อันนี้จะเป็น workflow โดยทั่วไป เวลาเกิดปัญหา

  1. เมื่อพบปัญหา การทำงานของระบบ
  2. ส่วนใหญ่ ก็จะทำการค้นหาจาก Google
  3. เมื่อค้นจาก Google เราก็จะพบบทความที่หลากหลาย ที่เกี่ยวข้องกัน
  4. ใช้เวลา ในการค้นหาจนกว่าจะเจอบทความที่ใช่
  5. ถ้าปัญหา ยังไม่ถูกแก้ไข ก็จะ ติดต่อ GS (Global Support) ทำการเปิด เคส
  6. ทำงานร่วมกับ GS เพื่อแก้ปัญหา

เราจะ เห็นว่าจะ สามารถ แบ่งเป็น 3 step หลักๆ คือ

  • พบปัญหา
  • เวลาในการแก้ปัญหา
  • วิธีการแก้ปัญหา

SHD (Skyline Health Diagnostics) จะช่วยลดเวลาในการ troubleshoot ปัญหา และลดเวลาที่เราใช้ในแก้ปัญหา

VMware SHD for vSphere

Issue resolution workflow with SHD

อันนี้จะเป็น SHD workflow เวลาเกิดปัญหา จะเป็นอย่างไร

  1. เมื่อพบปัญหา การทำงานของระบบ
  2. ทำการ Run SHD จาก log bundle ที่เกี่ยวข้อง
  3. จะได้ KB ที่เกี่ยวข้องกับปัญหา ที่เกิดขึ้น และ action plan
  4. ถ้าไม่พบคำแนะนำ จากปัญหาที่เกิดขึ้นให้ติดต่อ GS (Global Support) ทำการเปิด เคส
  5. จะเร็วขึ้นในการแก้ปัญหา จาก SHD log output

ขั้นตอนการ Deploy SHD (Skyline Health Diagnostics)

  1. ทำการ download SHD (Skyline Health Diagnostics) OVA file จาก link ด้านล่าง

https://customerconnect.vmware.com/downloads/get-download?downloadGroup=SKYLINE_HD_VSPHERE

2. ทำการ เลือก OVA ไฟล์ ขนาดไฟล์ 954.96 MB (version 2.5.2), click “DOWNLOAD NOW“.

3. เมื่อทำการ download เสร็จเรียบร้อยแล้ว เราก็จะได้ไฟล์ OVA มา 1 ไฟล์

4. ทำการ connect vCenter Server เพื่อจะทำการ deploy SHD OVA ไฟล์.

5. ทำการเลือก location ที่เรา save OVA ไฟล์.

6. ทำการเลือก location และใส่ชื่อ virtual machine name (ในที่นี้ใช้ชื่อ VM-Shd), click “NEXT“.

7. ทำการเลือก Compute resource, click “NEXT“.

8. Review details, click “NEXT“.

9. Accept License agreement, click “NEXT

10. ทำการเลือก Storage, click “NEXT“.

11. ทำการเลือก Network, click “NEXT“.

12.ใส่ Password สำหรับ root account และ shd-admin account

13.ใส่ค่าต่างๆ ให้ครบ หลังจากนั้นให้ click “NEXT“.

14. Read to complete, click “FINISH“.

15.เมื่อเราทำ deploy เสร็จเรียบร้อยแล้วให้ เรา Power-on SHD VM (VM-Shd)

16.ทำรอสักพัก หลังจากนั้นให้ทำการ “Launch Web Console” เราจะ พบว่า VM-Shd จะทำการ start process เพื่อทำการ boot SHD

17. ต่อมาให้ เรา access SHD โดย เปิด browser ให้ใส่ IP address ของ SHD, login ด้วย user “shd-admin“.

18. Click NEXT for “End user license agreement” และ “Customer Experience Improvement“, click “FINISH“.

19. เราก็จะเข้ามาเจอหน้าแรกของ SHD (Skyline Diagnostics).

จากด้านซ้ายมือ เราจะเห็น menu ในการ connect system เพื่อจะทำการ download และ analyze log bundle

  1. Connect ผ่าน vSphere (vCenter Server)
  2. Connect ผ่าน vSAN-HealthCheck (vCenter Server)
  3. Connect ผ่าน VMware Cloud Foundation (SDDC)

หรือเรา สามารถ upload bundle logs มาทำการ analyze ผ่านทาง SHD (Skyline Diagnostics)

20. เราจะทำการ Analyze log bundle จาก vSphere. โดยเลือก vSphere จากด้าน เมนู ด้านซ้ายมือ หลังจากนั้นให้ เรา ใส่ รายละเอียด

  • vCenter server (FQDN or IP)
  • Username access vCenter Server
  • Password access vCenter Server

Click, “CHECK CONNECTION“.

21. ทำการ Click “RUN DIAGNOSTICS“.

22. ทำการเลือก vSphere ESXi host ที่เราต้องการจะ Analyze logs (เราสามารถเลือกได้มากกว่า 1 host), click “VALIDATE“.

23. ใส่ชื่อ Report, click “FINISH“.

24. SHD ก็จะทำ การ download Log Bundle แล้วก็ Process ตาม workflow จนกระทั่ง Finalize Workflow จนได้เป็น Report ออกมา

24. โดย Report เราสามารถ Click ดูจาก ปุ่ม “SHOW REPORT” หรือ เราจะเลือกไปที่ Show Reports tab แล้วเลือก download หรือ ให้แสดง Report ก็ได้

25. ตัวอย่าง SHD report

Conclusion

SHD (Skyline Health Diagnostics) จะเป็น Tool อีกหนึ่งตัวที่จะช่วยให้เราทำวิเคราะห์ Logs ได้ด้วยตัวเอง พร้อมทั้งมี Report ที่แสดง Log Analysis รวมถึง มี การ ตรวจสอบ vSAN VCG (VMware Compatibility Guide) ที่ช่วยเราตรวจสอบ compatibility guide, Network driver, Firmware ต่างๆใน vSphere environment ที่เราใช้งานให้ด้วย

Reference

Credit: ขอขอบคุณน้อง Nat (Napongtorn) สำหรับขั้นตอนการ run SHD

VMSA-2021-0020 | Upgrade vCenter Server

By Lerpong Intaraworrapath | October 11th, 2021

Upgrade vCenter Server for VMSA-2021-0020

วิธีการจัดการ Security ในหัวข้อ VMSA-2021-0021 ที่ VMware แนะนำ คือ การ upgrade vCenter Server ตาม version ที่ระบุ (รวมถึง vCenter Server ในระบบ VMware Cloud Foundation: VCF)

Note: กรณี VCF ให้ follow step ใน KB85718

Note: vCenter Server ที่ connectedในแบบ ELM (Enhanced Linked Mode) ก็ต้องทำทุกตัวด้วยนะครับ

vCenter Server version ที่ระบุใน VMSA-2021-0020

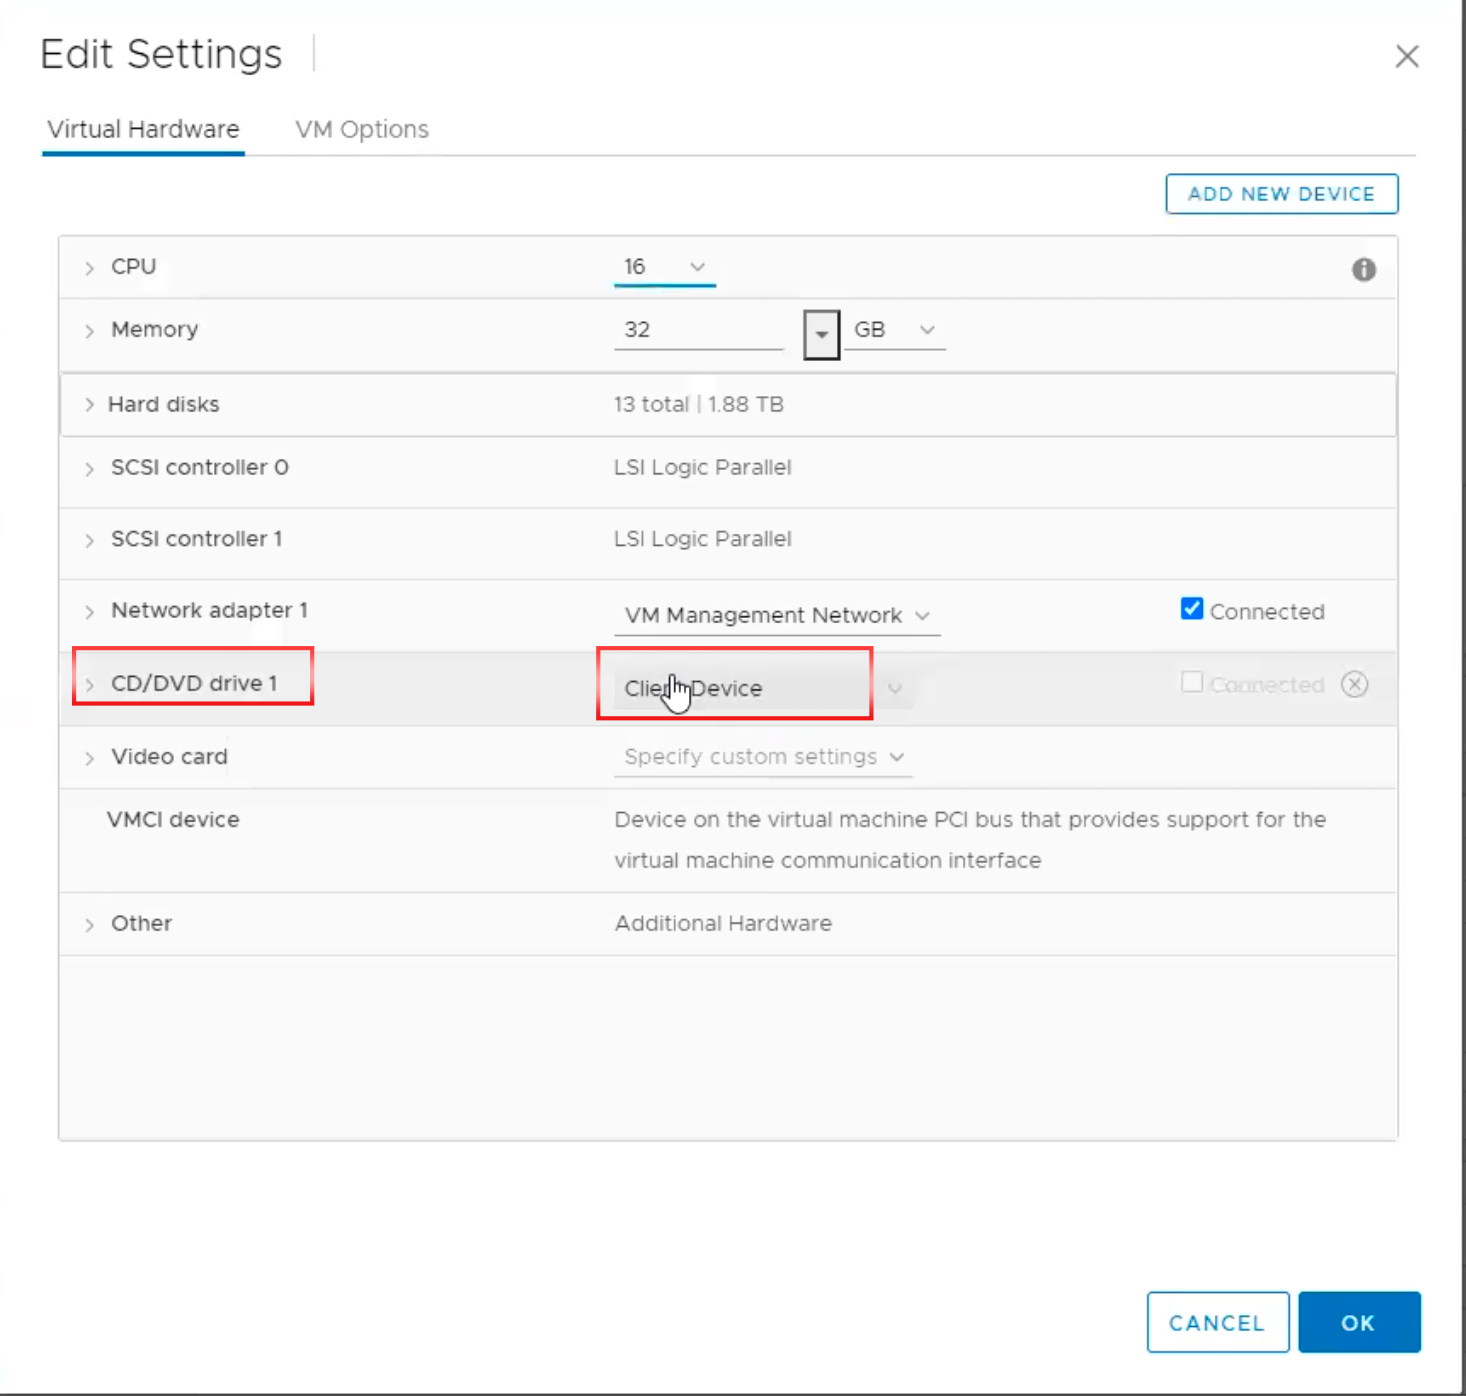
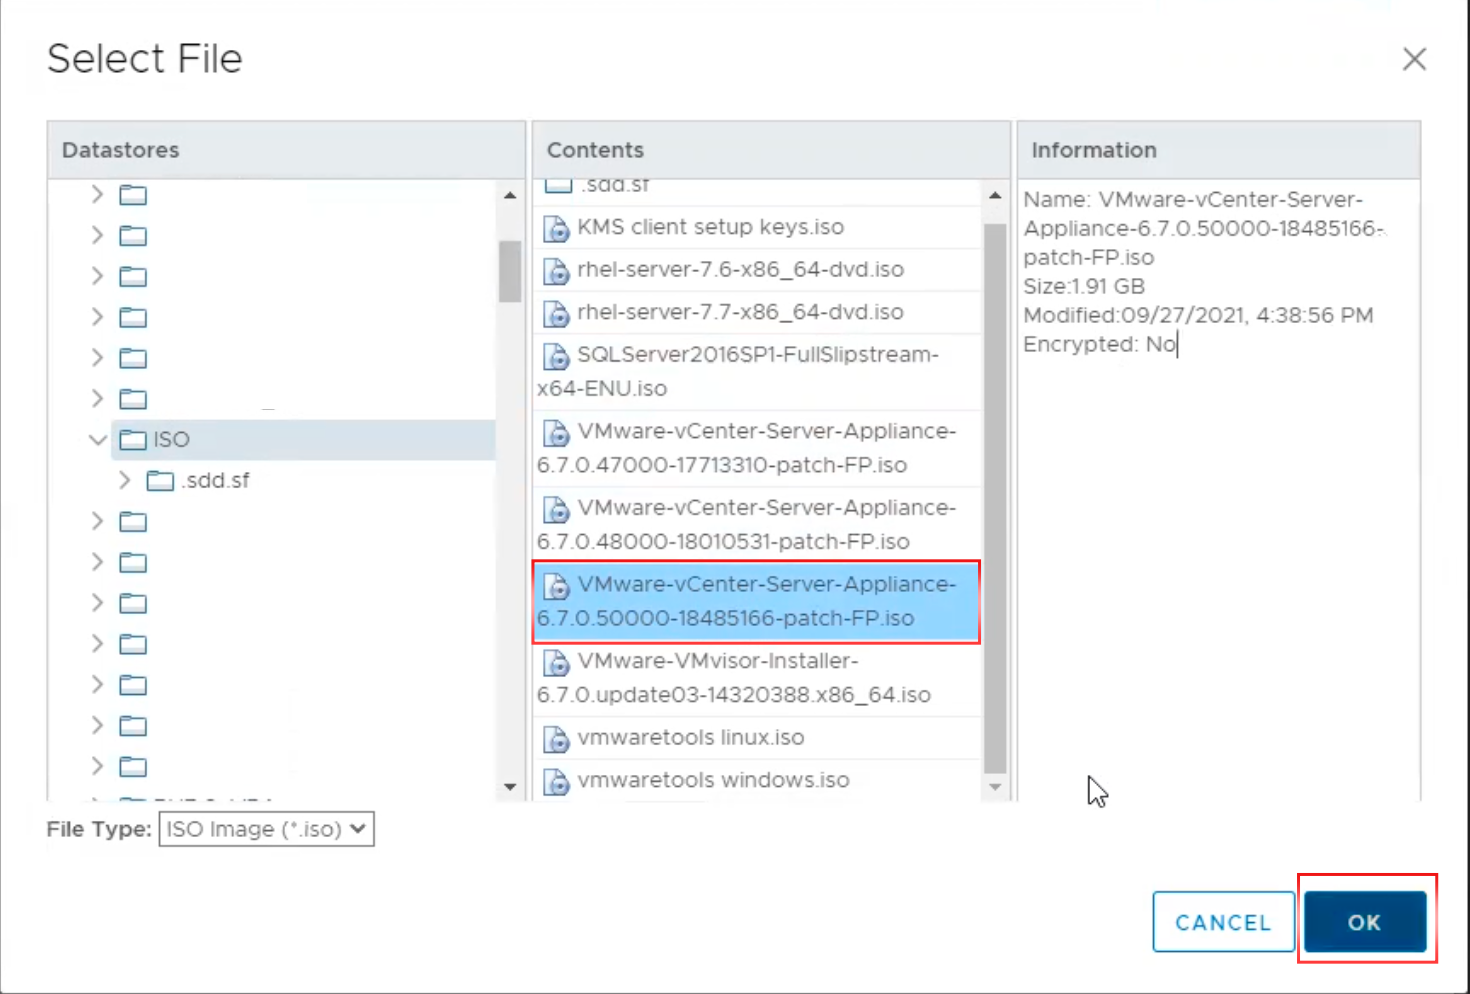
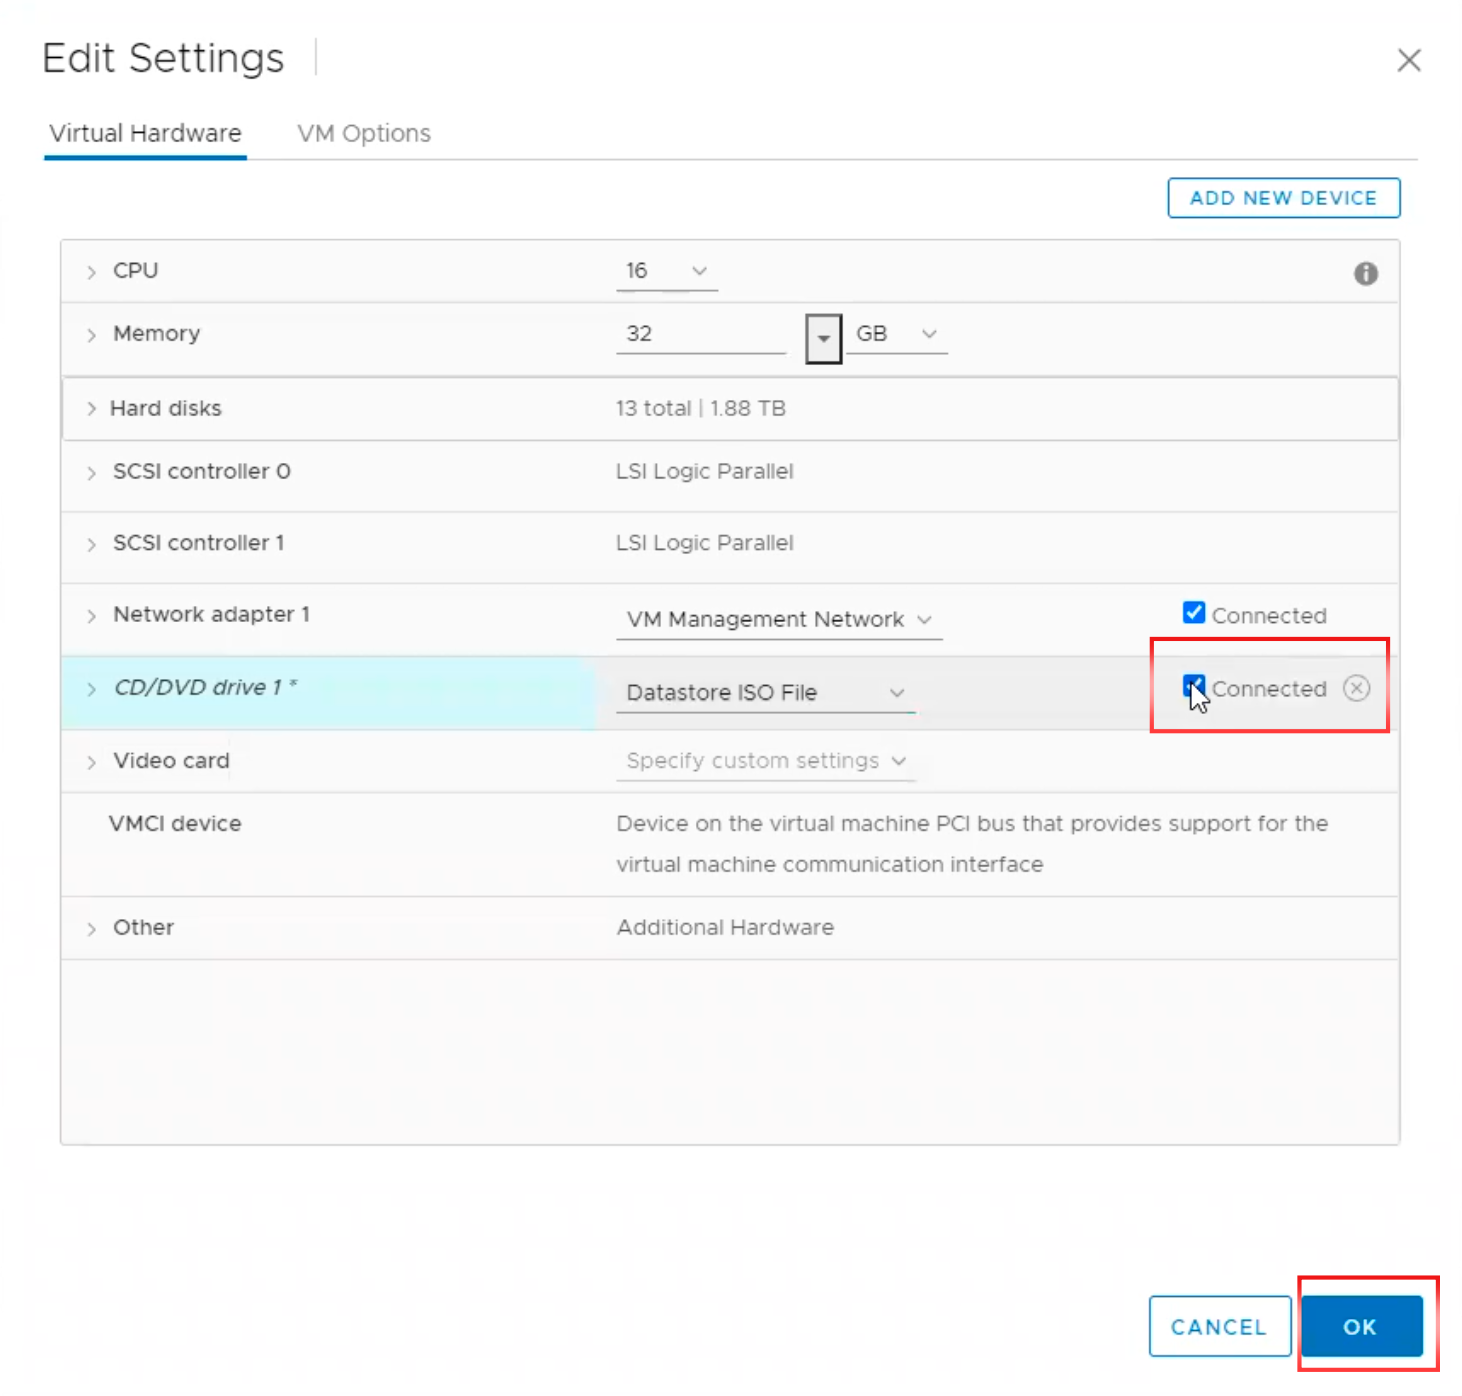
ในการ upgrade vCenter Server จะมีหลายวิธี ในบทความนี้ เราจะทำการ upgrade ด้วยวิธีแบบง่ายๆ ด้วยการ download ISO image แล้วก็ mount แผ่นให้ connect กับ vCenter Server

ขั้นตอนการ Upgrade vCenter Server

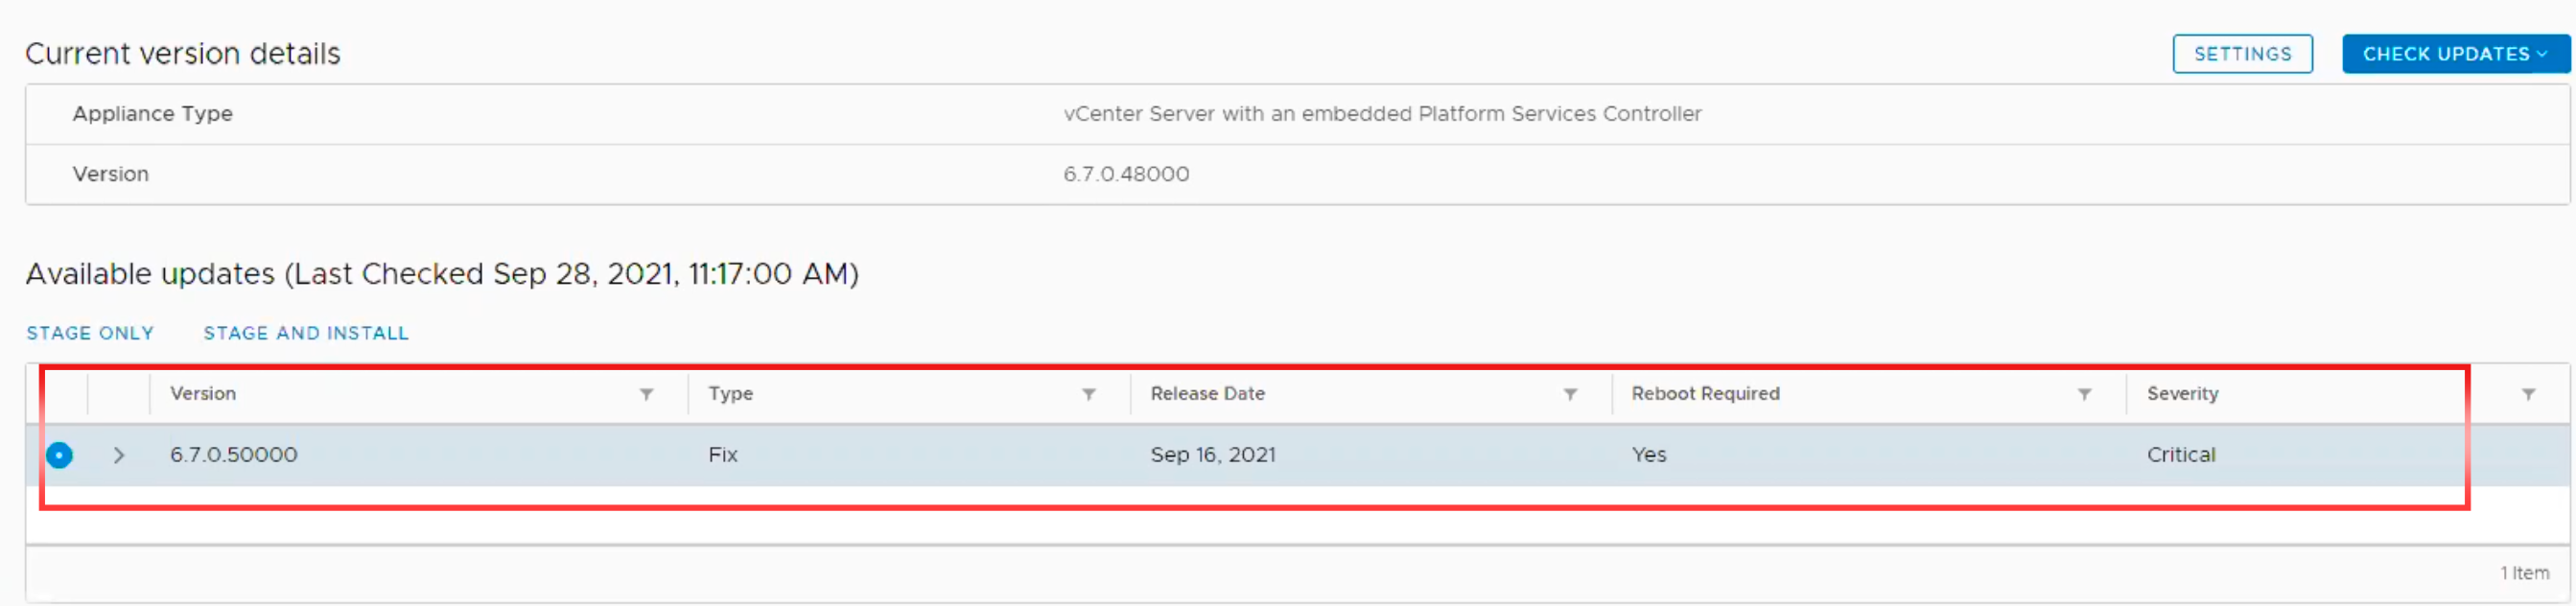
เราจะทำการ Upgrade vCenter Server version 6.7 U3n – 18010599

  1. ทำการ download ISO image ของ vCenter Server ที่เราต้องการ upgrade มาเตรียมไว้ จาก link https://my.vmware.com/group/vmware/patch

2. เมื่อทำการ download ISO images เรียบร้อย แล้วให้ทำการ uploade เข้าไปใน storage Lun เผื่อทำการ connect กับ vCenter Server ในขั้นถัดไป

3. ลำดับต่อมาทำการ Snapshot vCenter Server (กรณีการอัปเกรดผิดพลาด เราจะสามารถ revert snapshot ได้) เป็นขั้นตอนสำคัญที่ต้องทำ โดยการ Right-click ที่ vCenter Server แล้ว เลือก Snapshot ไม่ต้อง check box ให้ใส่ชื่อ Snapshot แล้ว Click “OK

4. ทำการตรวจสอบดูว่า Snapshot เราทำไว้ ได้ Snapshot ไว้เรียบร้อยไหม ไปที่ vCenter Server แล้วเลือก Snapshot -> Manage Snapshot

5. ต่อมาเราจะทำการ mount ISO ไฟล์ patch 6.7 U3o ที่เราทำการ upload เข้าไปไว้ใน storage LUN ขั้นตอนที่ 2

6. Right-click vCenter Server แล้วเลือก Edit Setting ทำการเลือก CD/DVD drive 1 -> dropdown “Client Device” ให้เลือก “Datastore ISO file

7. ทำการ Browse ไปยัง ISO image ที่เราทำการ เก็บไฟล์ ไว้ แล้วทำการตรวจสอบ ชื่อ ISO image ไฟล์ให้ ถูกต้อง “VMware-vCenter-Server-Appliance-6.7.0.50000-18485166-patch-FP.iso“หลังจากนั้นให้ Click “OK

8.ทำการ Check box connected แล้ว Click “OK

9. ทำการ Log in ไปที่ vCenter Server VAMI page ด้วย vCenter Server Name ตามด้วย Port 5480 ด้วย account “root“.

https://vCenter Server Name:5480

10. เมื่อ Log in เข้ามาได้แล้ว เราจะ เห็น Health Status (จะต้อง show “Good“) และ vCenter Server version ปัจจุบัน.

11. เมื่อ Health Staus ทุกอย่าง Good เราก็ สามารถ ทำการ upgrade vCenter Server ได้ โดย Click ไป “Update” เราก็จะ เห็น Status vCenter Server ทำการ Check Update

Note: บางครั้งเราสามารถ ใช้ command ในการ update vCenter Server ได้

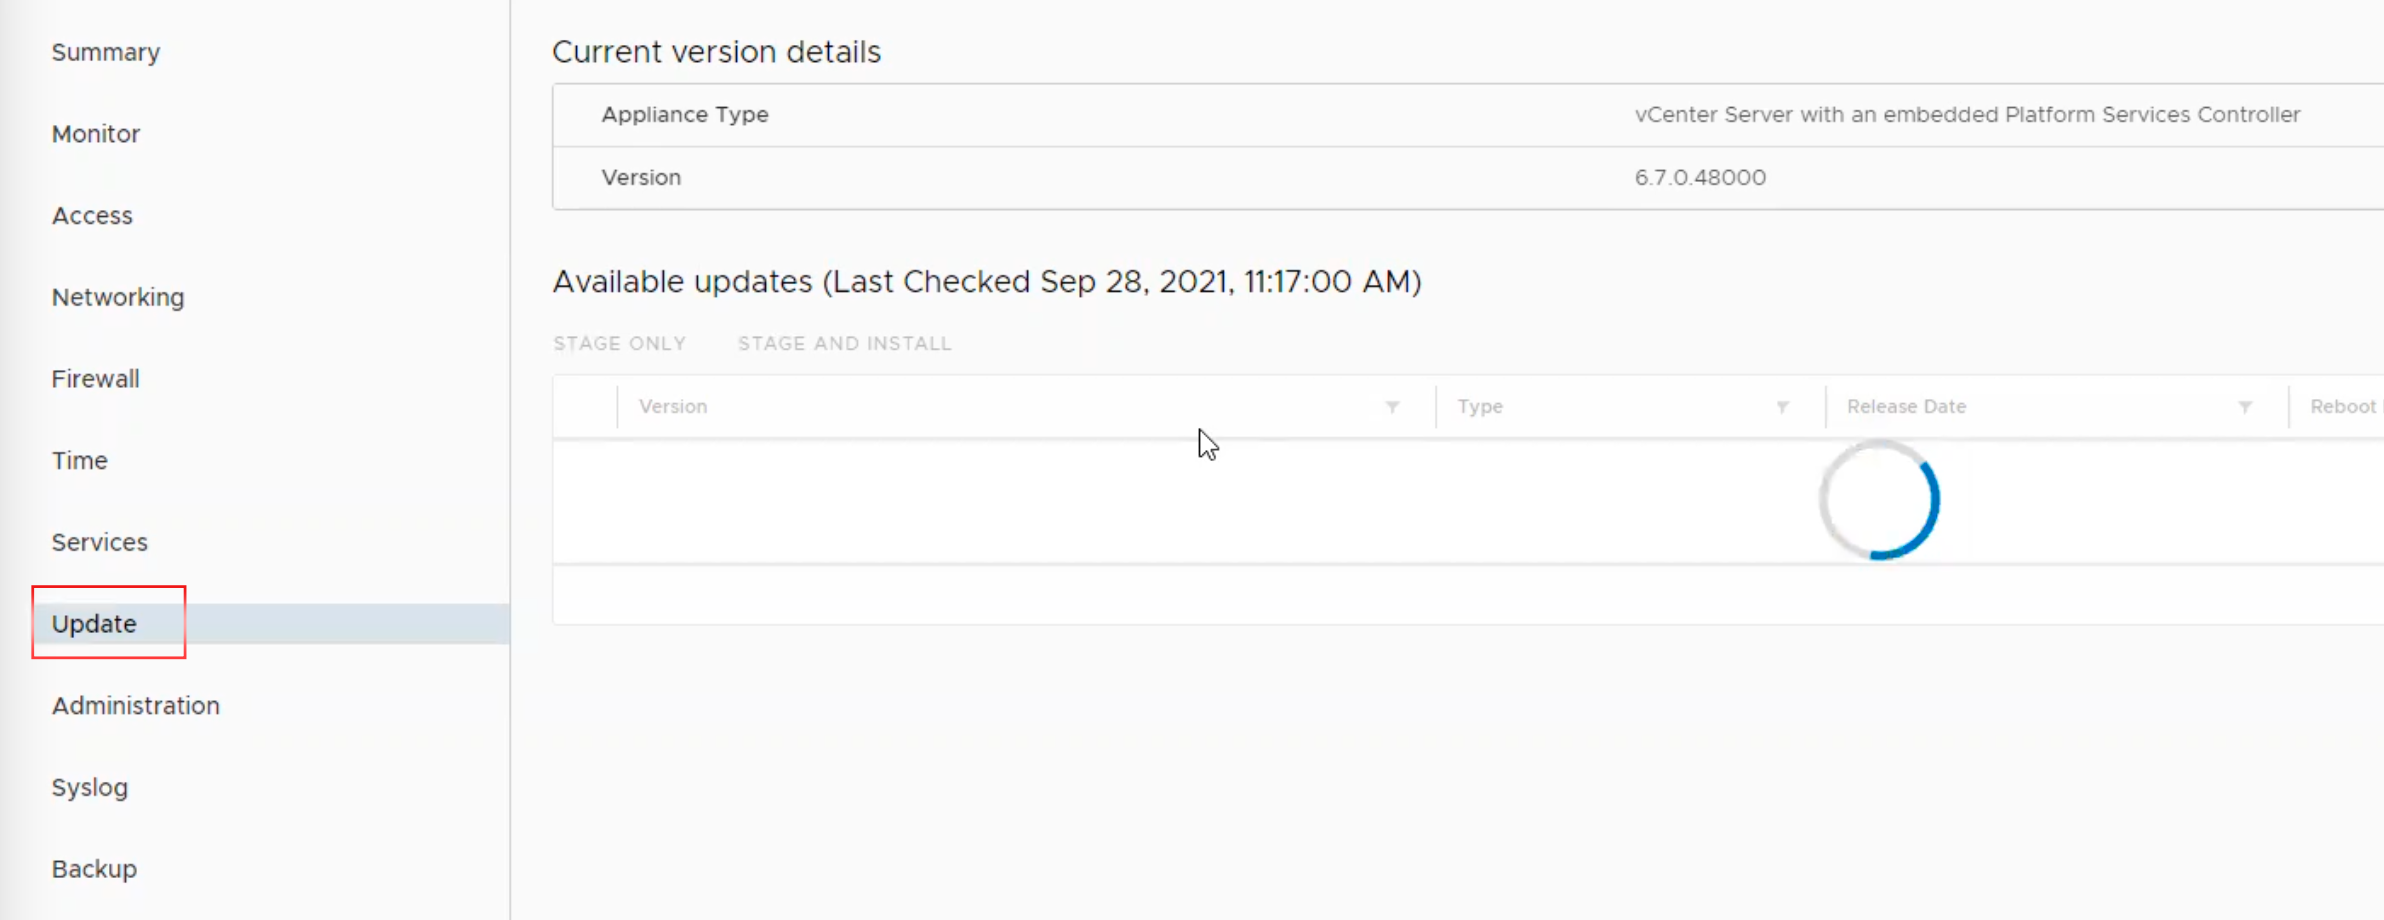
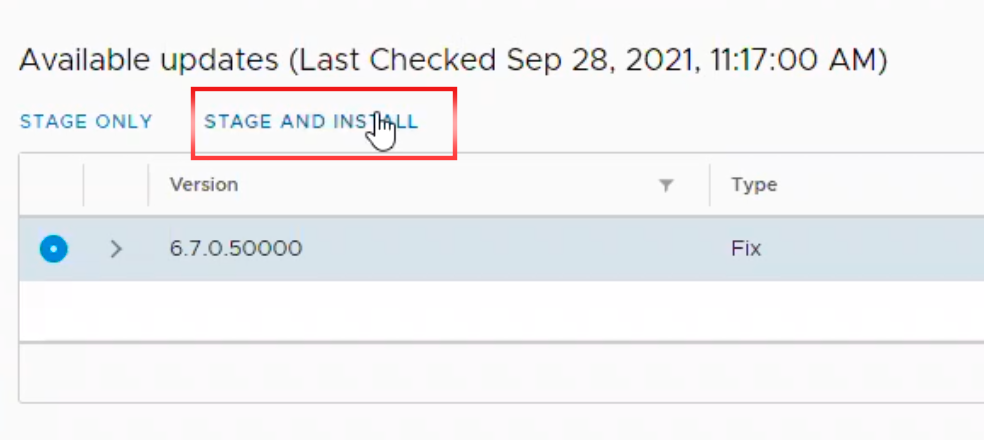
12. Version ของพี่ vCenter Server ที่เราต้องการจะ Update ก็จะปรากฏขึ้น

13. ทำการ เลือก “STAGE AND INSTALL“.
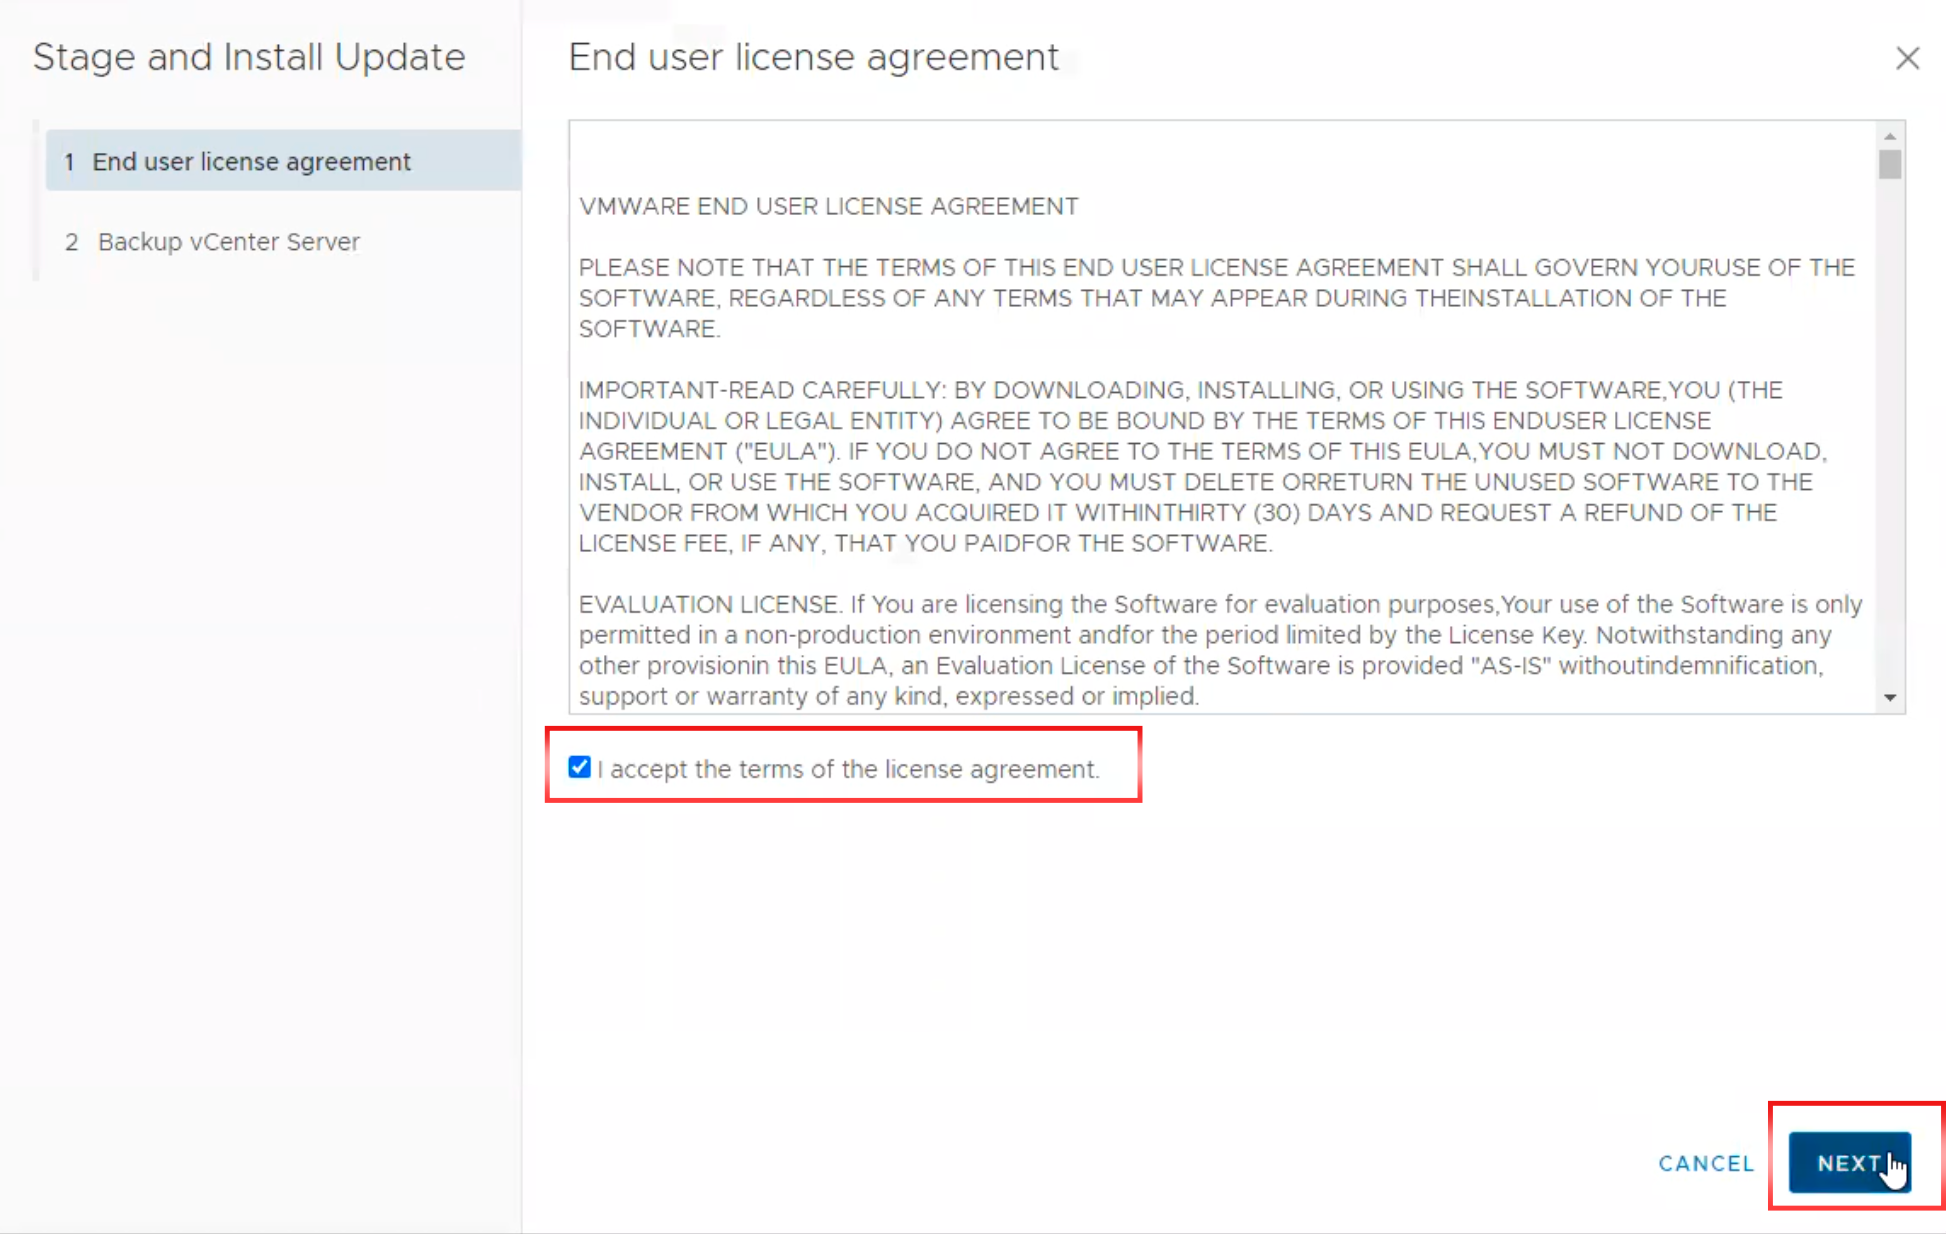
14. Click Check box แล้วก็ Click “NEXT

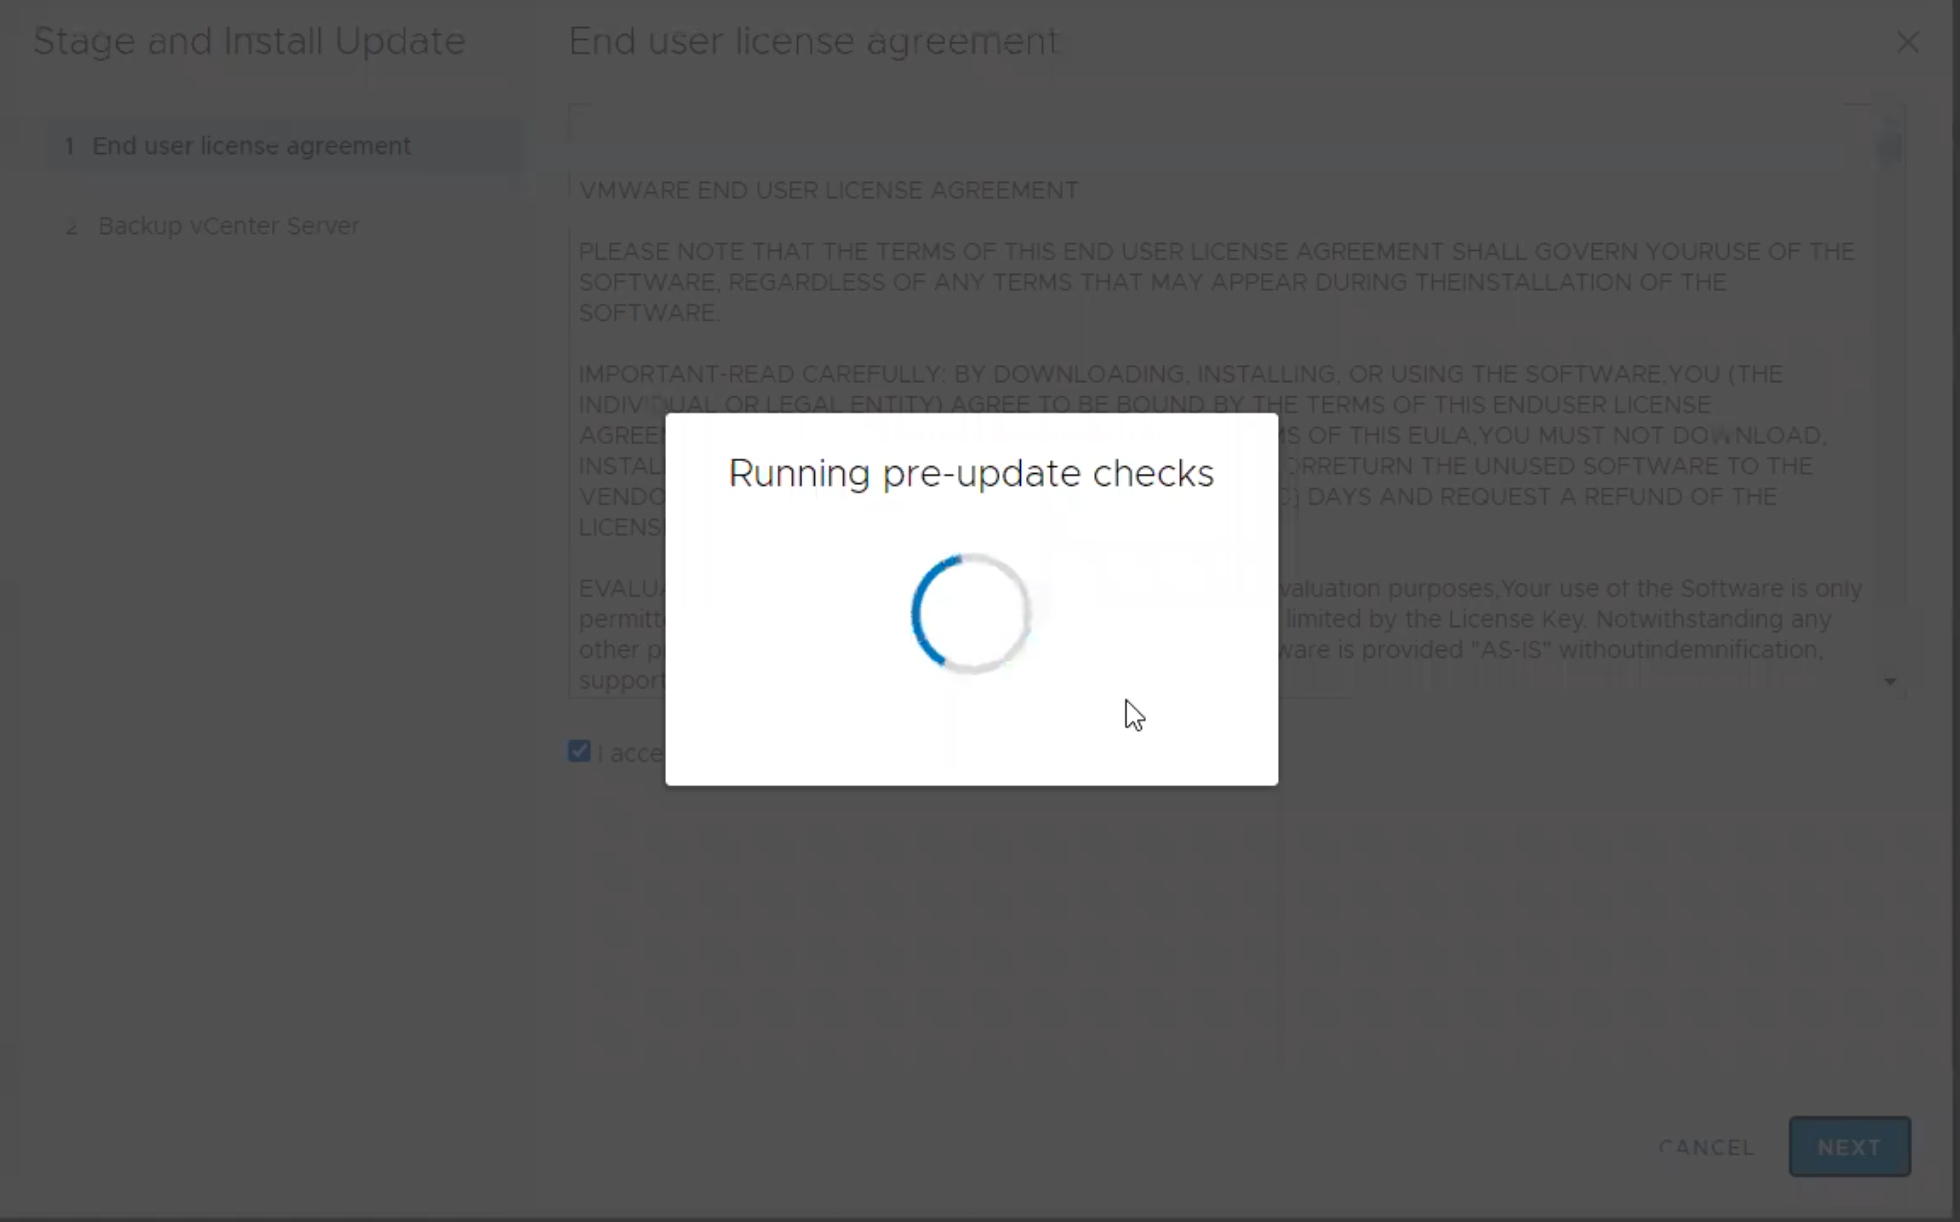
15. จะแสดงการ “Running pre-update checks

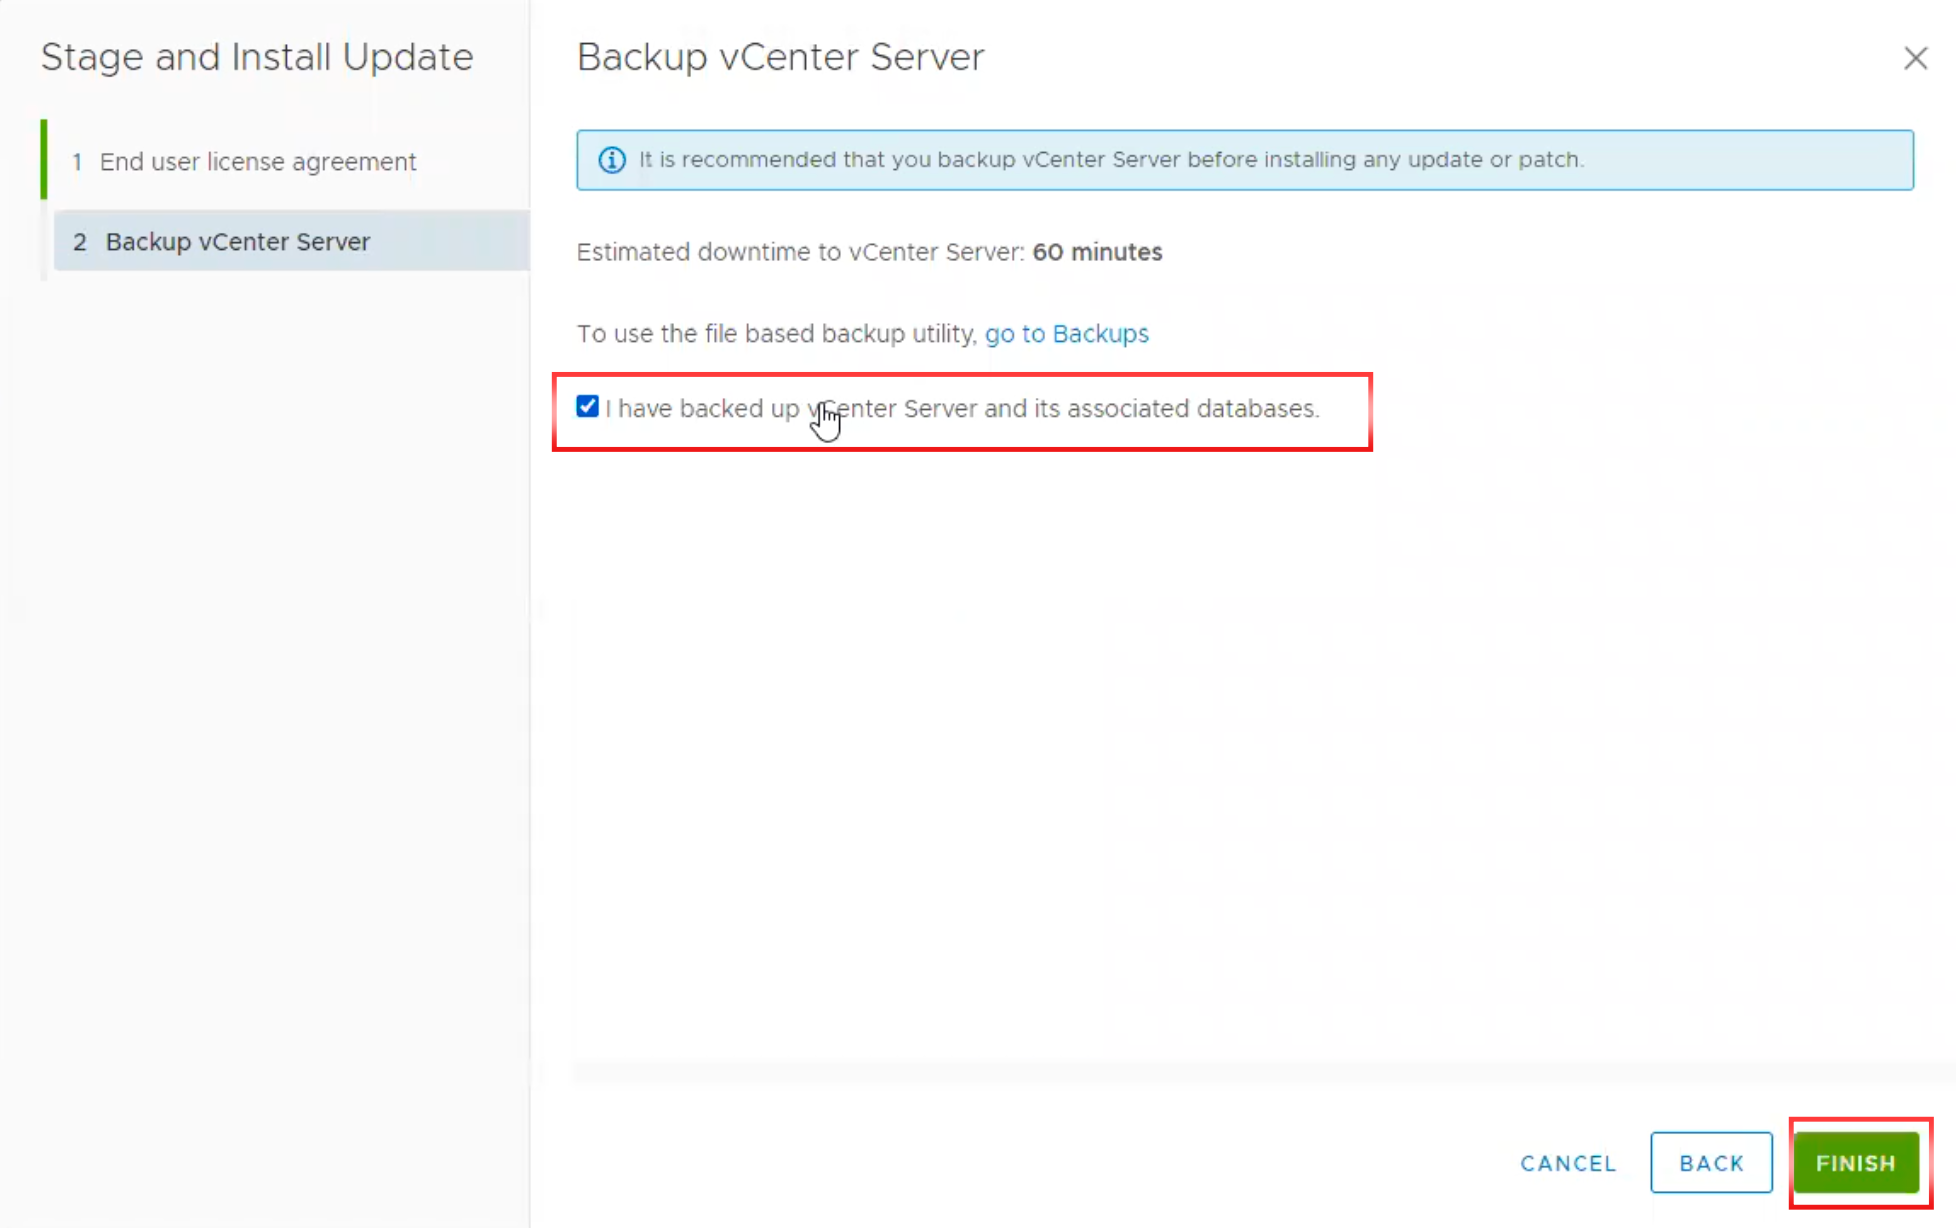
16. ทำการ ตรวจสอบว่าเรามีทำการ Back-up vCenter Server หรือไม่ (ถ้าเรามีการ Back-up vCenter Server ไว้ก่อนแล้วให้ทำ การ check-box) Click “FINISH

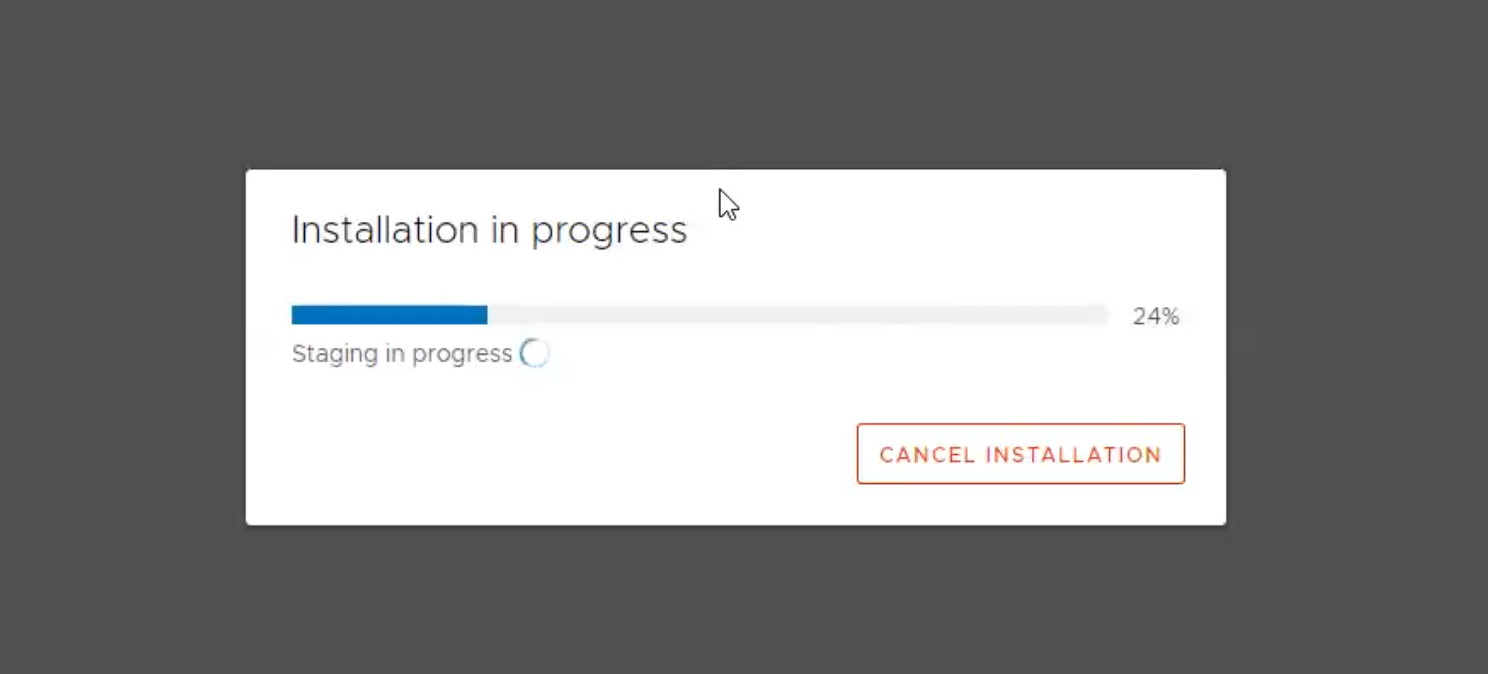
17. ขั้นตอน ต่อไปจะเป็นการ Install vCenter Server

18. โดยประมาณ 87% vCenter Server จะกลับมาที่หน้า Log in อีกครั้งให้เราใส่ user “root”

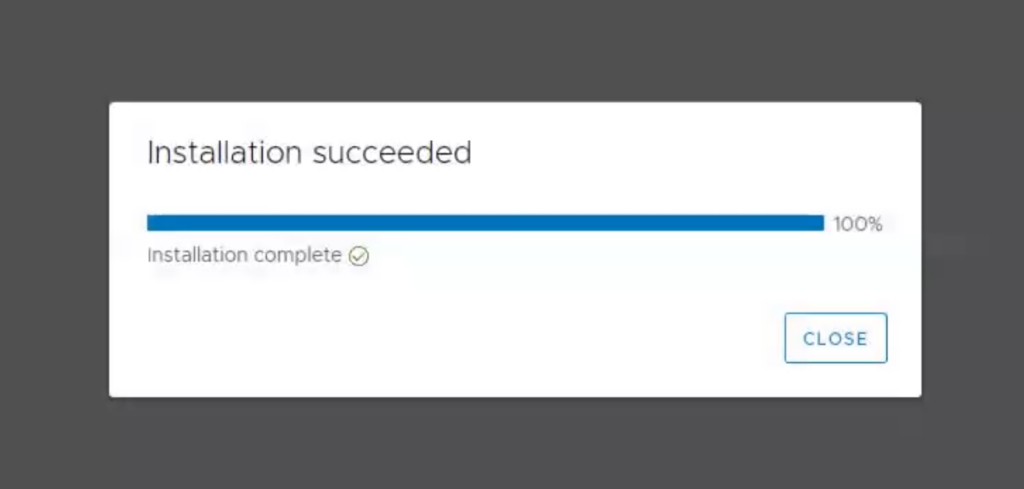
19. Installation Completed 100%

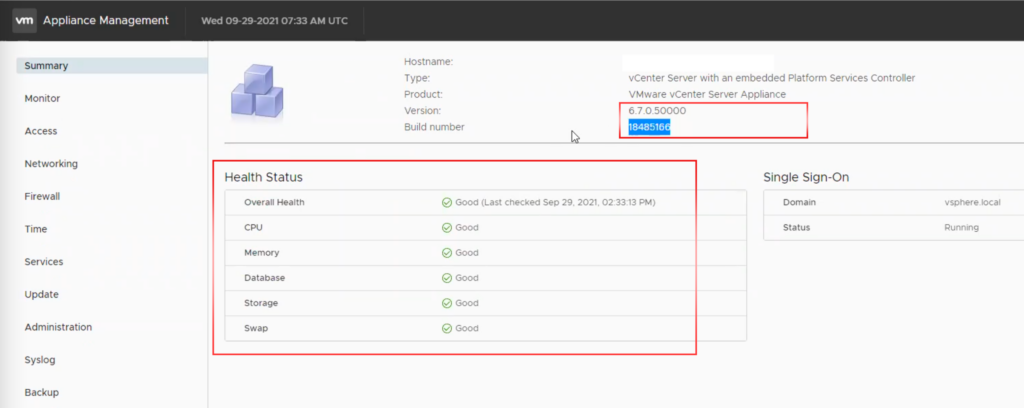
20. หลังจากเรา update เสร็จเรียบร้อย ก็จะพบว่า vCenter Server แสดง version ใหม่ที่เราทำการ update เสร็จเรียบร้อยแล้ว ให้ สังเกต Health Status จะต้อง แสดง status “Good” ทั้งหมด “vCenter Server 6.7.0.50000 – 18485166

21. และเมื่อเรา SSH เข้าไปที่ vCenter Server ไฟล์ ph-web.xl ในส่วนที่ comments ไว้ก็จะหายไป

22. เมื่อเราทำการ curl command ผลลัพธ์ ที่ได้ HTTP/1.1 400

Note: หลังจากทำการ update vCenter Server เสร็จเรียบร้อย ถ้าไม่มีอะไร ผิดพลาด อย่าลืม!!! ลบ Snapshot นะครับ!!!

Reference:

Credit: ขอบคุณน้องนัท (Napongtorn) สำหรับช่วยในการ update vCenter Server