VMSA-2021-0028 | Workaround in NSX-T Data Center 2.5.0-3.1.3 (87086)

By Lerpong Intaraworrapath | January 31th ,2022

Information regarding CVE-2021-44228 & CVE-2021-45046 in NSX-T Data Center (2.5.0-3.1.3) (87086)

ในบทความนี้ เราจะมาทำ workaround ในการแก้ปัญหา instructions to address CVE-2021-44228 and CVE-2021-45046 in NSX-T Data Center (2.5.0-3.1.3)โดยจะ followup วิธีการ จาก KB87086.

https://kb.vmware.com/s/article/87086

Note: ในส่วนของ Product อื่นของ VMware และ ข้อมูล CVE-2021-44228 and CVE-2021-45046 ให้ อ่านได้จาก VMSA-2021-0028.

Impact / Risks

  • Internal NSX-T processes/JVM’s เป็นการป้องกัน จากการสร้าง connection จากภายนอก ผ่านการ configured iptables ใน NSX-T Unified Appliance.
  • Version ของ Java JDK ใน NSX-T Datacenter version 3.0.2 และสูงกว่า จะป้องกัน remote code execution publicized (ie. LDAP attack vector).

All versions of NSX-T Data Center จะมี log4js. Further exploit of the log message lookup feature may be possible.

Note: NSX-T Edge VM’s และ Bare Metal Edge Nodes จะไม่กระทบจาก issue นี้.

Note: ถ้ามีการ upgraded หรือ deployed ใหม่ก็จำเป็นจะต้อง re-applied workaround อีกครั้ง.

Note: หากมีการ Restored NSX-T managers หรือ NSX-T Cloud Service Managers จาก backup ก็จำเป็นจะต้อง re-applied workaround อีกครั้ง.

Resolution

Workaround ในบทความนี้เป็น Temporary solution เท่านั้น แนะนำ.

NSX-T Data Center 2.5.3.4, 3.0.3.1 and 3.1.3.5 provide resolution for CVE-2021-44228 & CVE-2021-45046.
VMware recommends the following upgrade paths.

  • NSX-T 2.5.x should upgrade to 2.5.3.4
  • NSX-T 3.0.x should upgrade to 3.0.3.1
  • NSX-T 3.1.x should upgrade to 3.1.3.5

NSX-T 2.5.3.4 Release Notes: https://docs.vmware.com/en/VMware-NSX-T-Data-Center/2.5.3/rn/VMware-NSX-T-Data-Center-2534-Release-Notes.html

NSX-T 3.0.3.1 Release Notes:https://docs.vmware.com/en/VMware-NSX-T-Data-Center/3.0/rn/VMware-NSX-T-Data-Center-3031-Release-Notes.html

 NSX-T 3.1.3.5 Release Notes: https://docs.vmware.com/en/VMware-NSX-T-Data-Center/3.1/rn/VMware-NSX-T-Data-Center-3135-Release-Notes.html

Workaround

ในการ apply workaround สำหรับ CVE-2021-44228 & CVE-2021-45046 ให้ทำการ connect ไปที่ NSX-T Data Center Manager หรือ NSX-T Cloud Service Manager.

Imortant: ในทำการ apply workaround สำหรับ NSX-T Manager Cluster ให้ทำทีละ ตัวและให้ NSX-T Manager ตัวที่ทำ มี status “STABLE” ก่อนจะไปทำตัวถัดไป.

โดย version NSX-T Manager ที่เราทำการ apply workaround จะเป็น
NSX-T Manager 3.1.2.0.0.17883600

Account access
AccountAccess
adminNSX-T UI
adminSSH
rootSSH

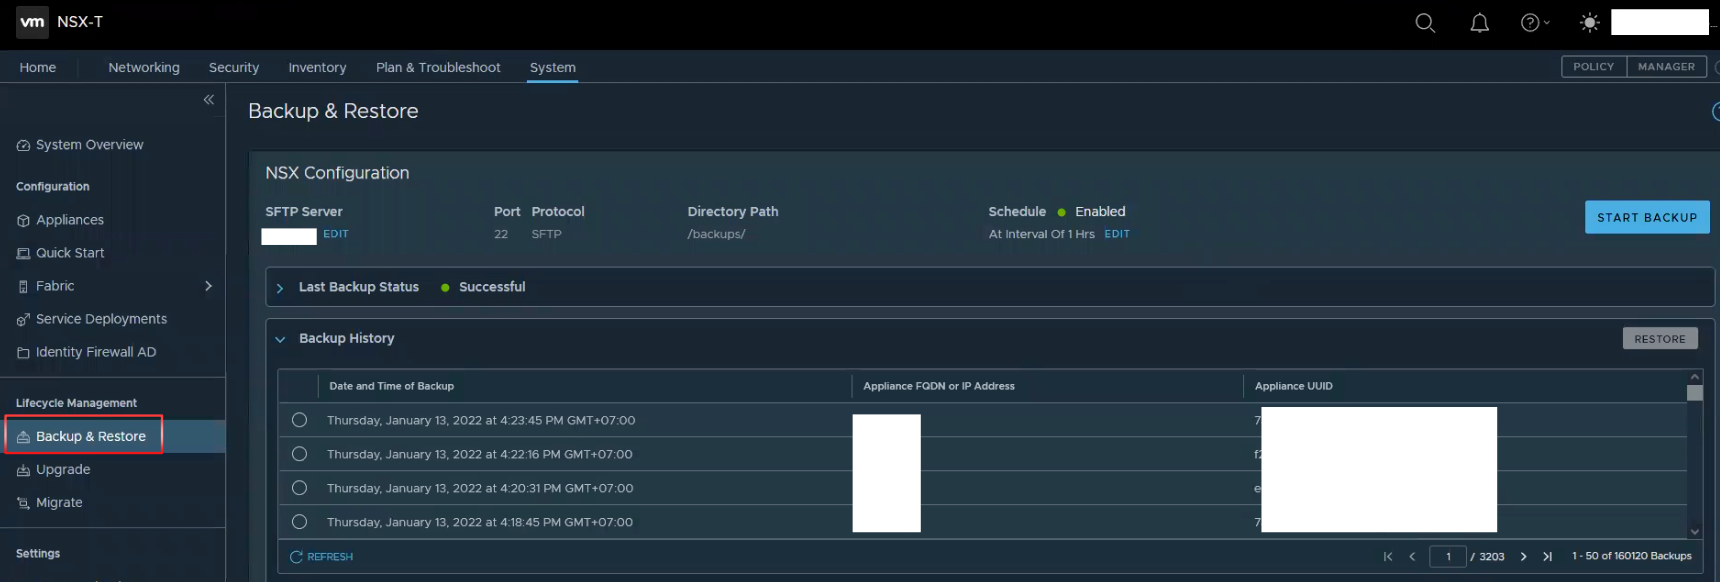
1.ให้ทำการ Backup NSX-T manager ผ่าน SFTP.

Reference the following document for guidance, if needed: https://docs.vmware.com/en/VMware-NSX-T-Data-Center/3.2/administration/GUID-E6181BF1-2CB7-4870-B508-BFAF5B47D702.html
2.ทำการ download Debian package “unified-appliance-log4j2-patch_3.1.3.6.0.19099859_all.deb” จาก KB87086.

3.ทำการ copy Debian package ไปไว้ NSX-T Manager appliances ทั้ง 3 NSX-T Manager appliances โดยใช้ WinSCP หรือ Linux based SCP หรือ tool ที่สามารถ transfer files ได้.

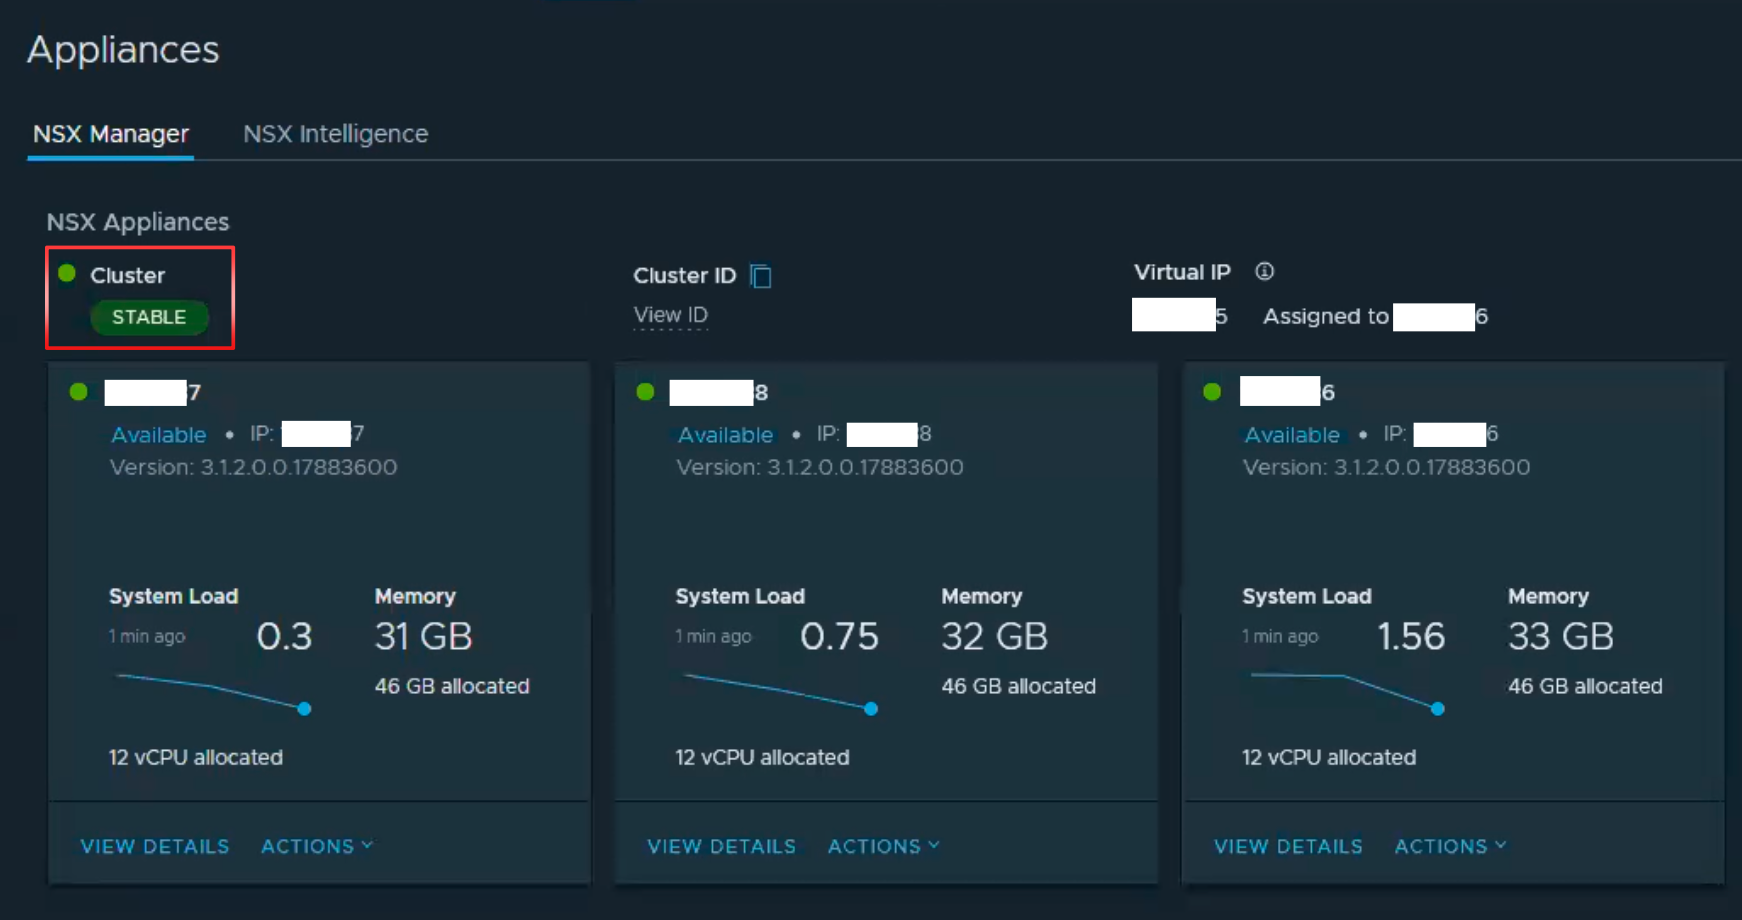
4.ให้ทำการ check status NSX-T Manager appliances.
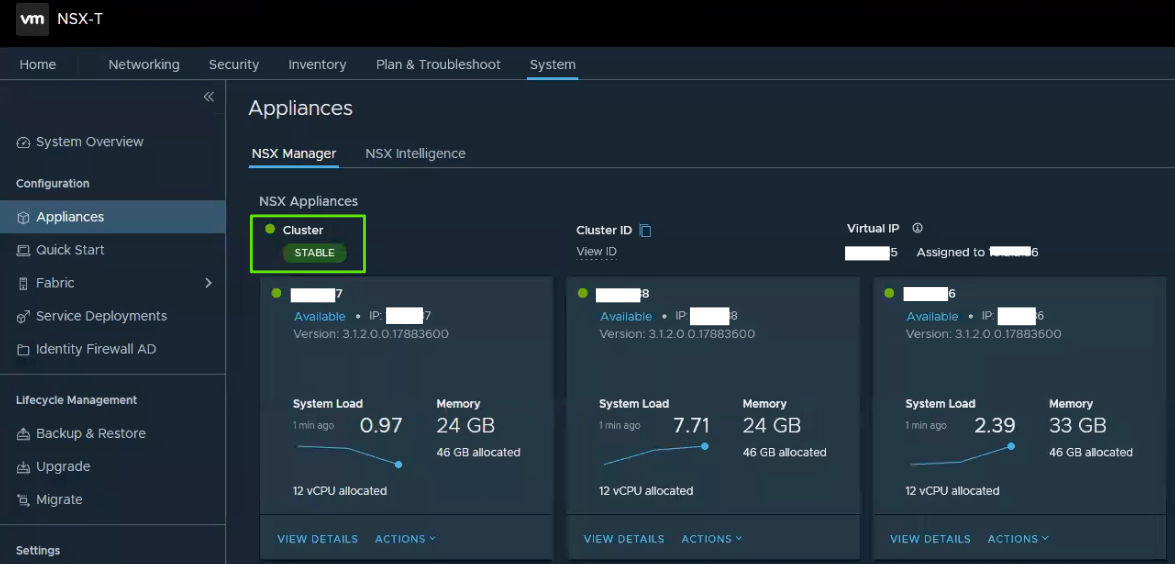
โดย Cluster status จะต้อง เป็น “STABLE” และ NSX-T Manager จะต้องเป็น “Available“.
5.Login NSX-T Manager appliance โดย SSH ใช้ user account “admin“.

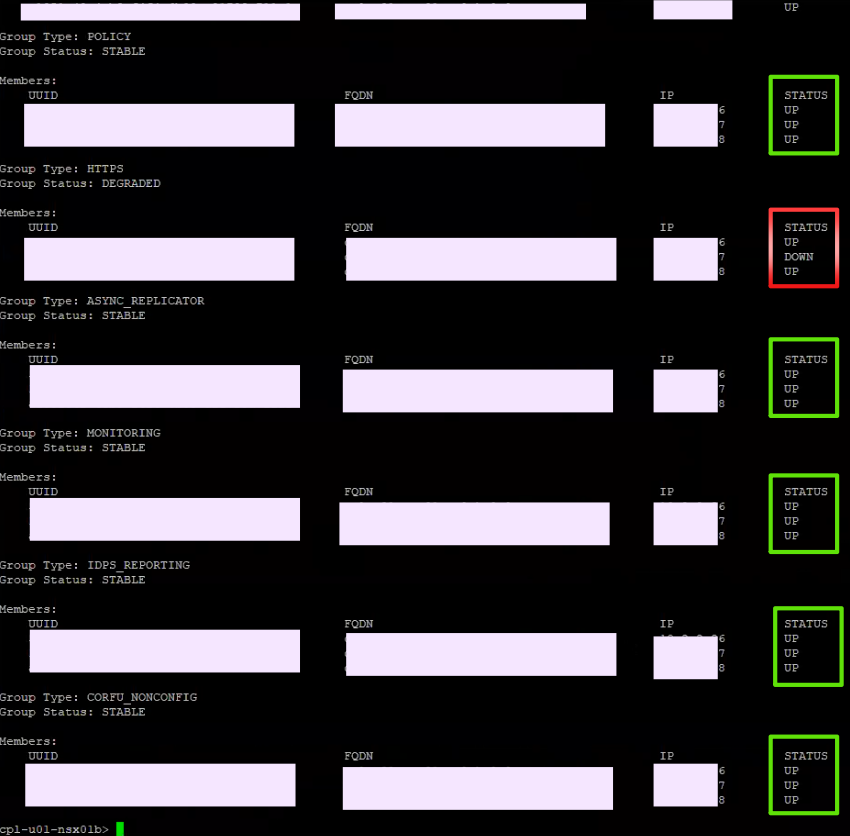
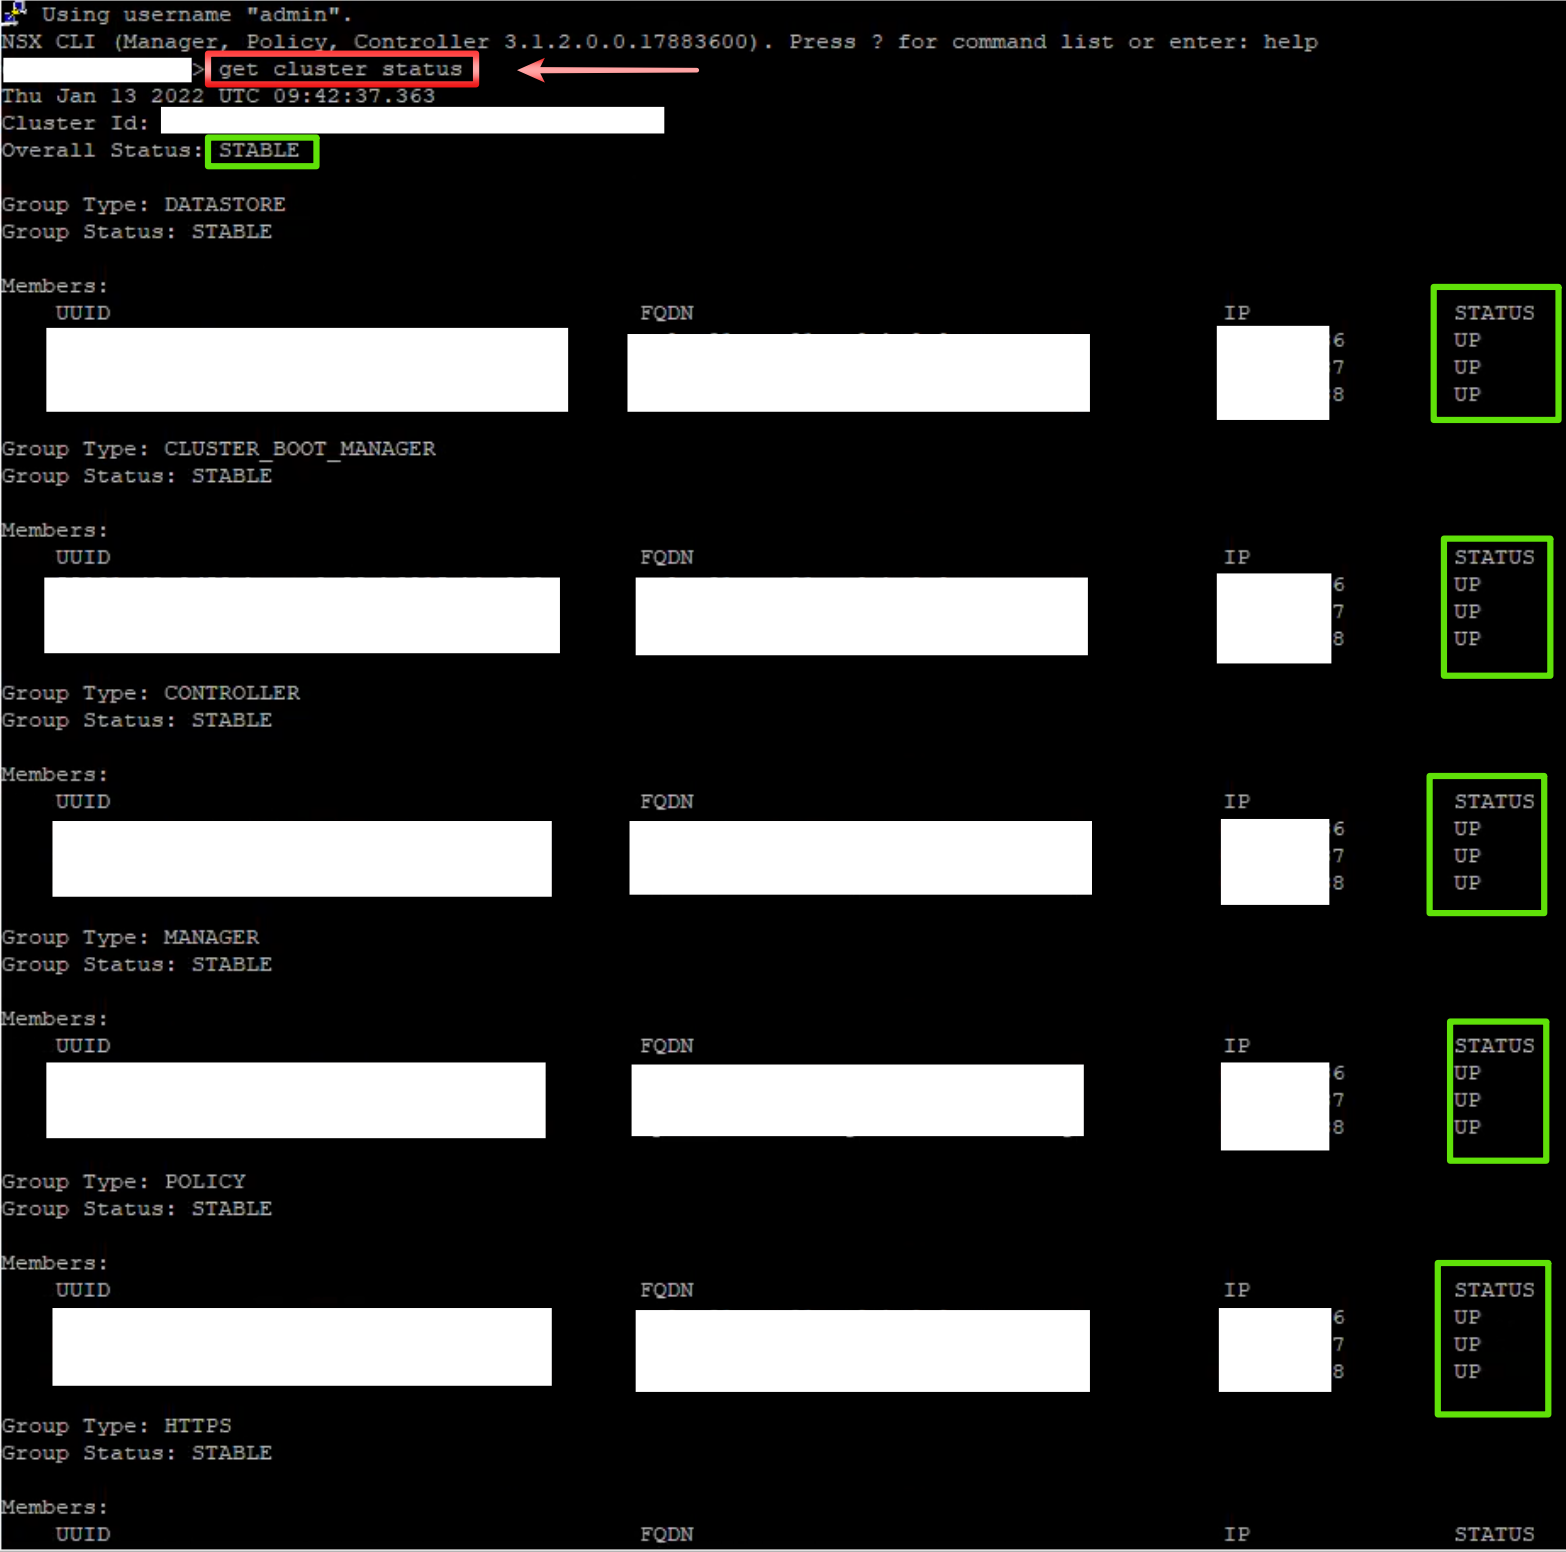
6.ให้ใช้ command check cluster status เพื่อตรวจสอบ cluster status อีกครั้ง โดย Overall Status จะต้องเป็น “STABLE” และ Status ต้อง “UP” ทั้ง 3 nodes ทุก services.
get cluster status
6.ให้ switch to account “root“.
st en
Enter the root password.

7.Install Debian package ด้วย command ด้านล่าง ใน directory ที่เราเก็บ ไฟล์ไว้
dpkg -i unified-appliance-log4j2-patch_3.1.3.6.0.19099859_all.deb

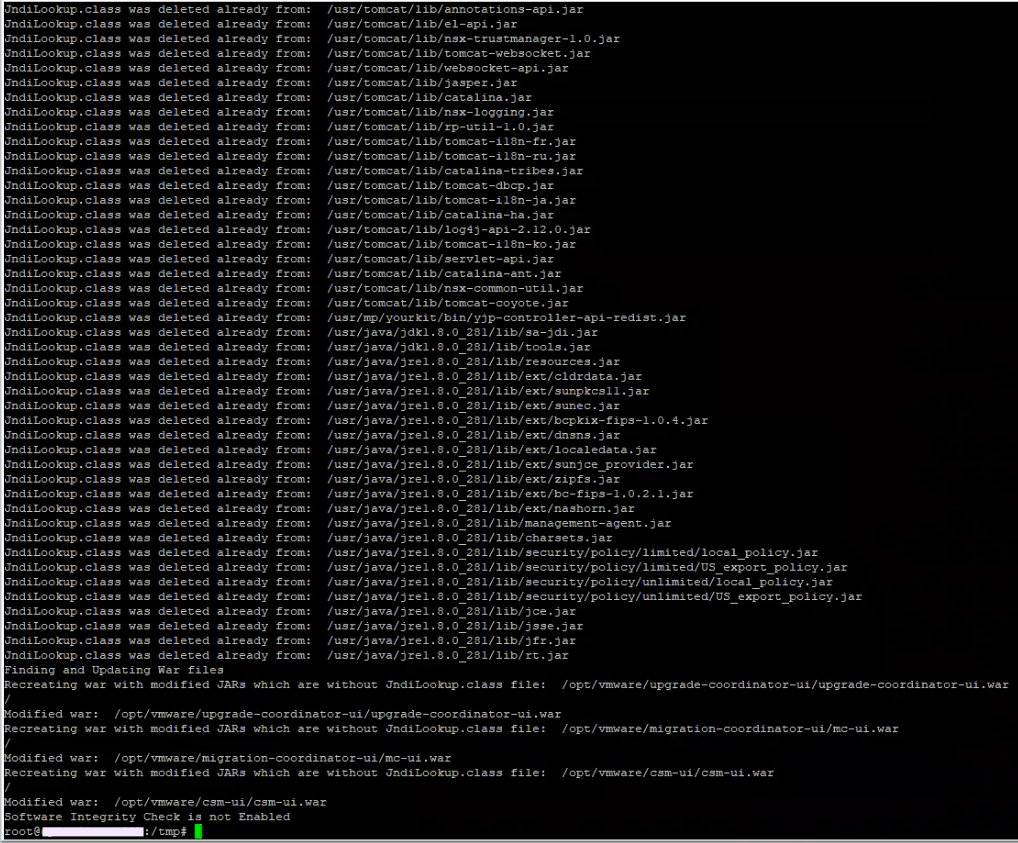
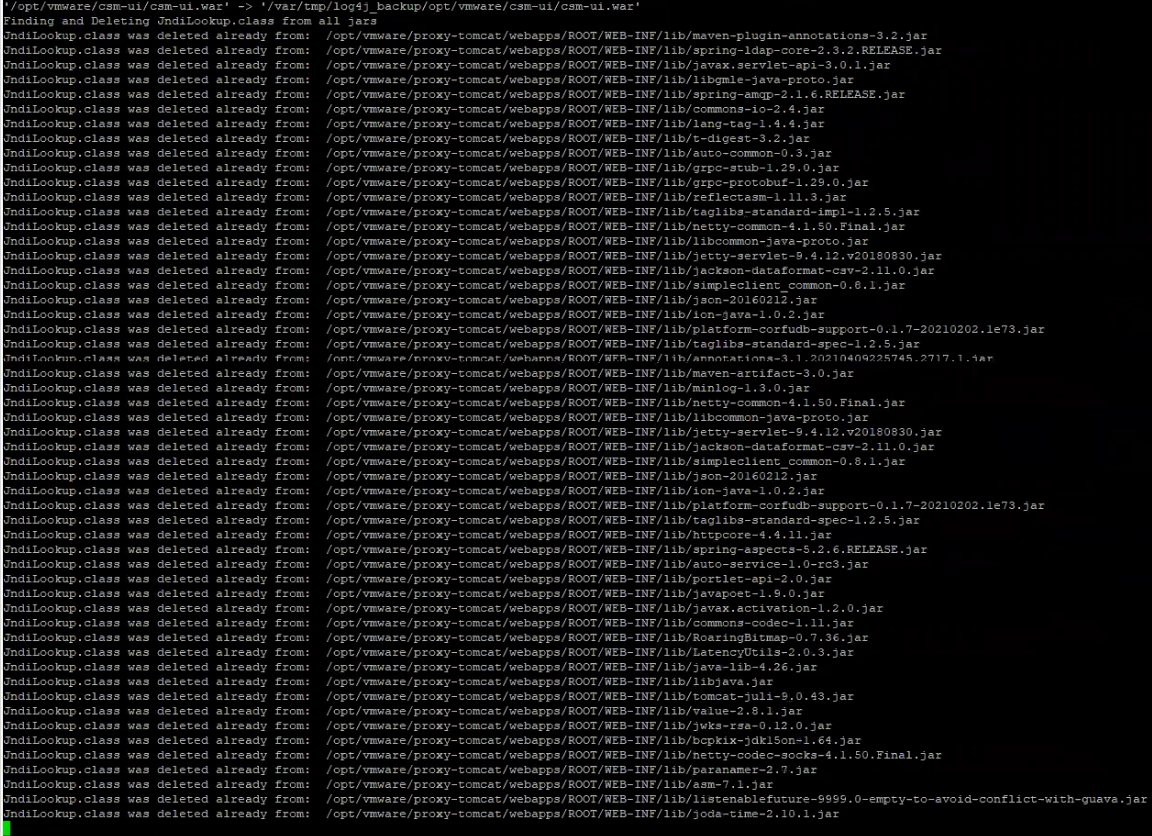
8.เมื่อกด Enter แล้ว script ก็จะทำการ check ไฟล์ JndiLookup ให้ทำการ รอ จนเสร็จสิ้น script.
9.ทำการ reboot system.
/sbin/reboot

Note: ให้ทำทีละ NSX-T Manager appliances ห้ามทำพร้อมกัน. ให้แน่ใจว่า NSX-T Manager หลังจาก ที่เราทำการ reboot แล้ว status “STABLE” แล้วจึงจะทำตัวถัดไป.

10.ในการ Monitor status NSX-T Manager cluster services เราจะใช้ command หรือ ใช้การ Monitor จาก หน้าจอ NSX-T Manager UI ก็ได้.

Command
get cluster status  

ให้แน่ใจว่าทุก status “UP” ทั้งหมด.
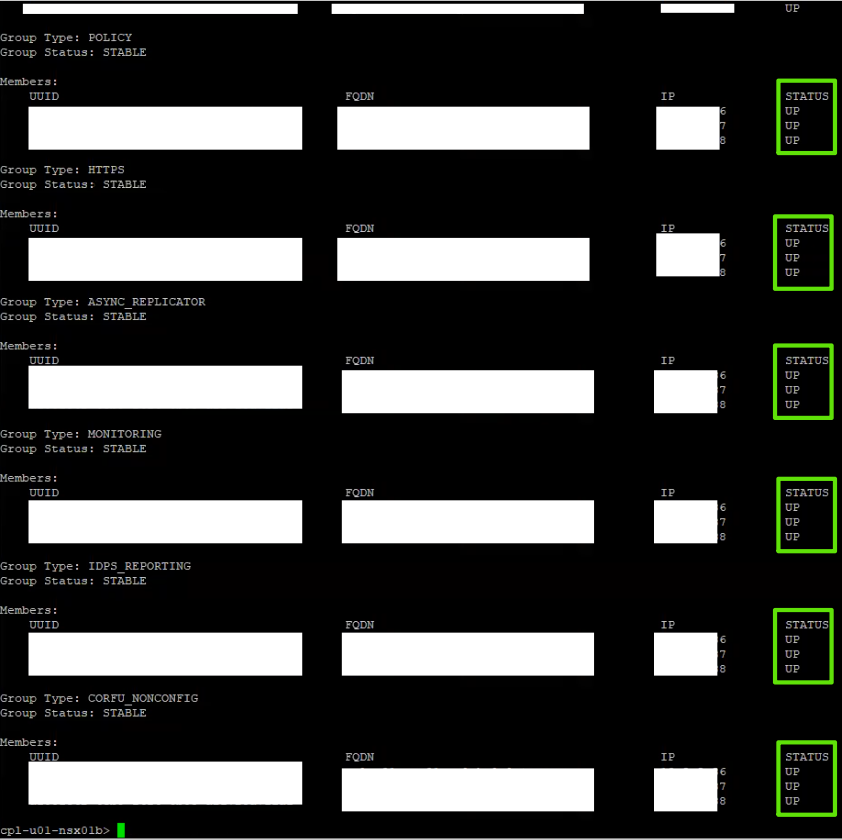
NSX-T UI

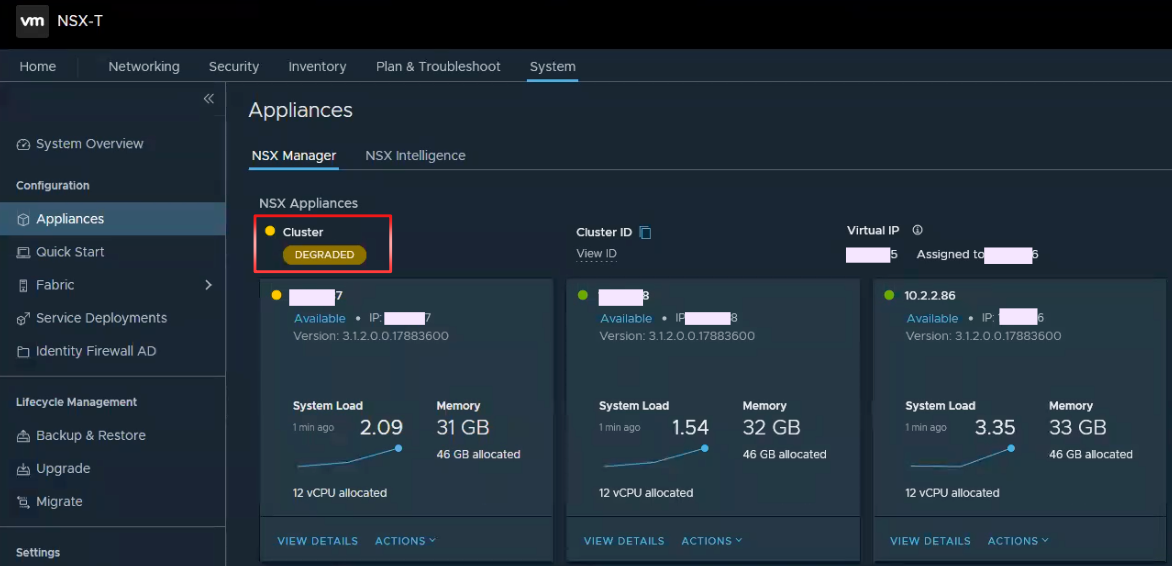
เราจะพบว่า ที่หน้า NSX-T Manager appliance status จะเป็น “DEGRADED“.
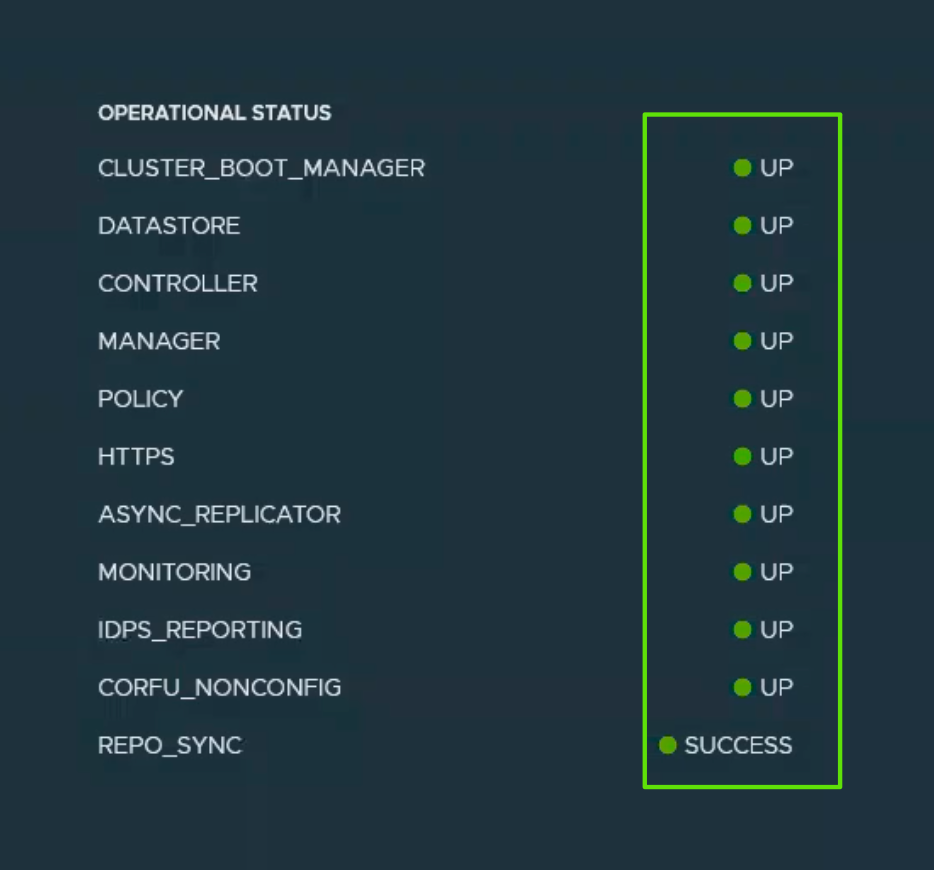
ให้ Click ที่ “VIEW DETAILS” เพื่อดู services status.
ให้แน่ใจว่าทุก status “UP” ทั้งหมด.
หลังจากนั้นให้ทำการ check status ของ NSX-T Manager appliances ให้ เป็น status “STABLE“.
Verification Steps

1.ให้ทำการ verify workaround ที่ apply ไปถูกต้องหรือไม่ โดยให้ login ด้วย account “root“.

2.ทำการ verify configuration โดย updated ด้วย “formatMsgNoLookup=true” flag โดยใช้ command ด้านล่าง.
grep "wrapper.java.additional.100=" /usr/tanuki/conf/*-wrapper.conf

3.ทำการ verify ไฟล์ “JndiLookup class” จะต้อง removed ออกจาก Jar files บน appliances โดยใช้ command ด้านล่าง.
find /usr /opt -xdev -iname "*.jar" | while read l; do  unzip -l $l|grep "JndiLookup.class"; if [[ ${PIPESTATUS[1]} -eq 0 ]]; then echo $l; fi; done

โดยผลลัพธ์ จะไม่แสดงผลอะไร ออกมา (None) แบบด้านล่าง.

Repeat step

ให้ ทำการ repeat step จากหัวข้อ Workaround เริ่มจากข้อ 4 ไปจนถึง Verification Step ในข้อ 3 จนครบทุกตัว (ให้ทำทีละตัว).

Revert the workaround

CVE-2021-44228 & CVE-2021-45046 to VMware NSX-T Data Center perform the following steps on each NSX-T Manager or NSX-T Cloud Service Manager.

โดยให้ restore จาก NSX-T Manager backup ที่เราทำการ backup ก่อนจะ apply the workaround.

Reference the following document for guidance, if needed: https://docs.vmware.com/en/VMware-NSX-T-Data-Center/3.2/administration/GUID-9749F041-15E5-4662-85E7-756D4B071C17.html

Conclusion

ในบทความนี้จะเป็น workaround instructions to address CVE-2021-44228 and CVE-2021-45046 in NSX-T Data Center (2.5.0-3.1.3)โดยจะ followup วิธีการ จาก KB87086 เท่านั้น โดย fix version สามารถเข้าไป download และ apply ตาม version ที่ท่านใช้งานอยู่ โดย ให้ทุกท่านติดตาม VMSA-2021-0028 ในการทำ workaround หรือ fix version รวมถึง Product อื่นๆ ของ VMware ที่ได้รับผลกระทบ เช่นกัน.

VMSA-2021-0028 | Workaround in vRealize Operations 8.x (87076)

By Lerpong Intaraworrapath | January 17th ,2022

Workaround instructions to address CVE-2021-44228 and CVE-2021-45046 in vRealize Operations 8.x (87076)

ในบทความนี้ เราจะมาทำ workaround ในการแก้ปัญหา instructions to address CVE-2021-44228 and CVE-2021-45046 in VMware vRealize Operations Manager 8.x โดยจะ followup วิธีการ จาก KB87076.

https://kb.vmware.com/s/article/87076

Note: ในส่วนของ Product อื่นของ VMware และ ข้อมูล CVE-2021-44228 and CVE-2021-45046 ให้ อ่านได้จาก VMSA-2021-0028.

Impact / Risks

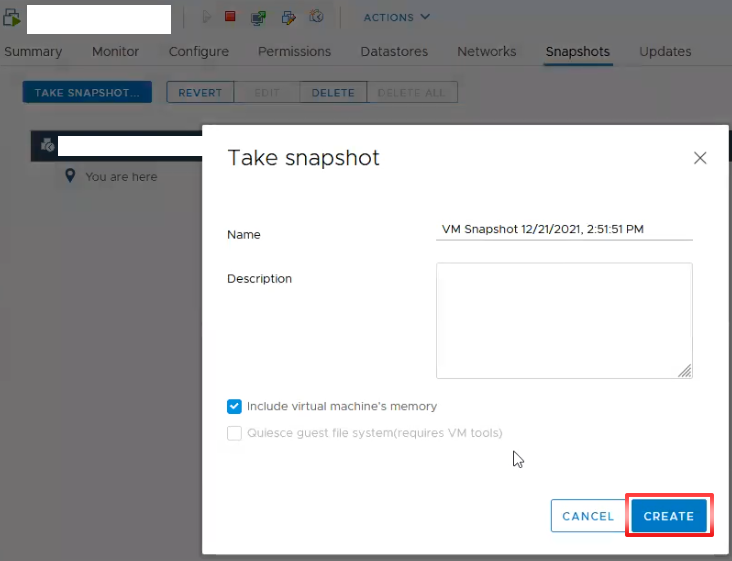
  • Recommended ให้ take snapshots vRealize Operations ทุก nodes ก่อน apply workaroundโดยสามารถ ทำตามได้จาก link How to take a Snapshot of vRealize Operations.
  • Mitigation จะยังคงเกิดขึ้นอยู่ ถ้ามีการ installed management pack หรือ activated หลังจาก apply patch. แนะนำให้ installed หรือ activated ให้เรียบร้อยก่อน แล้วถึงจะทำการ apply workaround.
  • การ appy workaround แนะนำให้ reapplied หลังจากมีการ deploying หรือ updating new vRealize Operations nodes or Cloud Proxies ที่ไม่มี bug fixed.
  • Mitigation ของ WAR files จะยังคงเกิดขึ้นอยู่ ถ้ามีการ redeployed vRealize Operations.

Resolution

This issue is resolved in the following releases:

Workaround ในบทความนี้เป็น Temporary solution เท่านั้น แนะนำ.

Workaround

Notice: The below content has been updated as of 12/15/2021 to add workaround steps for the related CVE-2021-45046 as noted above.  Please re-run all of the below steps even if you have already implemented the original CVE-2021-44228 workaround steps by running the data-rc-witness-log4j-fix.sh and cp-log4j-fix.sh scripts.

ในบทความนี้เราจะทำการ apply workaround สำหรับ “vRealize Operations Manager version 8.4.0” โดยจะประกอบ ด้วย
-Analytic (Primary, Replica, Data), Remote Collector 2 nodes จำนวนทั้งหมด 5 nodes (จะไม่มี Cloud Proxies).

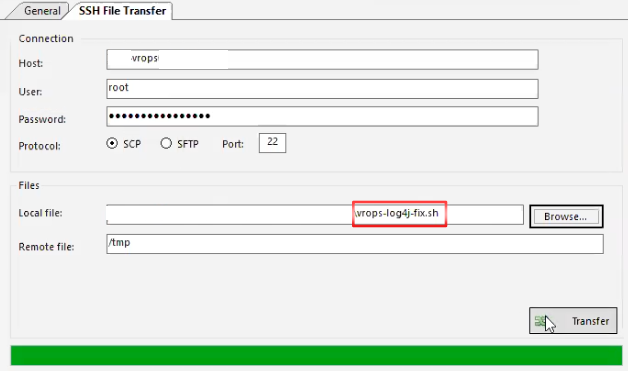
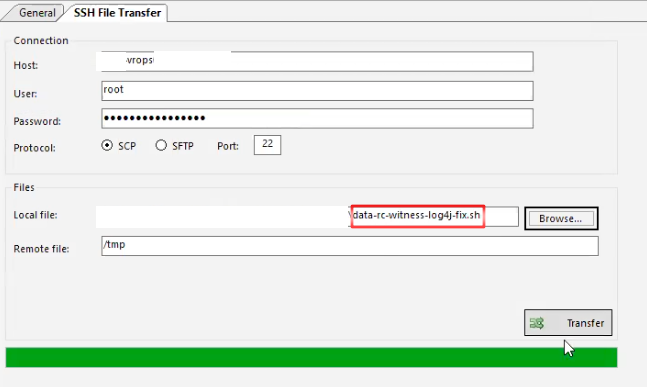
โดยเราจะ ใช้ 2 scripts ด้วยกัน data-rc-witness-log4j-fix.sh and vrops-log4j-fix.sh โดย download ได้จาก KB87076

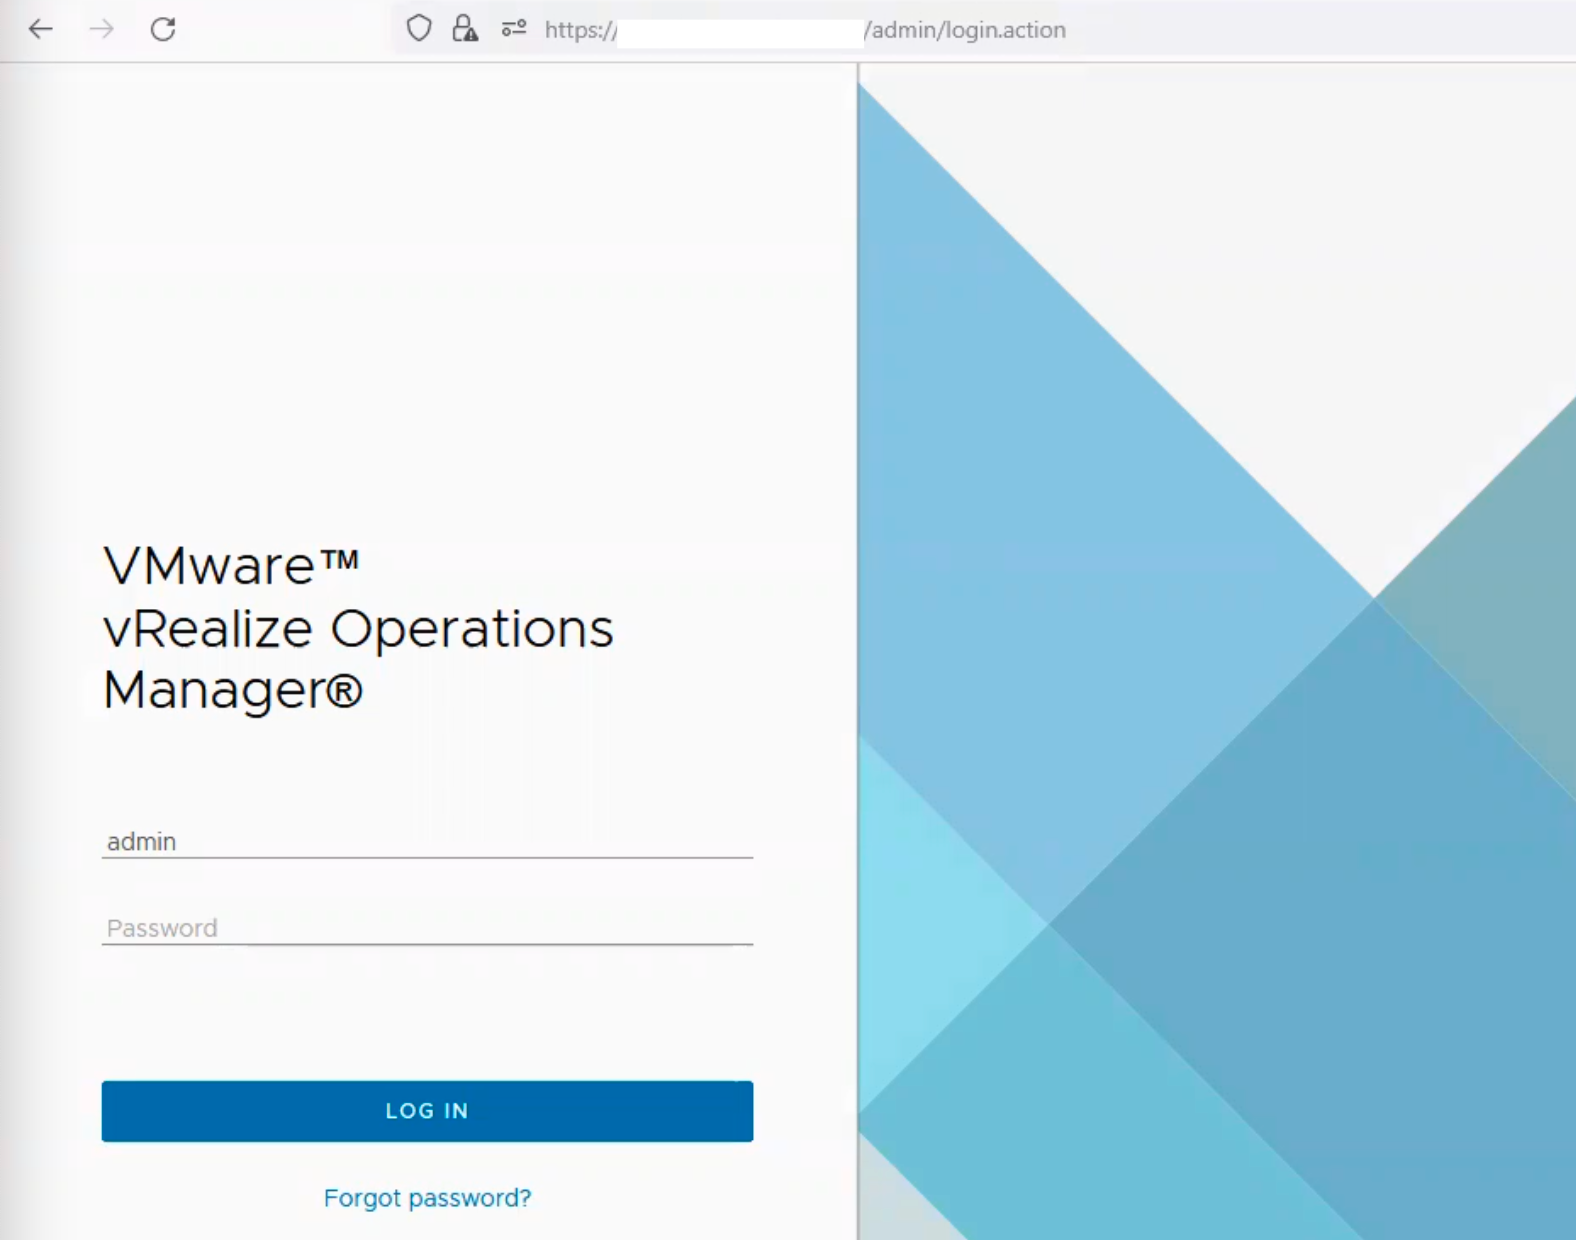
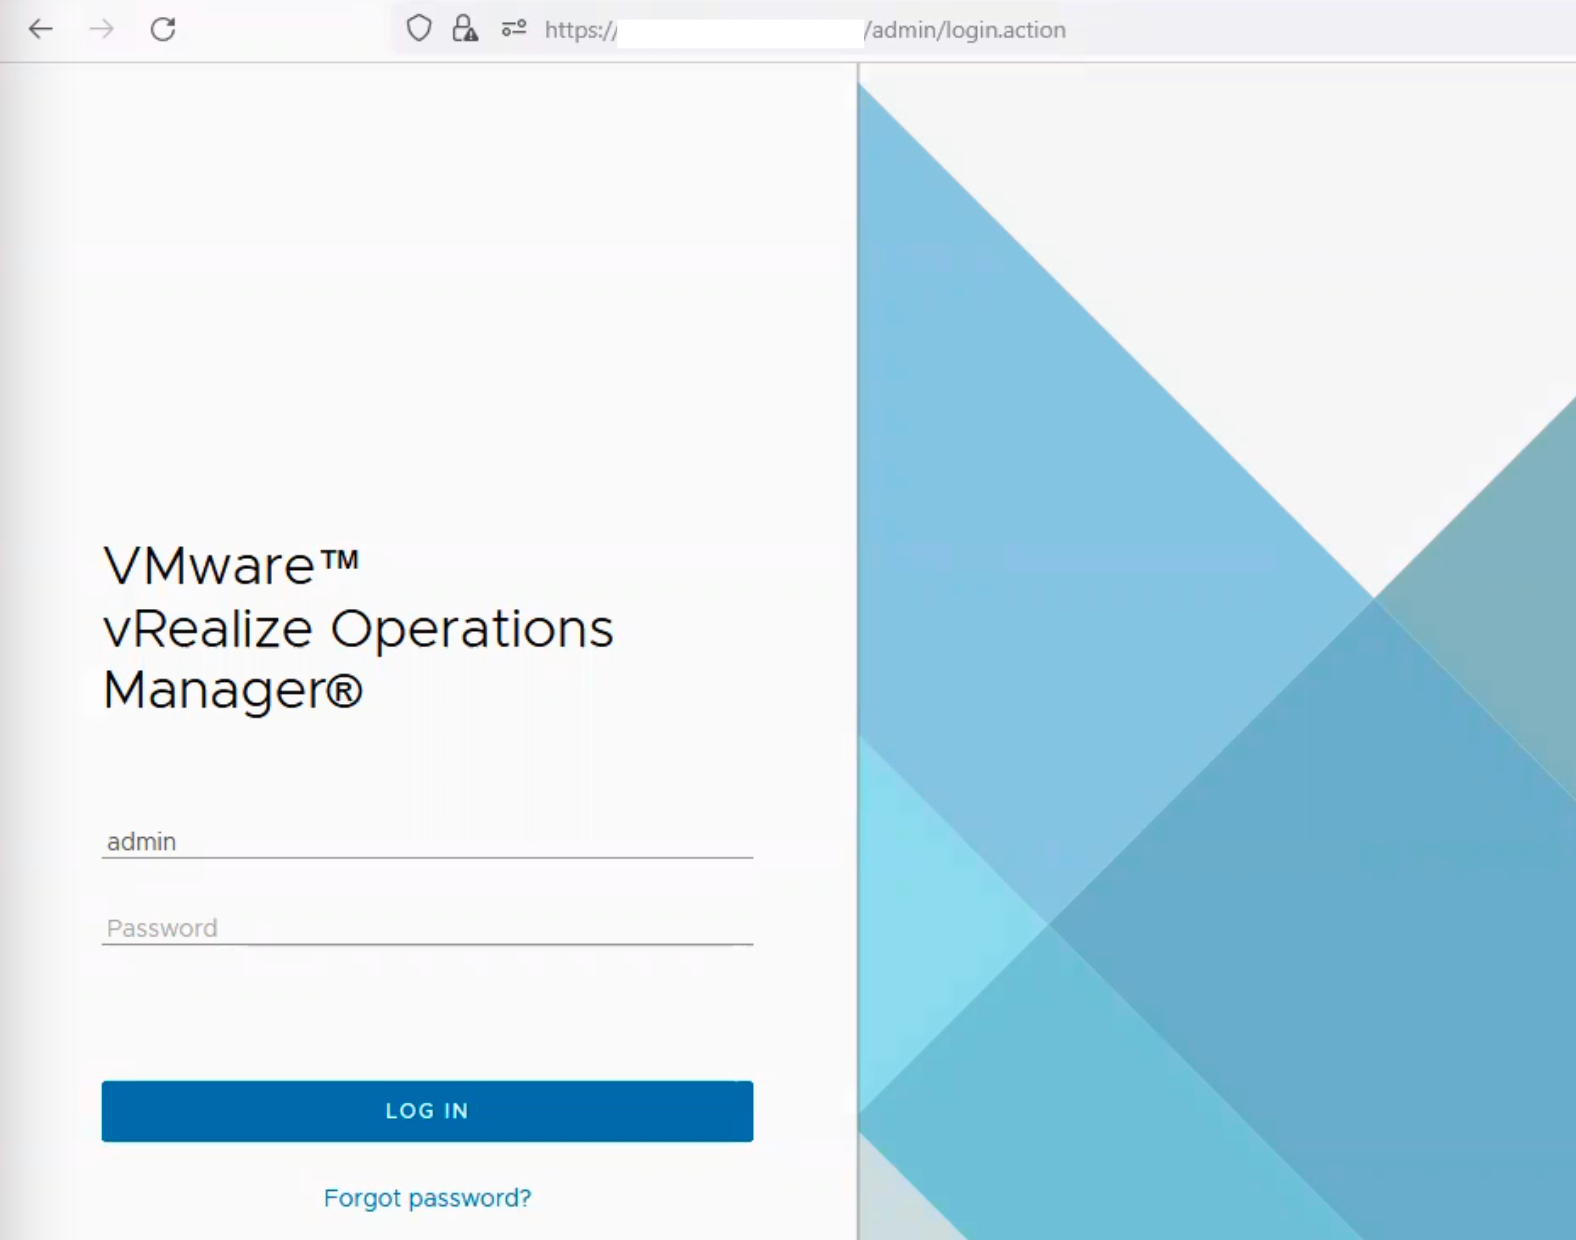
1.ทำการ Log in to the vRealize Operations Manager Admin UI โดยใช้ local admin user (https://vROPs-Name or vROPs-IP/admin).

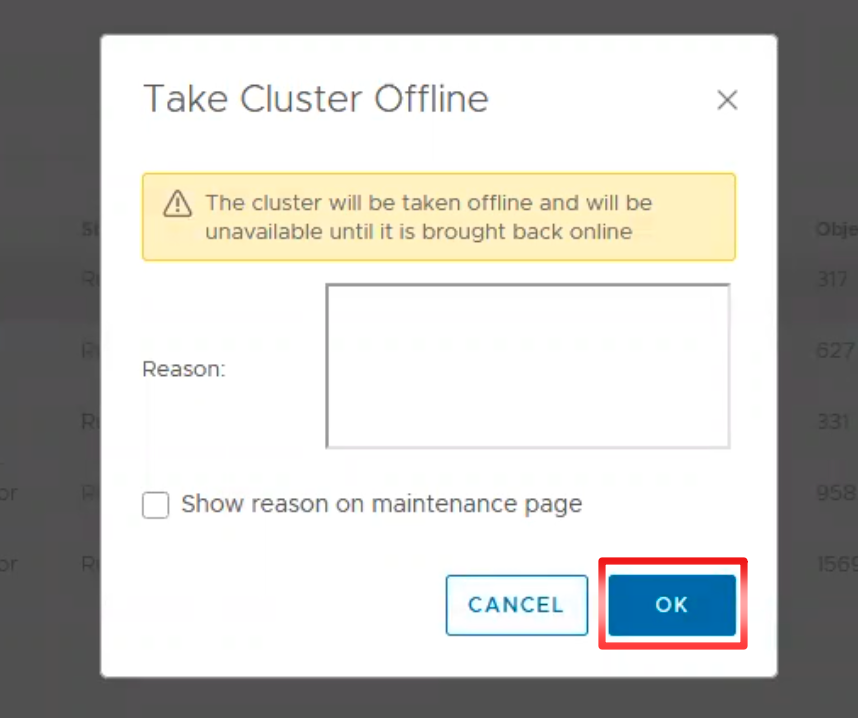
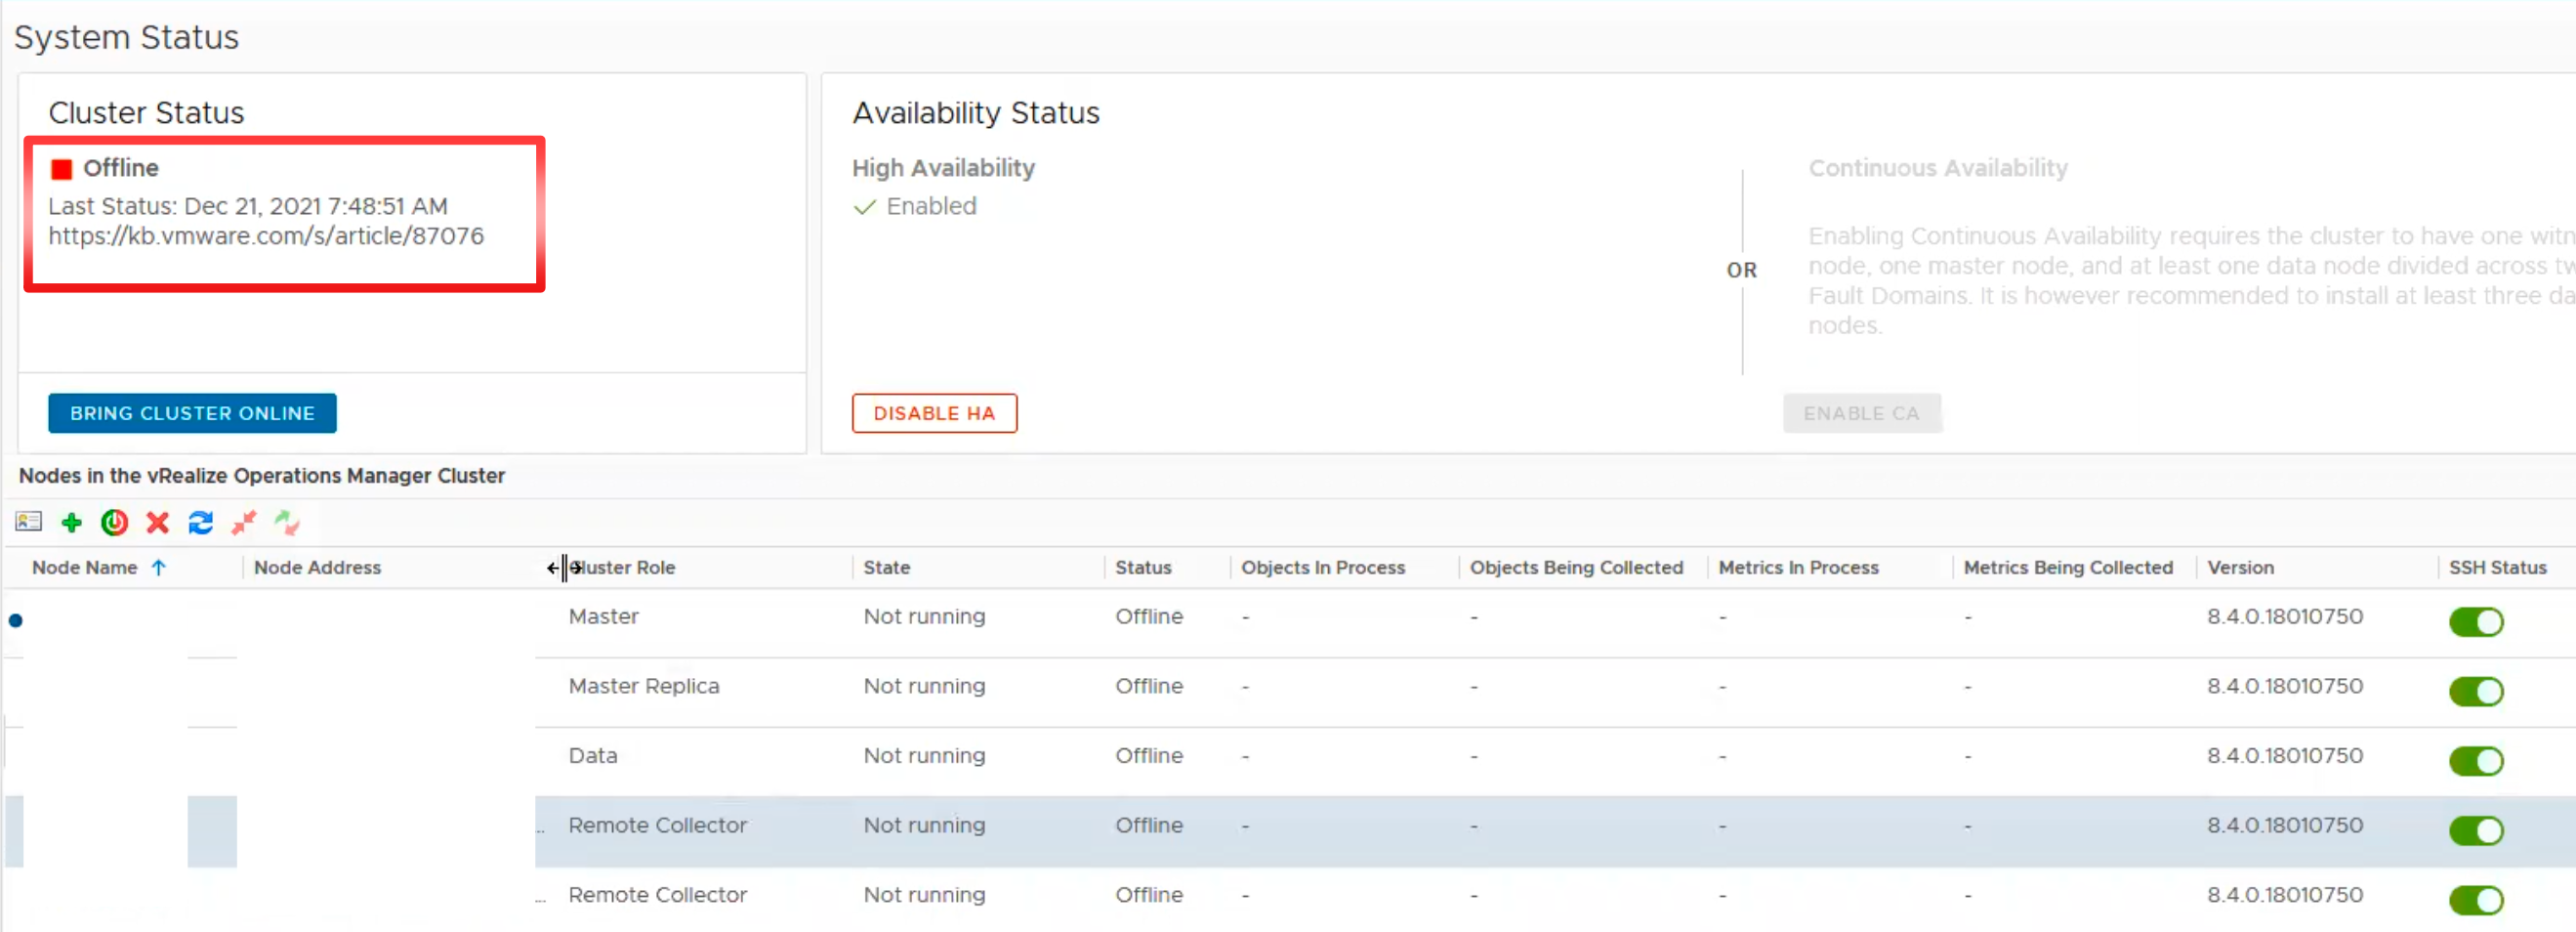
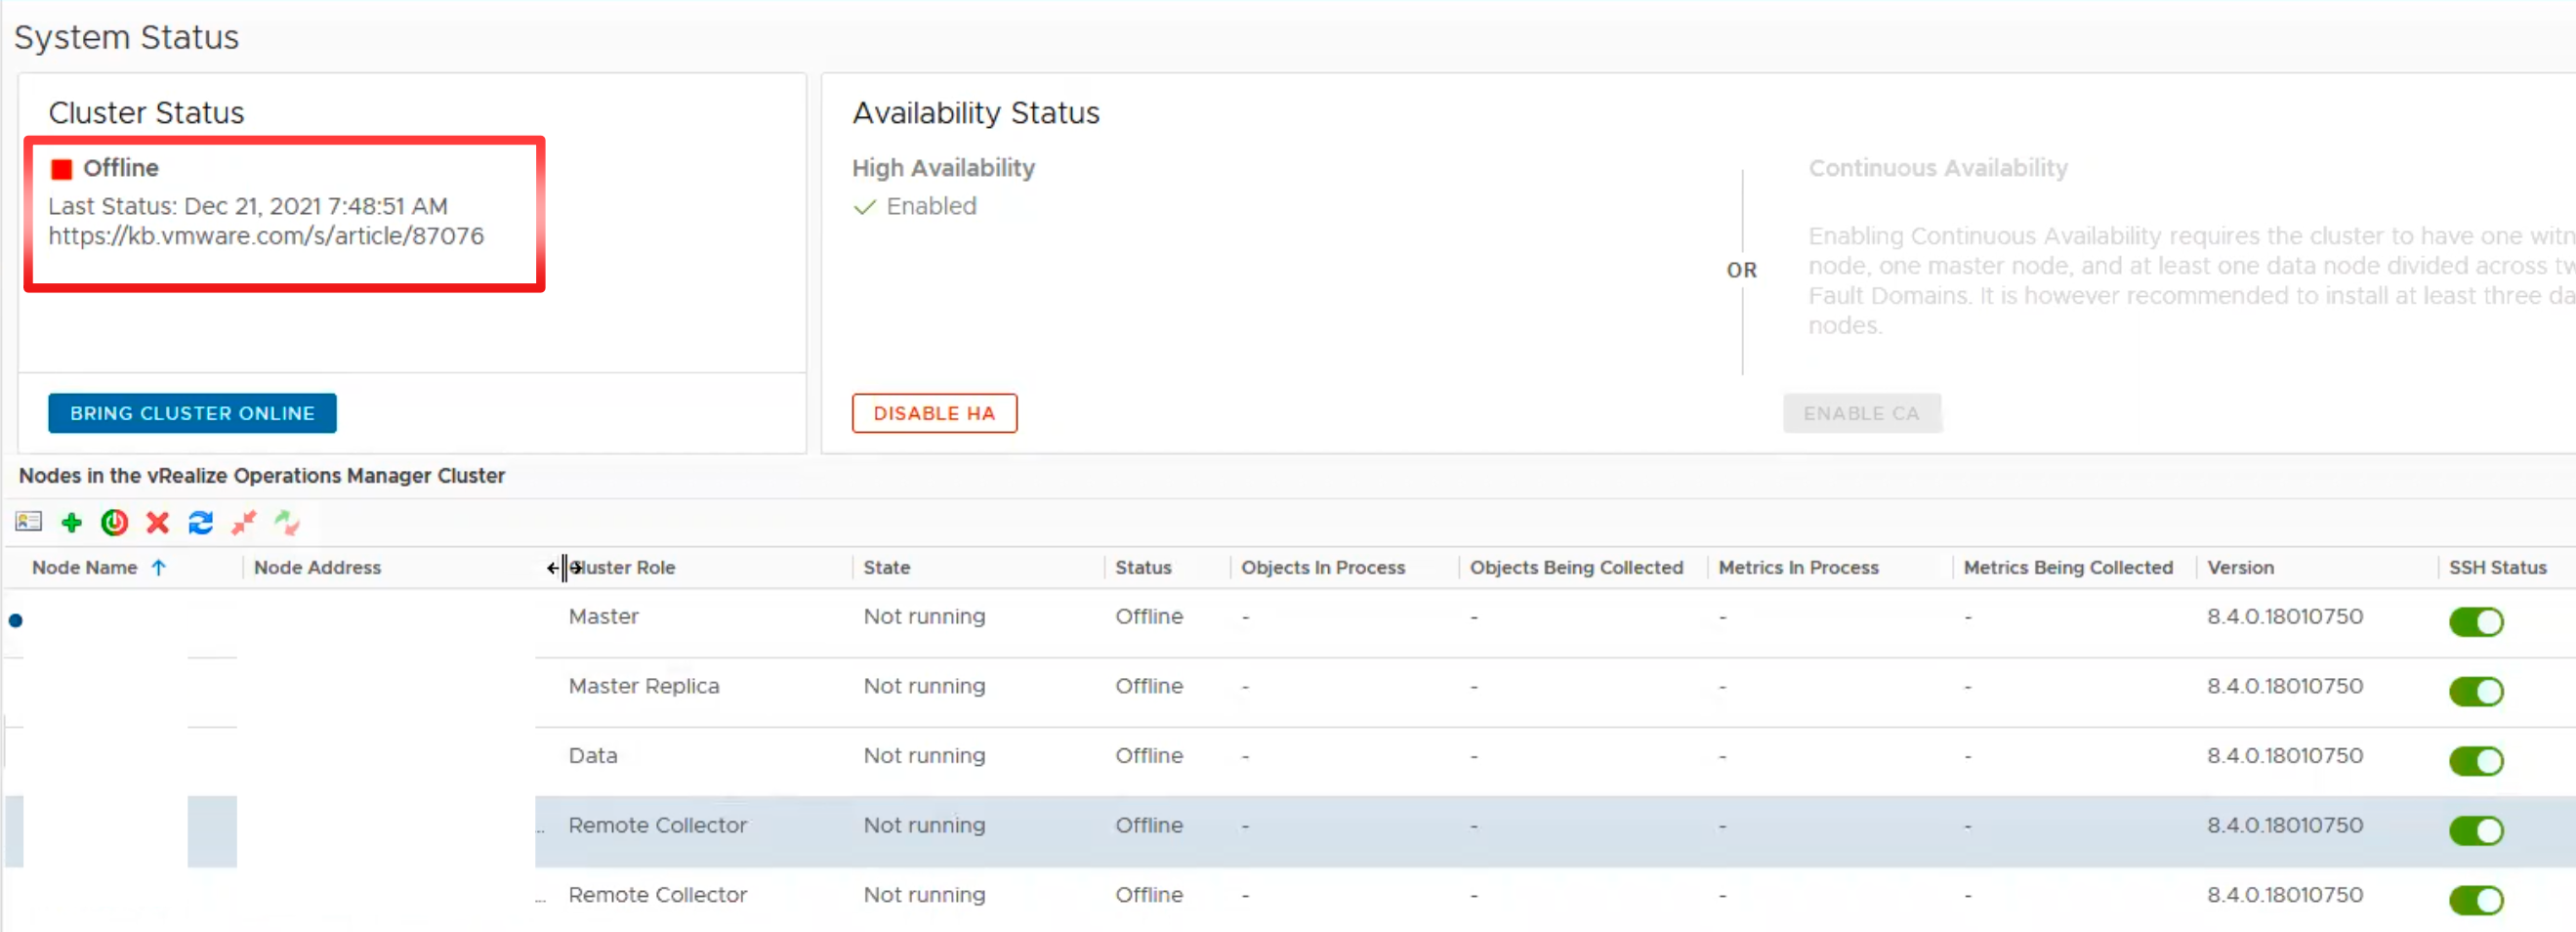
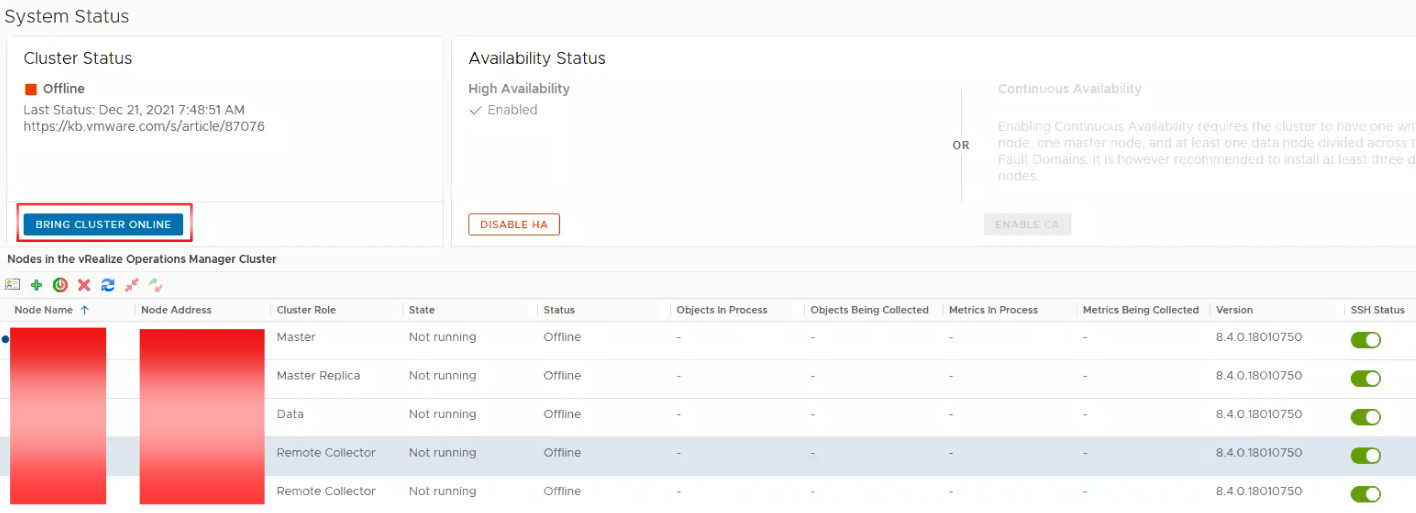
2.ทำการ Click “TAKE CLUSTER OFFLINE” under Cluster Status.

Note: Wait for Cluster Status to show as Offline.
ถ้าเราพบว่าหน้า vROPs admin จะไม่สามารถ access ได้ ให้เรา access โดยตรงไป ที่ vROPs Master node IP address (https://vROPs-Master node name or IP address/admin).

3.ทำการ take snapshots vRealize Operations nodes ทั้ง 5 nodes [Analytic (Primary, Replica, Data), Remote Collector 2 nodes] ก่อนจะ apply workaround (How to take a Snapshot of vRealize Operations.).

4.ทำการ copy file data-rc-witness-log4j-fix.sh และ vrops-log4j-fix.sh ไปที่ path /tmp ของ vROPs ทั้ง 5 nodes [Analytic (Primary, Replica, Data), Remote Collector 2 nodes] โดยอาจจะใช้ SCP หรือ Tools ที่สามารถ copy file ได้.

5.เราจะ เริ่มทำที่ Master nodes เป็นตัวแรกก่อน.

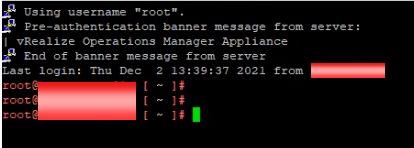
6.ให้เรา SSH หรือ Console โดยใช้ root login account ในการ access.

7.ทำการ cd ไปที่ patch /tmp แล้วทำการตรวจสอบ ดูว่าทั้ง 2 files ปรากฏ อยู่ใน path ครบไหม.

8.ทำการ run command เพื่อสามารถจะ execute scripts data-rc-witness-log4j-fix.shได้.
chmod +x data-rc-witness-log4j-fix.sh

9.ทำการ run command เพื่อสามารถจะ execute scripts vrops-log4j-fix.shได้.
chmod +x vrops-log4j-fix.sh

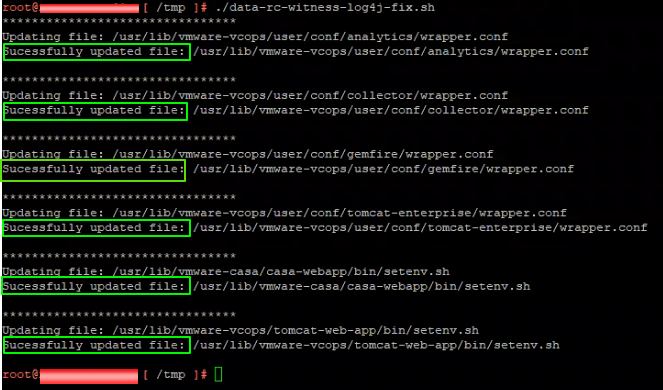
10.ทำการ run command execute scripts “data-rc-witness-log4j-fix.sh“.
./data-rc-witness-log4j-fix.sh

Note: ให้ตรวจสอบให้แน่ใจหลังจาก run command จะต้องไม่มี ERROR (NO ERROR).

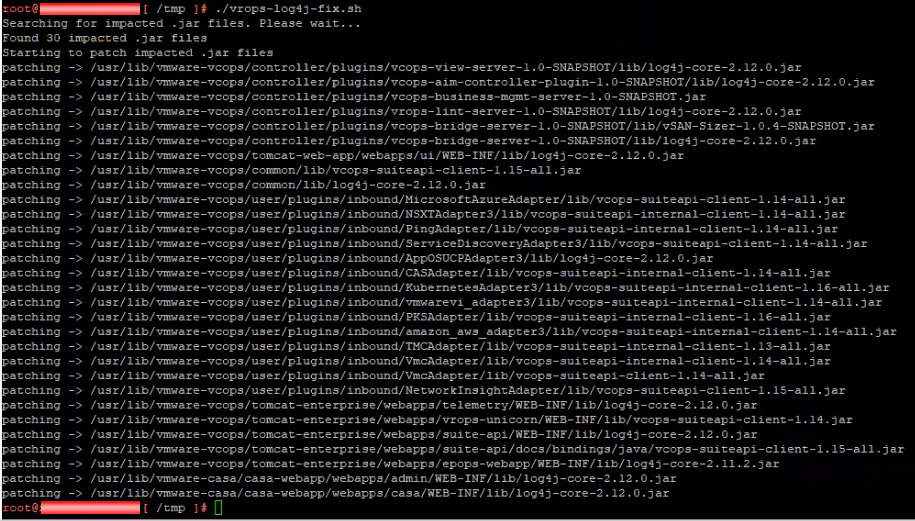
11.ทำการ run command execute scripts “./vrops-log4j-fix.sh“.
./vrops-log4j-fix.sh

Note: ให้ตรวจสอบให้แน่ใจหลังจาก run command จะต้องไม่มี ERROR (NO ERROR).

12.ทำการ restart the “CaSA service”:
service vmware-casa restart

Verify the change

ทำการ verify the workaround for CVE-2021-44228 ที่เราทำการ applied to vRealize Operations ว่าถูกต้องไหม ตาม step ด้านล่าง.

1.ทำการ run command สำหรับ verify ถ้า the data-rc-witness-log4j-fix.sh script สำเร็จ:
ps axf | grep --color log4j2.formatMsgNoLookups | grep -v grep

Note: โดยหลังจาก run command จะต้องมี output ออกมา; ถ้าไม่มี output ออกมาแสดงว่า applied workaround ไม่สำเร็จ.

2.ทำการ run command สำหรับ verify ถ้า the vrops-log4j-fix.sh script สำเร็จ:
./tmp/vrops-log4j-fix.sh

Note: ผลลัพธ์ ที่ได้จาก run command
Searching for impacted .jar files. Please wait…
No impacted .jar files found

Next step

ให้ทำการ Repeat Workaround step ตั้งแต่ข้อ 6 จนถึง Verify the change สำหรับ node ที่เหลือ อีก 4 nodes [Analytic (Replica, Data), Remote Collector 2 nodes].

Remark

โดยถ้า ท่านมี Cloud Proxies ก็ให้ทำ Cloud Proxies เพิ่มเติมจากใน KB87076 โดยใช้ script “cp-log4j-fix.sh” เพิ่มเติม.

Last step

หลังจากเราทำการ apply script ครบทุก node (ให้ตรวจสอบ ให้แน่ใจ ว่าเราทำครบทุก node).

1.ทำการ Log in to the vRealize Operations Manager Admin UI โดยใช้ local admin user (https://vROPs-Master node or vROPs-IP Master node/admin).

2.เราจะพบว่า cluster จะยังเป็น status offline.

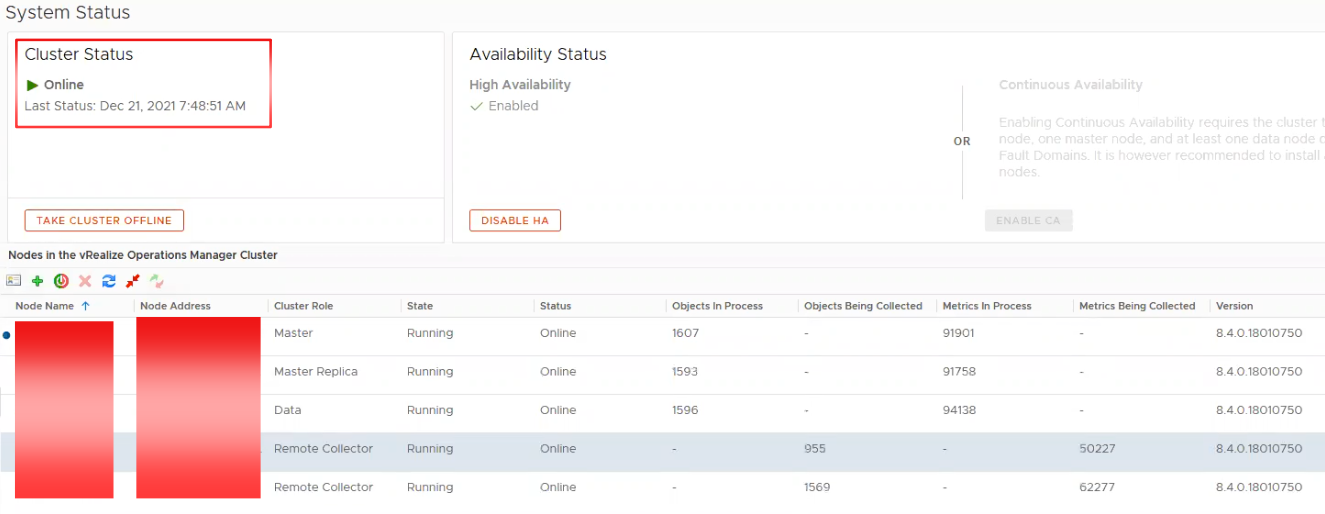
3.ให้เราทำการ click “BRING CLUSTER ONLINE“.

4.ให้รอจน cluster status “ONLINE“.

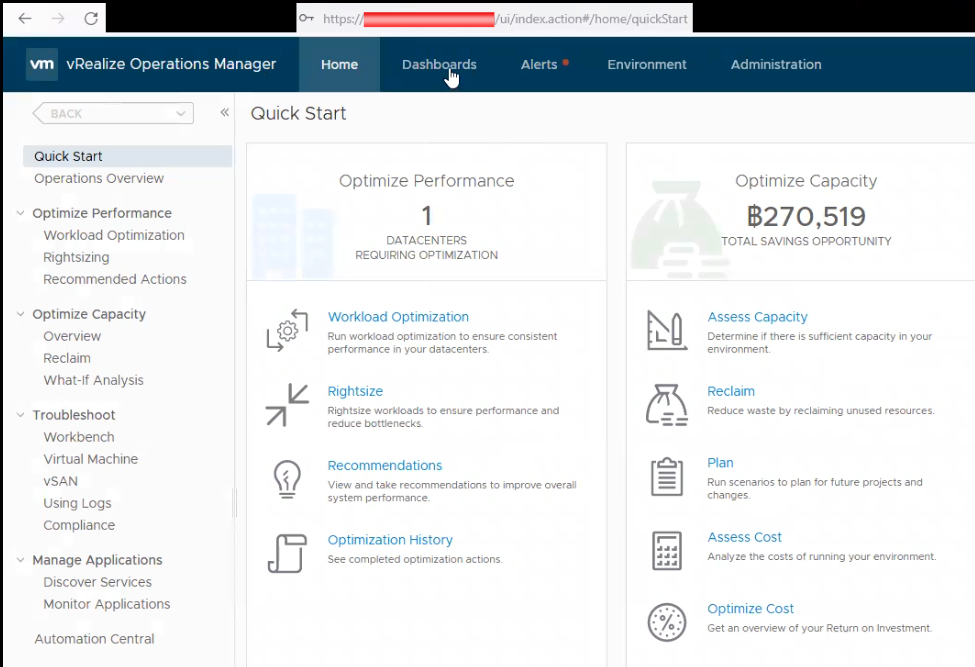
5.แล้วหลังจากนั้นให้ login vROPs UI console.
https://vrops name or ip address/ui

Conclusion

ในบทความนี้จะเป็น workaround สำหรับ VMware vRealize Operations Manager 8.x เท่านั้น โดย fix version สามารถเข้าไป download และ apply ตาม version ที่ท่านใช้งานอยู่ โดย ให้ทุกท่านติดตาม VMSA-2021-0028 ในการทำ workaround หรือ fix version รวมถึง Product อื่นๆ ของ VMware ที่ได้รับผลกระทบ เช่นกัน.
VMSA-2021-0028 | Workaround in vCenter Server virtual appliance (87081, 87088)

By Lerpong Intaraworrapath | January 6th, 2022

Workaround instructions to address CVE-2021-44228 and CVE-2021-45046 in vCenter Server and vCenter Cloud Gateway (87081)

ในบทความนี้ เราจะมาทำ workaround ในการแก้ปัญหา instructions to address CVE-2021-44228 and CVE-2021-45046 in vCenter Server virtual appliance 7.x, 6.7.x, 6.5.x โดยจะ followup วิธีการ จาก KB87081 และ KB87088

https://kb.vmware.com/s/article/87081?lang=en_US
https://kb.vmware.com/s/article/87088

Note: ในส่วนของ Product อื่นของ VMware และ ข้อมูล CVE-2021-44228 and CVE-2021-45046 ให้ อ่านได้จาก VMSA-2021-0028

Impact / Risks

  • ให้ทำการ remove VCHA ก่อนทำการ run script.
  • environment ที่มี external PSCs จะต้องทำการ run script ทั้ง vCenter และ PSC appliances.
  • Restore จาก File-Based Backup จะทำให้ environment กลับสู่ vulnerable. ให้ใช้ vc_log4j_mitigator.py หลังจาก restore.
  • อัปเกรด vCenter Appliance จะทำให้ environment กลายเป็น vulnerable. ให้ใช้ vc_log4j_mitigator.py หลังจาก อัปเกรด vCenter Appliance.

Resolution

Workaround ในบทความนี้เป็น Temporary solution เท่านั้น.
Completed remediation scenarios:

จะมี 3 วิธีในการทำ workaround สำหรับ vCenter server virtual appliance. ให้เลือกทำ วิธีใดวิธีหนึ่งเท่านั้น

  1. Used vc_log4j_mitigator.py from KB87081.
  2. Used vmsa-2021-0028-kb87081.py script from KB 87088 and remove_log4j_class.py from this KB87081.
  3. Used the manual workaround steps in KB87081 and remove_log4j_class.py.

Note: ในบทความนี้ จะใช้ วิธีที่ 2Used vmsa-2021-0028-kb87081.py script from KB 87088 and remove_log4j_class.py from this KB87081.
โดยจะเป็น vCenter server virtual appliance version 7.0.1.00301

Workaround

Automated Workaround (Recommended)

  1. ทำการ take snapshot “vCenter server virtual appliance”.
  2. ทำการ check disk space available by command “df-h” (capture screen ไว้ด้วย).
  3. ทำการ check vCenter server service by command “service-control –status –all” (capture screen ไว้ด้วย).
  4. Download the script attached this KB 87088 (vmsa-2021-0028-kb87081.py )

5. Login to the vCSA using an SSH Client (using Putty.exe or any similar SSH Client)

6. Login to the vCSA using an SSH Client (using Putty.exe or any similar SSH Client)

7. Transfer the file to /tmp folder on vCenter Server Appliance using WinSCP
Note: It’s necessary to enable the bash shell before WinSCP will work

8. Provide the root user name and password when prompted.

9. Run this command to enable the Bash shell:
shell.set --enable True

10. Run this command to access the Bash shell:
shell

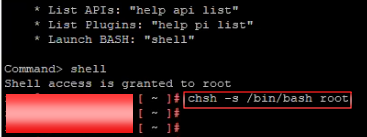
11. In the Bash shell, run this command to change the default shell to Bash:
chsh -s /bin/bash root

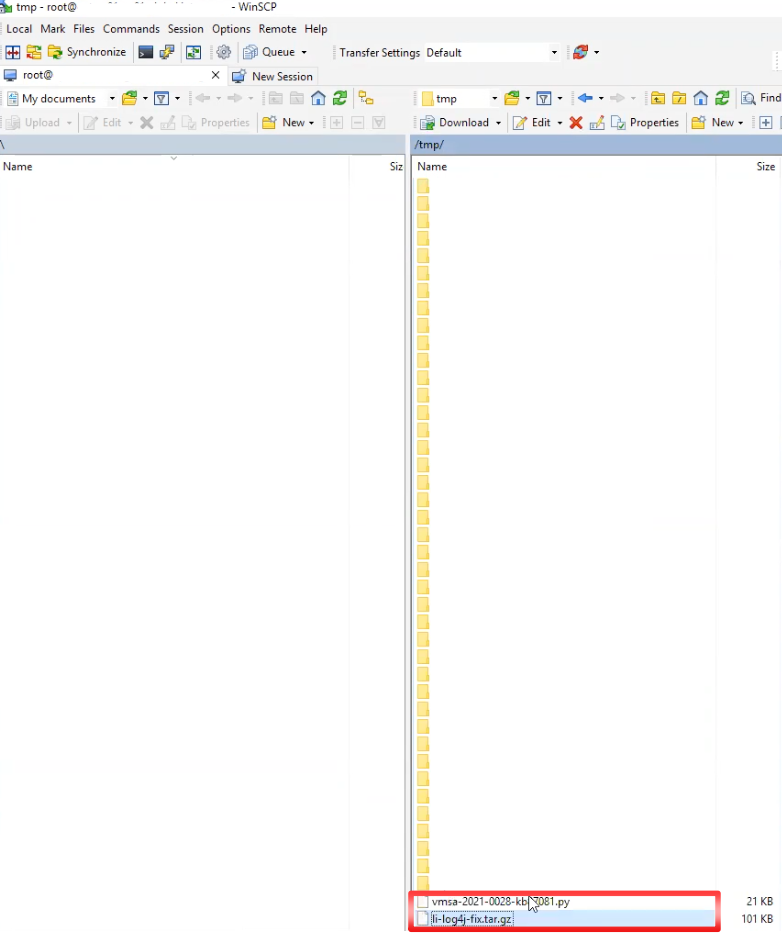
12. ทำการ copy ไฟล์ vmsa-2021-0028-kb87081.py และ remove_log4j_class.py โดยใช้ WinSCP ไปเก็บไว้ที่ /tmp

13. ทำการ Login to the vCSA using an SSH Client (using Putty.exe or any similar SSH Client) แล้วเข้าไปที่ path /tmp ใช้ “ls” command ทำการตรวจสอบไฟล์ ที่เราทำการ upload เข้าไป

14. ทำการ run script vmsa-2021-0028-kb87081.py
root@xxxx[/tmp]#python vmsa-2021-0028-kb87081.py

15. พิมพ์ Y แล้วกด Enter

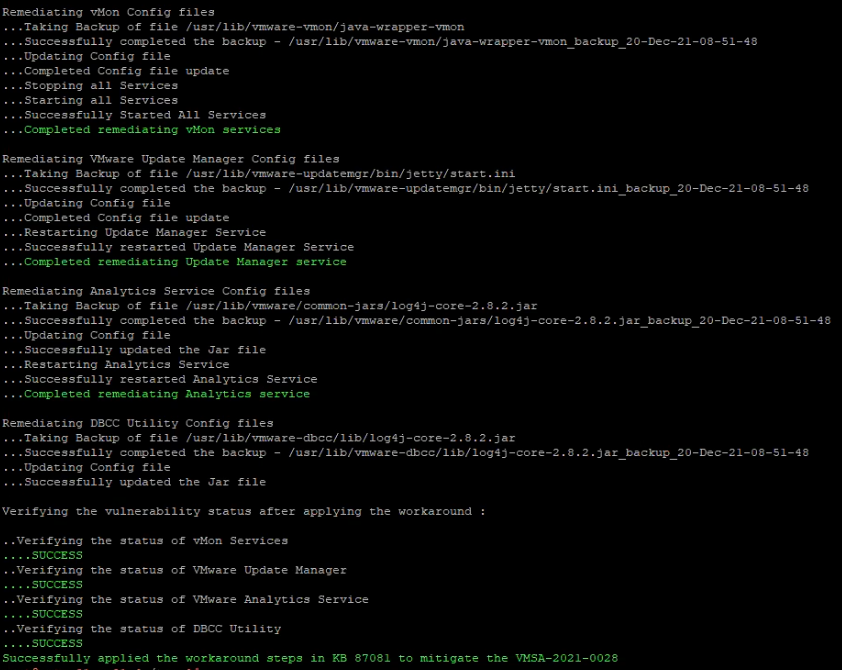
16. Script ก็จะทำการ run process เพื่อจะทำ workaround เกี่ยวกับ CVE-2021-44228 and CVE-2021-45046 (ใช้เวลา10 นาที โดยประมาณ).
โดย script ก็จะแสดง status ของแต่ละ process และที่สำคัญจะต้องแสดงผล “SUCCESS”
-vMON Config files
-VMware Update Manager Config files
-Analytics service Config files
-DBCC Utility Config files

17. เมื่อทำการ run script แรก เสร็จเรียบร้อยแล้วให้ เรา run script ตัวที่ 2 คือ remove_log4j_class.py from this KB87081.
root@xxxx[/tmp]#python remove_log4j_class.py

18. พิมพ์ Y แล้วกด Enter

19. Script ก็จะทำการ run process เพื่อจะทำ workaround เกี่ยวกับ CVE-2021-44228 and CVE-2021-45046 (ใช้เวลา10 นาที โดยประมาณ).โดย script ก็จะแสดง status ของแต่ละ process

Verify the changes

เมื่อเราทำการ run script ทั้ง 2 scripts completed แล้วให้เราทำ การ ตรวจสอบให้แน่ใจว่า script ที่เรา run นั้นถูกต้อง

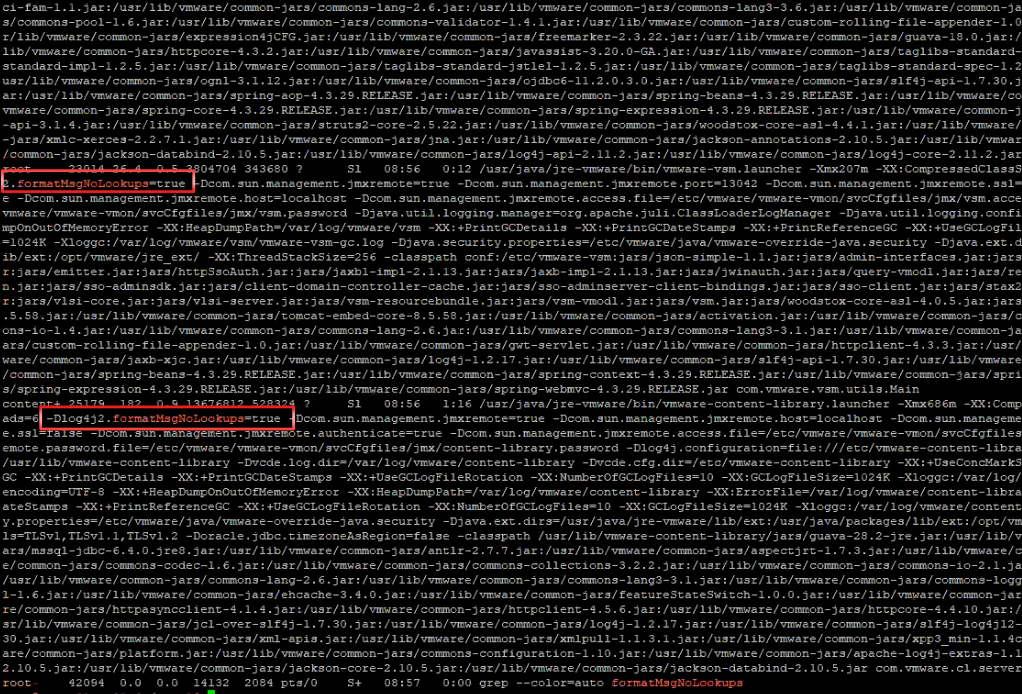
  1. Verify if the stsd, idmd, and vMon controlled services were started with the new -Dlog4j2.formatMsgNoLookups=true parameter:
    ps auxww | grep formatMsgNoLookups

โดย จะแสดง ผล -Dlog4j2.formatMsgNoLookups=true

2. Verify the Update Manager changes are shown under “System Properties” in the output of the following two commands:
cd /usr/lib/vmware-updatemgr/bin/jetty/
java -jar start.jar --list-config
system properties:
log4j2.formatMsgNoLookups = true (/usr/lib/vmware-updatemgr/bin/jetty/start.ini)

3. Verify the Analytics Service changes:
grep -i jndilookup /usr/lib/vmware/common-jars/log4j-core-2.8.2.jar | wc -l
โดย จะแสดงค่า “0

4. Verify the script successfully removed JndiLookup.class from all java files with the following command:
python remove_log4j_class.py -r

จะได้ผลลัพธ์ ดังนี้
2021-12-18T00:04:38 INFO main: Running in dryrun mode
2021-12-18T00:05:04 INFO main:
===== Summary =====
List of vulnerable files:
2021-12-18T00:05:04 INFO main: Done.

Remark

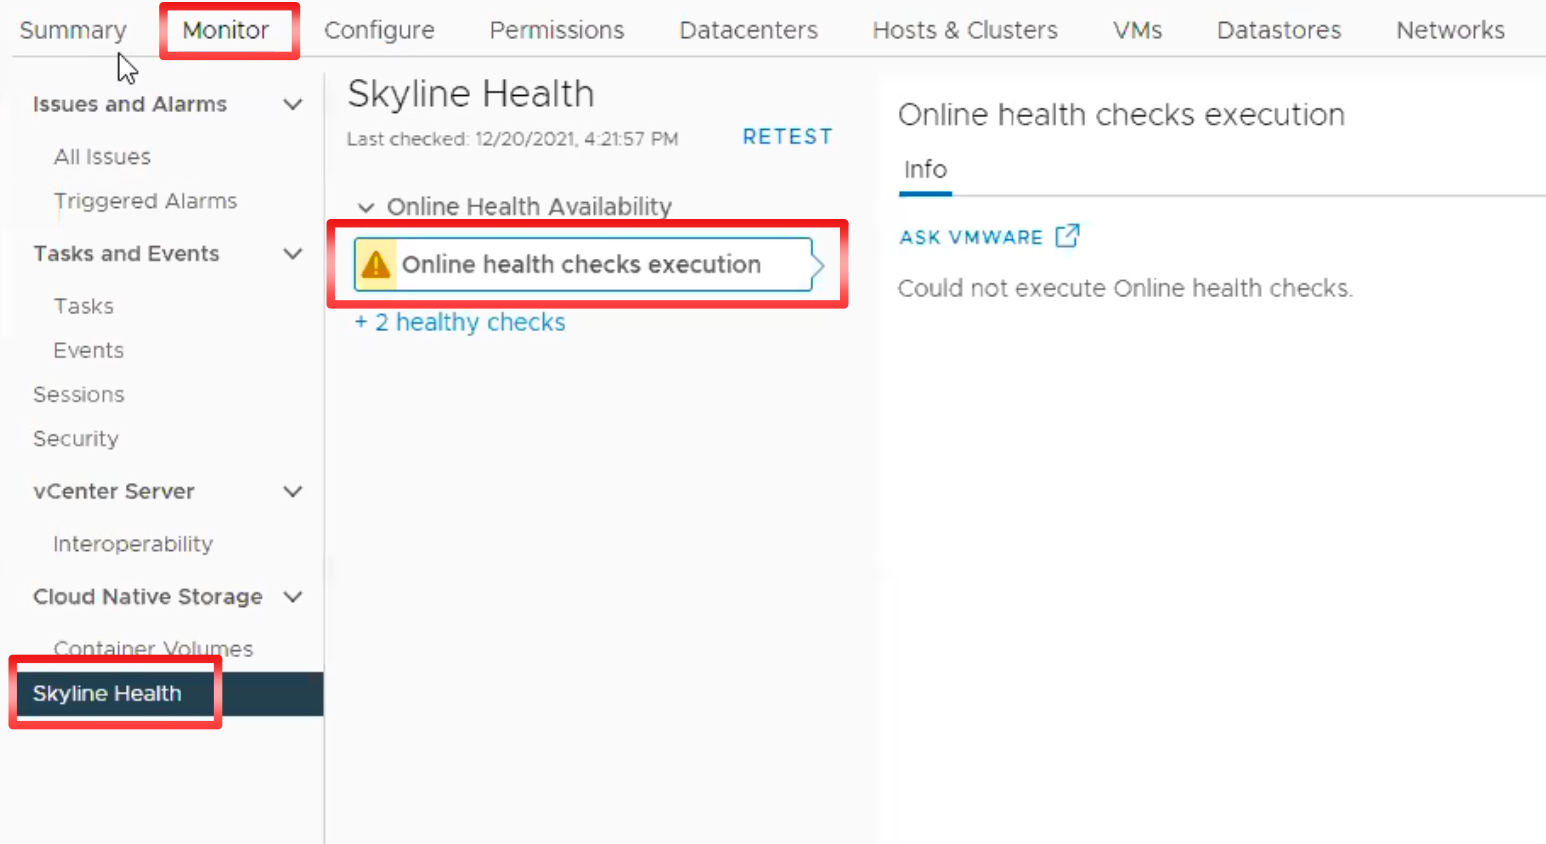
หลังจาก เราทำการ run script เสร็จเมื่อกลับที่ vSphere client browser ของ vCenter server จะพบว่า ที่ Tab -> Monitor ในหน้า Skyline Health จะ show warning “Online health checks execution” (ถ้าไม่เจอแบบนี้ก็ไม่เป็นไร นะครับ)
!!!warning ที่แสดง จะหายไป เอง นะครับ!!!

Conclusion

ในบทความนี้จะเป็น workaround สำหรับ vCenter server virtual appliance 7.x เท่านั้น โดย fix version ยังไม่มีออกมาในส่วน version อื่น ให้ทุกท่านติดตาม VMSA-2021-0028 ในการทำ workaround หรือ fix version รวมถึง Product อื่นๆ ของ VMware ที่ได้รับผลกระทบ เช่นกัน.